We may earn revenue from the products available on this page and participate in affiliate programs. Learn more ›
Over the past year or so, I’ve become quite familiar with a good variety of new tools. There was the bearing and bushing removal-slash-installation kit, and who could forget having my world turned upside-down by the convenience of a compact lithium impact wrench?
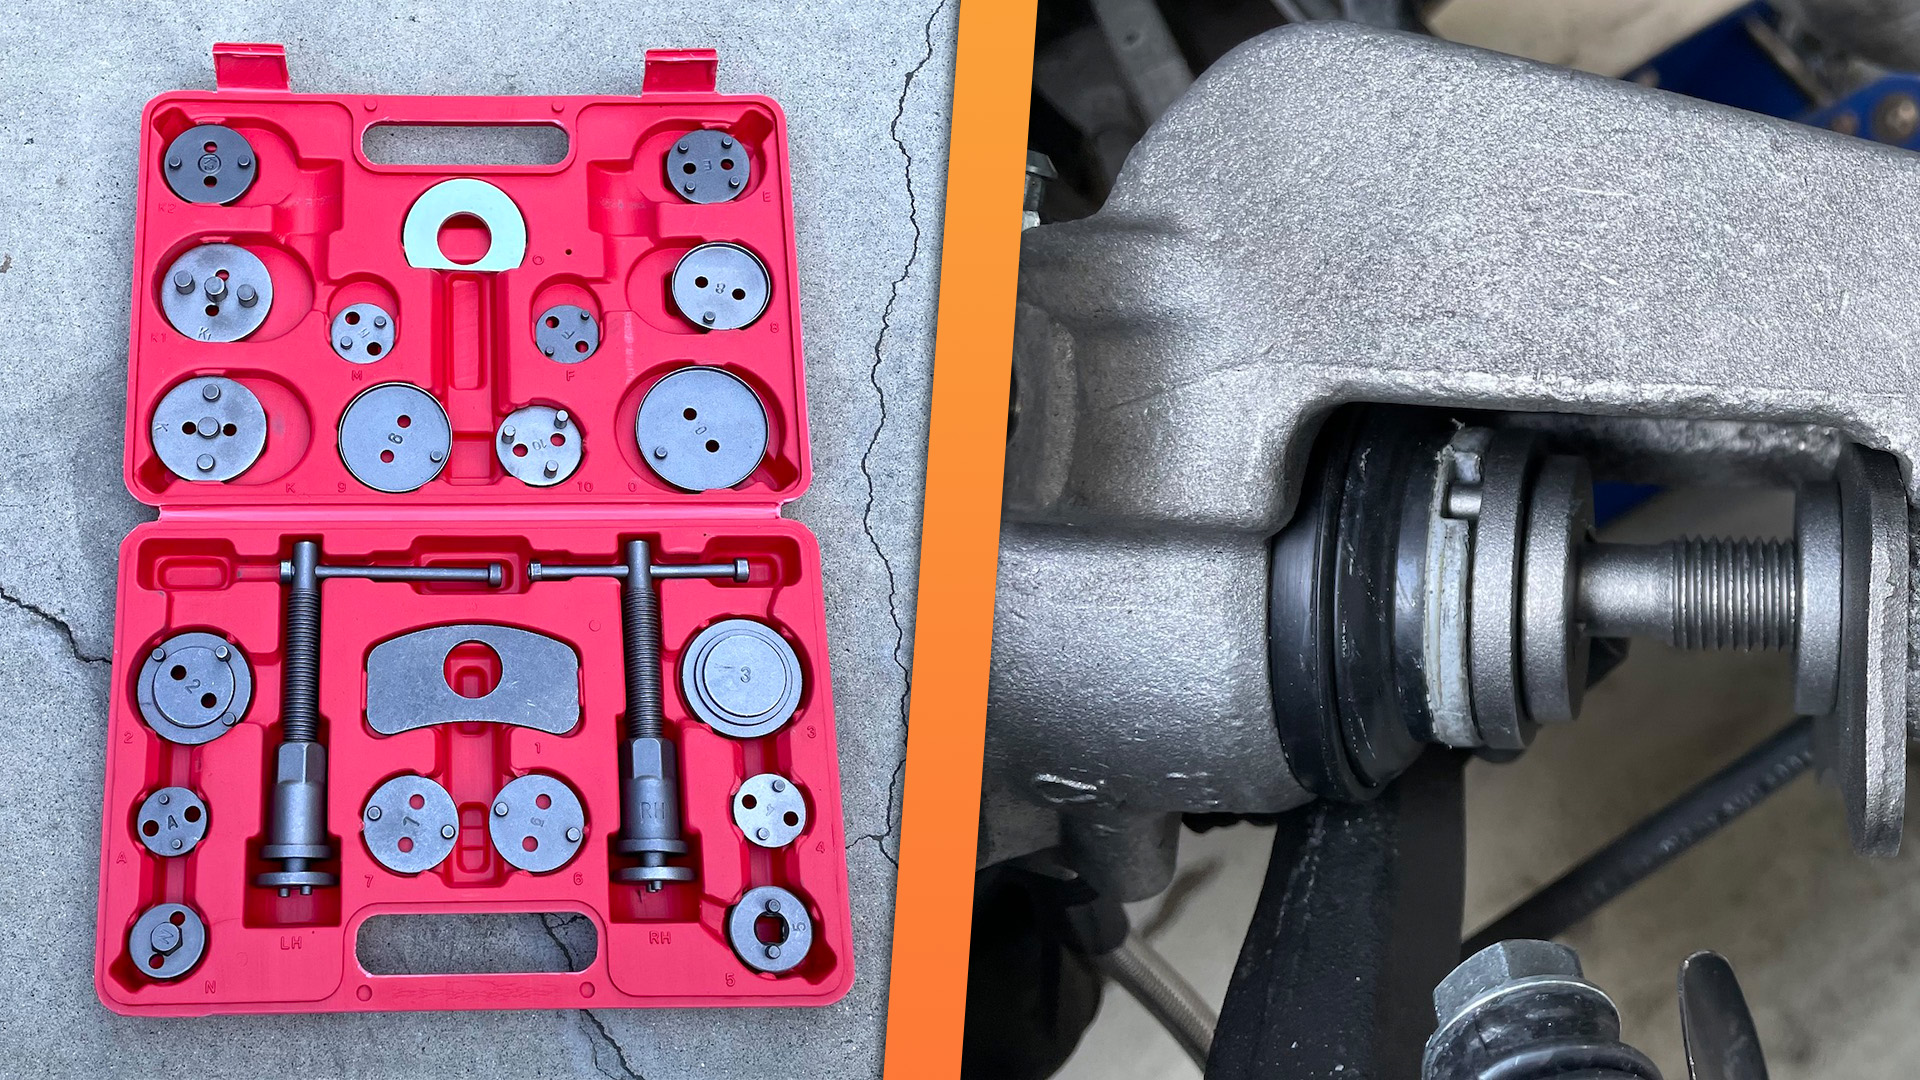
When it comes to brake jobs, the caliper press is an immensely simple contraption and its use makes for a seamless pad-changing procedure. But there’s another form of caliper press tool, often referred to as a brake caliper wind back or rewind tool, which accommodates rear brake calipers with integral parking brakes.
I had to recently use one of these while changing the pads on my 2002 Audi S4, so here’s how you use one when faced with a car that features this particular rear brake design.
What Are Integral Parking Brakes?
An integral parking brake means the rear caliper piston has two jobs: perform normal stopping duties and ratcheting up as the parking/emergency brake. This is done via the car’s cable-operated manual parking brake: pulling the interior lever pulls the cable which then splits off and equally pulls on each rear caliper. What exactly each cable pulls on is a parking brake mechanism attached to the rear calipers.
There’s a tight spring involved, so it’s a good idea to wear sturdy work gloves and eye protection when disassembling the rear caliper to swap out the pads. Well, it’s a good idea, in general, to wear both during all steps of the brake job process, as you never know when your grip will slip and you’ll end up cutting your hand on a nearby piece of metal. Ask me how I know.

The Process of Using a Brake Caliper Wind Back Tool
The slight bummer about using this particular caliper compressing tool is, well, you have to buy yet another tool that comes in a kit and takes up space. That simple five-dollar compressor that’s been a faithful assistant in brake jobs for years won’t work.
Thankfully, they can be picked up for quite cheap. They should also last a long time, as well as accommodate almost any brake caliper piston size that you might encounter.
Here’s how to use it.
Ensure the Vehicle is Safely Supported by Jack Stands
The first step to any brake job is safely raising the car and supporting it on jack stands. Before doing so, It’s a good idea to slightly loosen the wheel bolts or nuts when the car is still on the ground.
It’s never a bad idea to have redundant safety measures in place, too. Putting the wheel(s) underneath the car, keeping the jack on a jacking point (in this case, the rear differential), and so on are just a few ways to do so. In this instance, I chocked the front wheels to prevent any movement, even though I was working on a flat surface.
Remove the Wheel and Unbolt the Rear Caliper
Up next, unbolt and remove the rear wheel and then unbolt the rear caliper. It might take some effort to separate it from the disc, in my case it easily slid off the pads.
Don’t let the caliper hang freely, as the weight of the caliper puts stress on the brake lines and could damage them. In my case with my 2002 Audi S4, nearby suspension components worked great as a nice shelf and didn’t put any stress on the lines. Otherwise, a bungee cord or simple hanger does the trick.
Finally, open the cap on your brake fluid reservoir under the hood. It’s a good idea to put towels around it so that fluid doesn’t push out the top and get all over nearby sheet metal or components—brake fluid destroys paint.


Prepare the Wind Back Tool
The next step is to pop open the tool kit and select a circular plate that interfaces with the caliper’s piston. It’ll have two pins or notches, which fit into and sit flat against the grooved piston, and are what spin it back. Grab the back plate and place it in its position—this is what provides resistance that pushes the piston back into the caliper.
Then, attach the circular plate to the tool and loosen or tighten it up a tad so that it fits within the caliper. Turn the rear lever until it sits snug in the caliper, and then tighten the back bolt to hold the back plate in place.


Wind It On Back
Finally, start turning the rear lever. It might take a little muscle at first, but it usually becomes easier after the piston moves back a few millimeters. You’ll see the piston spin as it moves back, and continue pushing it back until it’s all the way in, or at least until there’s enough room to fit two new brake pads.
Reverse of Installation
Once the piston is pushed back to your liking, loosen the lever and then loosen the rear bolt and remove the unit from the caliper. Proceed with the rest of the brake job.

What if the tool doesn’t press the piston back into the caliper?
This could be due to the direction at which the piston spins, as usually, kits have left- and right-hand threaded shafts to accommodate both, try the other and see if that presses it back in.
If not, ensure the cable mechanism is properly disassembled. If it still won’t move back, there’s a very good chance that the piston is seized and the caliper requires either rebuilding or replacement.
Video
For an even more descriptive explanation of how to use a brake caliper wind back tool, check out this video:

How to Use Brake Caliper Rewind Tool Kit – FOR ALL MAKES & MODELS
More From The Drive
- Jerry Perez found the Mercedes-Benz EQE an expensive, but wonderful E-Class
- You can’t miss these awesome Harbor Freight deals
- There’s a dope tracked Audi Quattro
- Read Jonathon Klein’s ode to the best tool ever, the mechanical grabber