We may earn revenue from the products available on this page and participate in affiliate programs. Learn more ›
Few things are more frustrating than hearing a clicking sound when you turn the steering wheel, but few things are as serious as the problem behind that noise. Your car’s CV axles play a huge role in its ability to accelerate and drive normally, so ignoring a potential problem can have disastrous results.
If you’re unsure about what we’re talking about or have no idea where to even start, we’re here to help. The Drive’s editors have diagnosed and replaced CV axles on cars, both new and old, and are here to help you get started on the right path.
Most people will take their cars into the shop when it’s time for a new CV axle, but it’s a job that you can absolutely do yourself with some time, patience, and plenty of elbow grease. Don’t be intimidated, but do spend the time to research your own vehicle to make sure you’re comfortable with the work.
Let’s get started.

What Is a CV Axle and What Is Its Role?
You may already be familiar with engines and transmissions, or you’ve read a few of The Drive’s excellent explainers on the topic. For those who aren’t and haven’t—what’s wrong with you, go now—the engine generates power and the transmission transmits it to the wheels.
What you might not have thought much about is that the wheels of a vehicle are in constant motion, and not just as they roll, which means that the transmission needs a way to transfer its go-power to the wheels in a flexible and movable way.
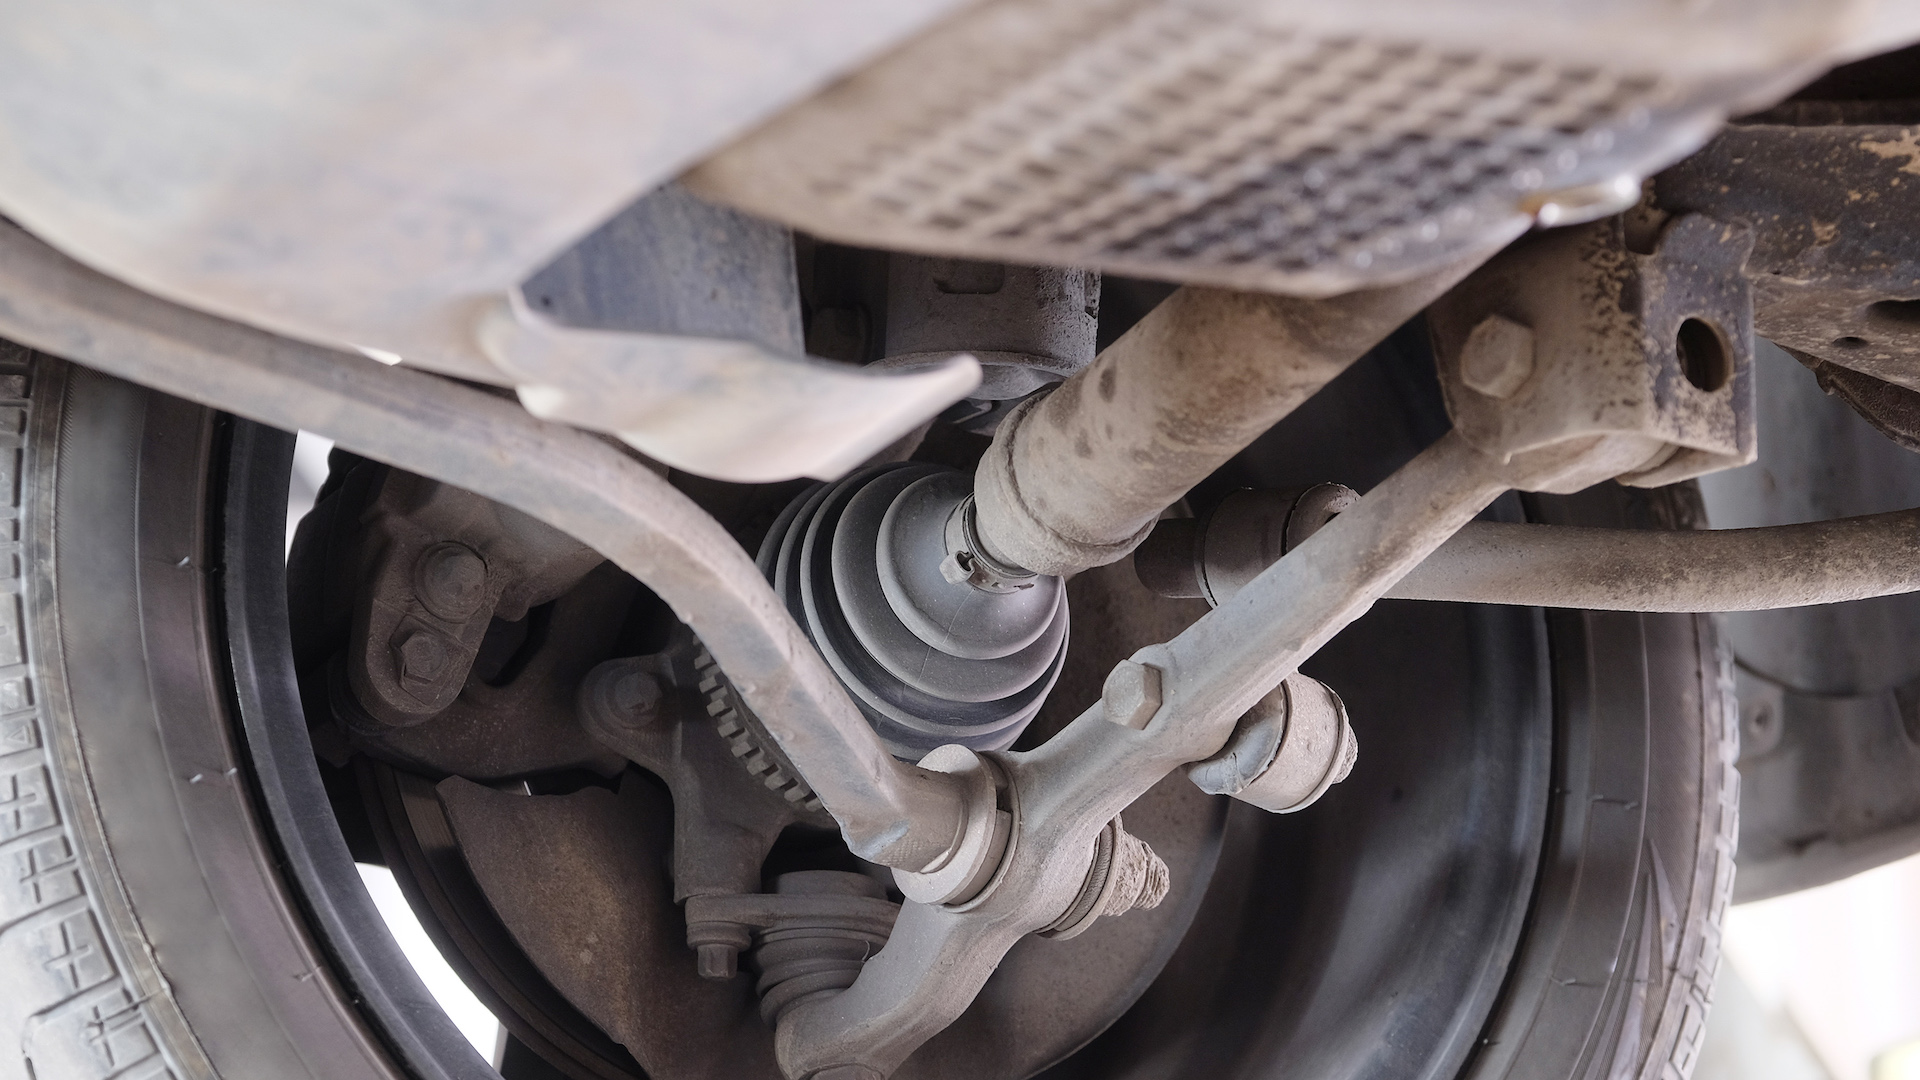
That’s where the CV axles come into play. CV axles, or constant velocity axles, come into play. They allow the transmission to drive a car’s wheels and open up a range of motion with bearings. The CV axle is composed of those bearings and rubber boots that can wear out over time.
What Are The Signs Of a Failing CV Axle?
Those cute little rubber boots that form the joints in a CV axle can become brittle and crack over time. When this happens, the grease and lubricant that is packed inside can leak out, or dirt and debris from the road can creep their way in.
You may notice a clicking sound when turning the wheel or accelerating and feel a vibration as the vehicle is in motion. You may also notice grease on the inside of your wheels or tires as the lubricant leaks out from a damaged CV boot.

Can I Fix or Replace My CV Axle At Home and How Much Will It Cost?
You absolutely can replace your CV axle at home, but you’ll need to be at least remotely comfortable using a jack, jack stands, and power tools. Assuming you have most of the equipment already set up in your garage at home, the cost to replace your CV axle will be quite reasonable. Most parts stores and online outlets will sell you a new one for less than $100.
CV Axle Basics
Estimated Time Needed: 1-2 hours, depending on your skill and comfort level
Skill Level: Upper-Level Beginner
Vehicle System: Drivetrain/suspension
CV Axle Safety
Working on your car can be dangerous and messy, so here’s exactly what you’ll need to ensure you don’t die, get maimed, or lose a finger and that you keep your jeans, shirt, and skin spotless—hopefully.
- Work on a flat surface to avoid having the car fall off the stands.
- Don’t yank or shake the vehicle while it’s on stands. If you need to seriously torque down the axle nut, lower the vehicle on its wheels so you can seriously wrench on a stable vehicle.
- Make sure to carefully replace the bolts and components you remove during this process. Failure to do so correctly can be just as dangerous as a failing CV axle.
Everything You’ll Need To Change A CV Axle
An impact wrench isn’t required for this job, but it’ll make your life a whole lot easier. It can also make this job safer, since you won’t have to worry as much about torquing the axle nut.
Tool List
- Jack
- Jack stands
- Automotive tool set (pliers, screwdrivers, sockets)
- Pry bar
- Lubricant
- Brake Cleaner
- Hammer or mallet
- Impact wrench (optional)
Parts List
- Replacement axle
- Replacement cotter pins
Organizing your tools and gear so everything is easily reachable will save precious minutes waiting for your handy-dandy child or four-legged helper to bring you the sandpaper or blowtorch. (You won’t need a blowtorch for this job. Please don’t have your kid hand you a blowtorch—Ed.)
You’ll also need a flat workspace, such as a garage floor, driveway, or street parking. Check your local laws to make sure you’re not violating any codes when using the street because we aren’t getting your ride out of the clink.
Here’s How To Change Your CV Axle
The process below is a general guide on the steps to replace a CV axle. Your vehicle may be slightly or drastically different, depending on the make and model. Refer to your vehicle’s service manual to see the exact steps that you’ll need to follow.
You’ll also notice that we recommend using an impact wrench to remove the axle nut, but note that doing the job by hand is safer when done while the car is on the ground. If you’re following the by-hand route, step five should be performed before jacking up the car.
Let’s do this!
Replacing The CV Axle
- Make sure the vehicle is in Park or that it is in gear with the parking brake set.
- Jack up the car and remove the wheel on the side where you will be working.
- Locate the axle nut. It will be in the direct center of the hub or wheel assembly where you removed the wheel.
- Some vehicles have a cotter pin to secure the axle nut. You’ll need to remove it using pliers to straighten the pin so it can be pulled out. You can spray it with lubricant if it’s rusted or stuck.
- Now it’s time to remove the axle nut. In some cases, this step may require quite a bit of effort. If this is the case, your safety bet is to do this step before jacking the car up.
- This is where the optional impact wrench will come in handy. The wrench will help you safely remove the axle nut without having to use a pry bar.
- Carefully remove the bolts holding the brake caliper brackets in place and remove the calipers.
- Instead of dropping the caliper to dangle on the brake line, use a carabiner or other small hook to support the caliper and keep pressure off the brake line.
- Loosed the bolts holding the outer tie rod to the steering knuckle. If there’s another pin here, you’ll again need to use pliers to straighten it out.
- In some cases, the steering knuckle and tie rod will not want to be separated. This will require a few light taps with a hammer or mallet.
- Remove the bolts holding the hub to the strut tower. You’ll need to keep the nut from turning while unbolting the hub.
- Look further down the axle to see where it meets the transmission. Use your pry bar to pry the axle from the CV joint. You should be able to remove the axle at this point.
- You might see transmission fluid or have some leak while prying the axle. This is completely fine, but you may want to set up a pan or tray to catch the fluid.
- Insert the new axle into the transmission where the old one was removed.
- You can use your mallet or a hammer wrapped in a towel to carefully coax the axle into position.
- Attach the new axle to the hub and begin replacing the bolts you removed earlier in the process:
- Hub/strut tower
- Tie Rod/steering knuckle
- Caliper
- Replace the axle nut. Here, as before, use an impact wrench if you have one to safely tighten the nut. If you don’t have one, get the nut as tight as you can without yanking on it while it’s up on stands.
- Replace the wheel and lower the vehicle.
- If you need to tighten the axle nut further, it’s best to do it with the vehicle on the ground, so that you can really push on a wrench or bar to tighten without worrying about the vehicle falling.

Sometimes You Need a Certified Mechanic
As much as The Drive loves to put the “you” in do-it-yourself, we know that not everyone has the proper tools, a safe workspace, the spare time, or the confidence to tackle major automotive repairs. Sometimes, you just need quality repair work performed by professionals you can trust like our partners, the certified mechanics at Goodyear Tire & Service.
Pro Tips to Change A CV Axle
Here are The Drive’s pro tips.
- If you don’t have a garage, find the flattest spot possible to do this job. The car will need to be securely lifted on jack stands, and that can’t happen if you’re working on an incline.
- Wear gloves and eye protection during this project. There will be plenty of opportunity to hurt yourself, and your hands and eyes are some of your most important assets.
- If you’re uncomfortable with any part of this process, it’s best to have a pro do the work. Getting halfway in and deciding that you’re not able to finish is going to present a problem, since you won’t be able to just drive the car to the shop.
- Take a look around while you’re working on this project. You’ll have the opportunity to see damage to your brakes and other suspension components, and it’s easier to do two fixes at the same time while you’ve got the wheel off and the car on stands.
FAQs About CV Axles
You’ve got questions, The Drive has answers!
Q: Can You Drive With a Bad CV Axle?
A: No. Do not ignore a bad CV axle. The vibrations you’re feeling and noise you’re hearing are a warning that it’s time for maintenance. If your axle fails while you’re driving, you could lose control of your car.
Q: How Long Should a CV Axle Last?
A: CV axles are usually covered by the manufacturer’s powertrain warranty, which should have you covered for at least four to five years and 50,000 to 60,000 miles. As for whether or not the axle makes it past the warranty period, there are many factors that can impact its lifespan. Driving over rough terrain where there are rocks and debris can shorten the life of a CV axle, because there are more opportunities to damage the rubber boot that protects the moving parts. The same goes for driving in snowy or icy conditions, where salt and sand can also damage the rubber. In some cases, the rubber just dries out and cracks, which has the same effect.
Q: What Does a Bad Axle Sound Like?
A: If you hear a clicking or grinding sound while turning, there’s a good chance your CV axle is starting to go. The noise may also be present while accelerating, but it’s most noticeable when turning the steering wheel.
Q: Can The CV Axle Damage My Transmission?
A: Yes, since it’s connected directly to the transmission, a failing CV axle can cause damage. Excessive movement from a damaged axle can wear components inside the transmission more quickly than they would normally.
Let’s Talk: Comment Below To Talk With The Guides & Gear Editors!
We’re here to be expert guides in everything How To related. Use us, compliment us, yell at us. Comment below, and let’s talk! You can also shout at us on Twitter or Instagram, here are our profiles. Got a question? Got a pro tip? Send us a note: guidesandgear@thedrive.com.
- Jonathon Klein: Twitter | Instagram
- Tony Markovich: Twitter | Instagram
- Chris Teague: Twitter | Instagram
- Hank O’Hop: Twitter | Instagram
- Victoria Scott: Twitter | Instagram
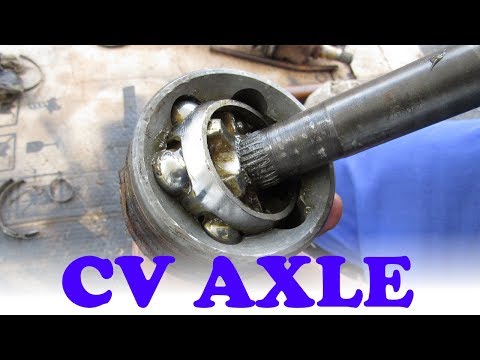
How a CV Axle Works
Featured Products
Safe handler Clear Lens Safety Glasses
Got a question? Got a pro tip? Send us a note: guidesandgear@thedrive.com