We may earn revenue from the products available on this page and participate in affiliate programs. Learn more ›
Drum brakes have been around a long time, but they’re not irrelevant yet. The 2022 Toyota Tacoma has them, the 2022 Hyundai Accent SE has them, and even Volkswagen’s all-electric ID.4 crossover has them. It’s possible drums might even make a small comeback on electric vehicles, meanwhile you’ll find them on plenty of used cars today. They’re not quite as easy to deal with as discs are, but servicing them isn’t too bad once you read through the instructions here.
Those unfamiliar with drums might be intimidated by the high-tension springs or self-adjuster that are part of the design, but it’s really not that complicated. Just like servicing disc brakes with rotors and pads, taking the job one step at a time makes it doable at home.
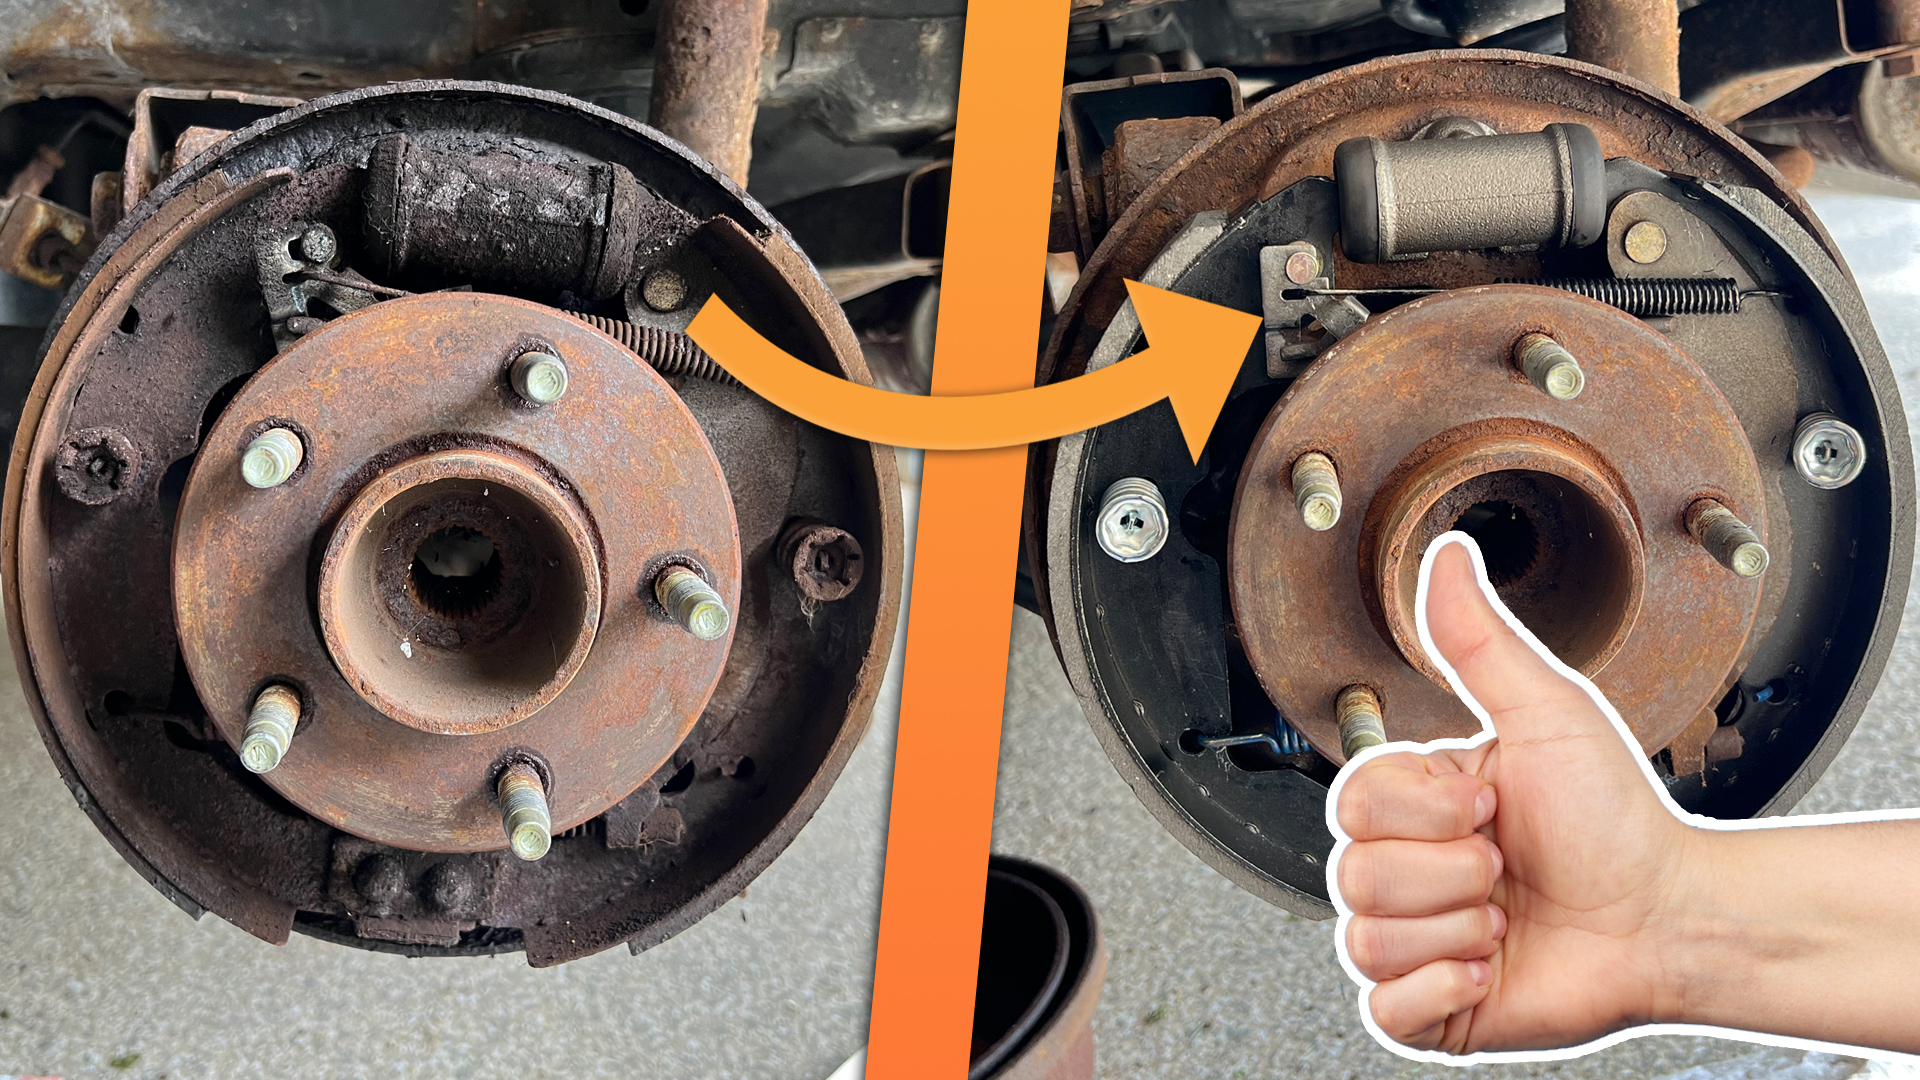
I recently performed a complete overhaul of the rear drum brakes on an inherited front-drive 2006 Saturn Vue. The brakes hadn’t been serviced in some time, and it was my job to find the source of the leaking brake fluid, clean everything up, and get the car back in safe working condition. That meant replacing not only the brake shoes, but the metal brake lines, wheel cylinders, and spring kit, as well. The design and execution of drum brakes on modern cars can vary slightly, but this guide should give you a general idea of what you’re dealing with.
The Basics of Changing Drum Brakes
Estimated Time Needed: A few hours, depending on how many wheels and condition
Skill Level: Beginner
Vehicle System: Brakes
Safety
Never take risks when it comes to safety while working on your car. Make sure to have these basic items stocked in your garage for service jobs.
Everything You’ll Need To Replace Brake Shoes
This job can be done with basic tools you probably already have, but there are also a selection of specialty tools that make the job a whole lot easier. Things like line wrenches, a brake spring tool, brake spring pliers, and a small tubing bender will smooth things out along the way and hopefully prevent wasted hours.
Tools and Products List
- Screwdriver set
- Tire Iron (or Impact Wrench and Impact Sockets)
- Socket Set
- Needle nose pliers
- Brake spring tool
- Brake spring pliers (needle nose works, but these are specialized)
- Metal brush
- Rubber mallet
- Small tubing bender
- Brake cleaner
- Files (if necessary)
- Sandpaper
- Drain pan/cardboard/plastic sheeting
- Disposable rags and/or paper towels
Parts List
- Brake shoes
- Spring replacement kit (springs, clips, rubber, if necessary)
- Wheel cylinder (if necessary)
- Brake line (if necessary)
- Brake fluid
Here’s How To Change Drum Brake Shoes, Springs, and Wheel Cylinder
To repeat, this is how the job is done on a 2006 front-drive Saturn Vue without ABS, which means it’s a leading/trailing shoe design. Changing drum brakes on other cars should follow a similar procedure, but every car is different and some use twin-leading or duo-servo-type designs.
1. Loosen the Lugs, Jack the Car Up, Put It on Jack Stands
Once you’re parked in a safe area on a flat surface (and make sure the parking brake is off), you can start by loosening the lugs with a tire iron while the vehicle is on the ground. Once you can move them with your fingers, find a jack point and jack the car up until the wheel is off the ground. Insert your jack stands, remove the lugs, and remove the wheel.
On the Vue, the wheels were rusted to the drums, so it took some impacts to knock them off. I used my foot and a rubber mallet, but be extremely careful not to rock the car too much.

The Garage's Tool Tip
An impact wrench is a great way to speed things up. Rather than having to manually break the lug nuts free with the vehicle on the ground, you can move right to jacking the vehicle up and setting it on jack stands. The impact wrench can remove the lug nuts at that point, dramatically reducing time and effort for this step.
2. Remove the Drum

The drum acts as a housing of sorts for the brake internals, including the shoes and springs, so you need to remove it first. The drum should slide off fairly easily, but it might be stuck, as were the drums on the Vue. Once again, I used a rubber mallet to hit it a few times, then patiently wiggled it off. If what you see is covered in grime, this is a good time to give it an initial spray of brake cleaner (there will be many). Before you spray it, put a catch pan or a few towels underneath the wheel to catch all the dirty crumbs and grime that comes off.
3. Remove the Shoe Holder Springs

Before you do anything else, take a photo of the brakes, especially if this is your first time. It’s a quick and easy way to have a record of where everything goes.
Next, locate the springs that hold the shoes in position. They are the ones that have what look like small circular plates on top of them and they jut out toward you. These are held in by a pin that comes in from the rear of the brakes and locks into place through a small slot. Using the $10 tool (needle nose pliers could also work), rotate the plate/spring until the edges on the pin align with the slot and the spring pops off. Remove both.
4. Remove the Other Springs


By removing the holder springs, the shoes can flex and bow forward a little bit. This makes it easier to remove the horizontal springs, also known as the return springs, that bring the shoes back in after they’ve been pressed out against the drum. Be very careful when you’re removing these.
I used needle nose pliers and some might to pluck them off, but the specialty spring pliers would make this task much easier.
5. Remove the Shoes and Adjuster

One of the shoes and the adjuster should basically fall out once the springs are off. The other shoe, however, is attached to a parking brake module. You will need to remove a small metal horseshoe clip to separate the shoe. This can be done with a flathead screwdriver or pliers. The replacement spring kit should include replacement clips, as well, so don’t worry about doing it too cleanly. This will leave the parking brake lever hanging off, that’s fine.
6. Clean Everything

At this point, it’s time to get your metal brush and/or sandpaper and start cleaning everything up. Brush the entire setup, including the adjuster, the backing plate, and everything else that looks dirty and/or rusty. Switch between brushing and heavily spraying brake cleaner (I used an entire can on my job).
7. Replace the Wheel Cylinder


Note: If you’re not replacing these as part of your job (you probably should, the parts are cheap), skip ahead to step 9.
This was a core goal in my service on the Vue. The wheel cylinders on both sides were literally crumbling apart due to rust, and the metal brake lines were fused into the cylinders, as well. First, remove the brake line on the rear of the cylinder with a line wrench. There should be brake fluid that comes out, so make sure you have a towel or catch in place.
Next, there will be two bolts that hold the cylinder in place, remove those and pull the cylinder out. You might find some debris leftover, so clean that up.
8. Shape and Replace the Metal Brake Lines

The metal brake line on the Vue that connected the cylinder to the brake hose was only about a foot long. I unscrewed the side attached to the hose, again making sure to catch any fluid, and removed it.
I then used a small tubing bender to create a similar shape to the existing line. Just get the main bends in there to get both sides close, it doesn’t have to be perfect. Screw in one side of the metal tubing, and then you should be able to gently bend the rest of the line to fit, and screw in the other side. Just make sure you don’t pinch the line or leave it in a position where it will get hit.
9. Reattach the Shoe to the Parking Brake and Screw Shoes Back on


First, put the shoe back on the parking brake lever and secure it in place by closing the new horseshoe clip with pliers. Once connected, get the new parts from your spring replacement clip. Insert the pin from the back, through the shoe, then using your tool push the plate and spring back over the pin, and twist it until it’s locked into place.
Next, you’re going to do the same thing on the other shoe, but while you’re putting that shoe in place, you want to also position the adjuster and adjuster lever in place as well. Once those are slotted in their correct positions (in between the two shoes), put the other holder spring in the shoe. That should hold it all in place.
10. Attach New Springs


Once the shoes are secured, put the retainer/return/horizontal springs back on. On the Vue, I chose to do the top one first, then the bottom. Again, I only used regular pliers, but this is when the specialty tool will come in handy.
11. Check That Everything Is in Position

There are a lot of components working together on drum brakes, and after you put everything back together, you want to check to make sure it’s all seated correctly. Double check the self-adjuster, the springs, and the ends of the brake shoes for any gaps or inconsistencies. This is also a good time to pull the parking brake to make sure it’s functioning correctly.
12. Prep the Drum and Hub, Then Put the Drum Back on

Using sand paper and your metal brush, clean the hub face and the drum. In addition to removing rust, you also want to sand down the lip on the inside of the drum. Use more brake cleaner to clear that all off. Once your drum is prepped, slide it back over the shoes and into place.
13. Bleed the Brakes
This can be a one- or two-person job, but you absolutely cannot skip it. This process removes air from the brake lines to make sure the brakes work correctly and predictably when you hit the pedal. Air in the line could make them mushy and severely reduce or impact braking ability. Make sure you always use brand-new fluid, too. For more information about how to do this, read our article How To Bleed Brake Fluid With a Pneumatic Vacuum Pump. Basically, you’re using a hose attached to the bleeder valves on each wheel to draw the air out of the system. This can be actuated with a person pressing the brake pedal or using a hand pump or vacuum pump to create suction.
14. Put the Wheel Back
Place the wheel back onto the hub and hand-tighten the lugs in a star pattern. Once they’re snug, remove the jack stands and lower the vehicle. With the vehicle on the ground, use a torque wrench to properly tighten the wheel lugs to spec. Done!
Tips and Tricks
- Replace the wheel cylinder and springs when you replace the shoes. They’re inexpensive parts, and it’s easy to do the whole job in one shot.
- Buy the specialty tools. They’re relatively cheap and they’ll make the experience quicker and easier.
- On the Vue, the metal brake line was about a foot, and I made sure I had the correct size line/threads by checking the threads with the new wheel cylinder before I left the store.
- Get a pump or one-person bleeder catch so you don’t have to call a buddy to bleed the brakes.
Video
For anybody who doesn’t want to read all of that text, here’s a good tutorial that explains the exact job I did on the Saturn Vue.

Drum Brakes 101 – Cleaning and Servicing Brake Drums, Shoes, Handbrake etc
FAQs About Drum Brakes
You’ve got questions. The Drive has answers.
Q. Can you put new brake shoes on old drums?
A. Yes, you absolutely can. If the drums aren’t rusted out, you can clean them and use them again. If you notice severe pitting or structural damage, however, you should replace them.
Q. How many brake shoes are in a drum?
A. Each wheel has two brake shoes inside the drum.
Q. Is the hand brake part of the drum brakes?
A. Yes, it’s possible the hand brake will be a part of the drum brakes. I explain where it comes into play in steps five and nine.