We may earn revenue from the products available on this page and participate in affiliate programs. Learn more ›
Spring is around the corner and any motorcyclist who’s been forced to put their pride and joy into hibernation all winter is probably starting to get jittery. As horrible as it feels to be forced off two wheels, there is a silver lining to all this: You have the chance to get your bike as ready for the road as you are. Think of this as preseason training, but for your motorcycle.
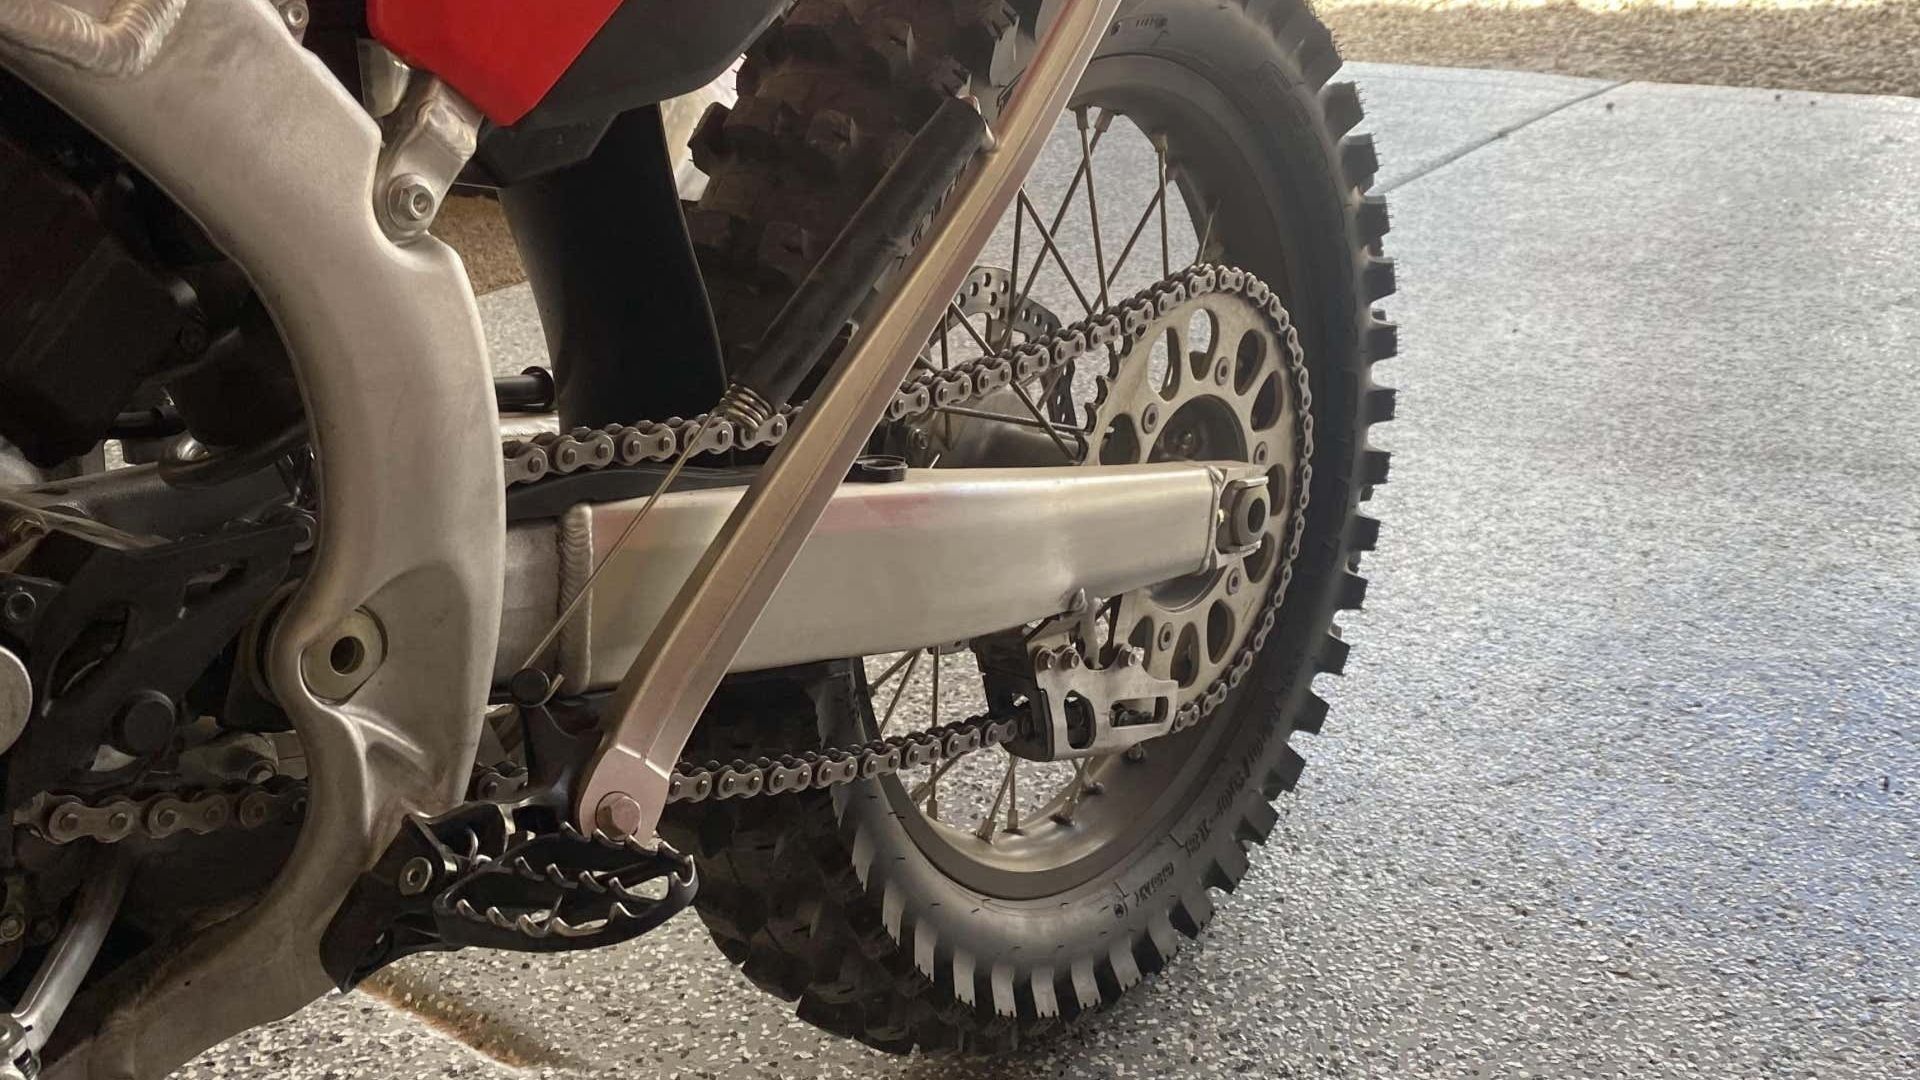
One of the best parts of riding a bike is the feeling of connectivity. You’re one with the machine you straddle, and that feeling starts with the link between your wrist and the rear wheel. But once your chain sags below the manufacturer’s recommended range, so too does the relationship between you and your motorcycle.
Thankfully, tightening your chain isn’t a big job if you know what you’re doing, and The Drive’s crack team of experts are here to walk you through it step by step.
Adjusting Your Chain Basics
Estimated Time Needed: 15 minutes
Skill Level: Beginner
Vehicle System: Chain
Chain Adjustment Safety
Working on your bike can be dangerous and messy, so here’s exactly what you’ll need to ensure you don’t die, get maimed, or lose a finger and that you keep your jeans, shirt, and skin spotless — hopefully.
Everything You’ll Need To Adjust Your Chain
We’re not psychic, nor are we snooping through your toolbox or garage, so here’s exactly what you’ll need to get the job done.
Tool List
- Wrench set
- Torque wrench
- Ruler or chain slack measuring tool
- Rubber mallet
- Chain alignment tool
- Rear stand (maybe)
Organizing your tools and gear so everything is easily reachable will save precious minutes waiting for your handy-dandy child or four-legged helper to bring you the sandpaper or blowtorch. (You won’t need a blowtorch for this job. Please don’t have your kid hand you a blowtorch—Ed.)
You’ll also need a flat workspace, such as a garage floor, driveway, or street parking. Check your local laws to make sure you’re not violating any codes when using the street because we aren’t getting your ride out of the clink.
Here’s How To Adjust A Motorcycle Chain
Let’s do this!
1. Get Set Up
Depending on your bike, you’ll either need to check the chain slack with it on its side stand, center stand/paddock stand, or with someone sitting on it (check your owner’s manual to see what the manufacturer recommends). Make sure your motorcycle is in neutral and that the chain and sprockets are in good condition before starting the adjustment.
2. Know Your Measurements
Refer to your owner’s manual to see what your chain slack should be. You might also find this information on the bike’s swingarm. Having 1.2-1.6 inches (30-40 mm) of slack is normal for most street bikes, but adventure and dirt bikes might need 1.4-2 inches (35-50 mm).

3. Check the Slack
Find the midway point between the front sprocket and rear axle bolt, as this is where you’ll measure the chain slack. Look for any tight spots in your chain by rotating the wheel and checking the chain slack at intervals. You should measure your chain’s free play from its tightest spot. At this spot, push the chain to its lowest and highest points and measure.
You can measure with a ruler or a chain slack measurement tool. If you’re using a ruler, push the chain to its lowest point and place the ruler at the link pin before moving the chain to its highest point and taking note.
4. Loosen the Axle Nut
Using a torque wrench, loosen the bike’s axle nut enough for the axle to move freely, but don’t completely remove the nut. If you only have a short wrench, then you might need to give it a little bit of percussive persuasion (using your foot).
5. Adjust Your Chain
Different bikes will have different mechanisms to tighten the chain, but the principle remains the same. You’ll usually need two wrenches and a torque wrench, but some will require an Allen wrench instead of open wrenches. Most bikes will have a lock nut and an adjustment nut. First, you’ll need to loosen the lock nuts on both sides, and then you can start using the adjustment nuts to tighten your chain.
When tightening your chain, only move the adjustment nut a quarter turn at a time, then do the same on the other side. Ensuring that you make incremental, equal changes will help you keep your axle aligned (assuming it was when you began).
6. Recheck Your Slack
Every time you adjust the adjustment nuts by a quarter turn on each side, check the chain slack. Keep an eye on the indicators along the axle’s groove and ensure that the axle position matches on both sides. Repeat this process until your chain slack meets the manufacturer’s recommendations.
7. Make it Tight
Once you’ve correctly adjusted your chain, you can grab your rubber mallet and give the back of your tire a whack inwards (if you don’t have a mallet, check out some of our pro tips below). This ensures the axle and adjusters have made solid contact. Now check your chain’s free play again, and if it’s still correct, tighten the axle using your torque wrench and the lock nuts with your open wrench.
Tighten the axle nut to the recommended torque value (refer to owner’s manual) and make sure that you don’t alter the wheel’s alignment as you tighten it. Finally, check your chain slack one last time to ensure it didn’t change when you secured everything.

8. Straight as an Arrow
Before hitting the road, you need to make sure your wheel is properly aligned. Fit a chain alignment tool to a chain link that’s sitting on the top of your sprocket. Check the metal prong to ensure your chain is straight, but if it’s not, you’ll need to adjust your axle accordingly using the adjustment nuts.
Pro Tips to Adjust Your Chain
Here are a few tips to help guide you during the process.
- If you’re preparing your bike for a trip with a pillion, you’ll need to leave some extra play in your chain, as the added weight will cause your rear shock to compress more than usual.
- When pushing the chain upward, don’t do it with so much force that it lifts the section of the chain that sits above the swingarm. As soon as this section becomes taught, stop pushing upward.
- If you’ve loosened your bike’s axle nut but still can’t get it to budge in the direction you need, it’s time to give your tire a few encouraging love taps with a rubber mallet.
- If you don’t have a mallet to move your wheel inwards, you can place a screwdriver, Allen wrench, or a rag between your chain and sprocket and roll the wheel backward. This will cause the chain to tighten and pull the wheel inwards.
- If you don’t have a chain alignment tool, you can measure the distance from the axle bolt to the swingarm pivot point on both sides to see if your wheel is aligned properly.
- Even if your owner’s manual recommends adjusting your bike’s chain with the back wheel off the ground, it’s always best to check it again with the bike fully loaded. This includes any luggage you’ll carry and pillion passengers.
Video
Check out the video below, in which Ari Henning adjusts the chain on a Kawazaki Z125. As you can see, adjusting any motorcycle chain follows the same principles, whether it’s a Z125 or an R1. He also shows you how to use the rag trick to tighten the axle against the adjustment nut.
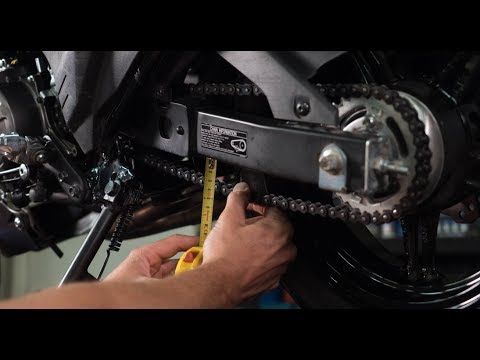
How To Check and Adjust Your Motorcycle Chain | MC Garage
FAQs About Adjusting a Motorcycle Chain
You’ve got questions. The Drive has answers!
Q. How often does a motorcycle chain need to be adjusted?
A. Check your chain slack every 500 to 1,000 miles and adjust it if necessary. Dirt bike chains need to be checked and adjusted more frequently than street bikes.
Q. How do I know if my motorcycle chain is too loose?
A. If your chain is too loose, then you might hear a grating or clicking noise as it runs over the sprockets. You might also hear the chain lash as it makes contact with the swingarm or chain guard when you accelerate or decelerate. A chain with too much free play will cause a jerky motion when you apply the throttle, as it goes from slack to taut.
Q. What happens when the chain is too tight on a motorcycle?
A. A chain that’s too tight will put excess pressure on the bike’s components, like the sprockets, and cause them to wear out more quickly. A tight chain also makes a bike’s engine work harder due to the force working against the engine through the front sprocket. Your motorcycle’s suspension will also be subjected to more resistance and might not work to its full potential. Finally, because a tight chain places more stress on the chain itself, it’ll cause it to wear out more quickly and could even result in it snapping while you’re riding.
Q. Does a motorcycle chain get tighter when you sit on the bike?
A. In short, yes. When you sit on a motorcycle, you compress the suspension. Compressing the rear suspension increases the distance between the front and rear sprockets, thus making the chain tighter.
Let’s Talk: Comment Below and Reach Out to the Guides & Gear Editors!
We’re here to be expert guides in everything How-To related. Use us, compliment us, yell at us. Comment below and let’s talk!