We may earn revenue from the products available on this page and participate in affiliate programs. Learn more ›
At the very least, tearing down, inspecting, and cleaning hydraulic lifters is good engine hygiene that can contribute to long service life in your classic car. It’s also a great way to inspect the health of your valvetrain and can be helpful in determining the source of peculiar noises. And if you’re tearing into an engine with any kind of mileage on it, a good cleaning is the least you can offer those tired, old lifters.
I recently created a mess while working on my 1969 Dodge Charger’s 440 with the lifter valley exposed. Rather than simply giving the lifters a quick superficial cleaning to clear debris from the surface, I opted to tear into them to ensure I completed the project to the best of my ability. While not entirely necessary to keep my engine running, it did at least serve as an opportunity to show others how simple this forgotten process is.
Here’s what I needed and how I did it.
Lifter Cleaning Safety
Don’t let the size of a lifter fool you, it’s ready to give you problems you didn’t sign up for. You’re dealing with small, viscous springs and equally evil chemicals. Do yourself a favor and protect the soft stuff.
Everything You’ll Need To Clean Flat Tappet Lifters
To be perfectly clear, this guide focuses on the process as it relates to flat tappet lifters in a Chrysler 440. The information is still valuable to most applications with hydraulic lifters, but different applications require different steps. It’s important to research the process for your exact engine before jumping in.
As for what you’ll need to tackle flat tappet lifters, there is a right tool for the job. However, finding a vintage lifter compressor is easier said than done. Thankfully, a few basic hand tools will work fine in their place. Some picks, locking pliers, an old pushrod, lint-free shop towels, and bore brushes should all be at the ready. You’ll also need some chemicals to do the heavy lifting. My old service manual suggests using kerosene, but a cleaning solvent such as mineral spirits or lacquer thinner and your favorite degreaser will work just fine. Of course, some motor oil or assembly lube will be necessary when returning the lifters home as well.
Tool List
- Neiko 38-Piece Wire Brush Set
- Klean Strip Odorless Mineral Spirits
- Lucas Oil Assembly Lube
- Hotop 4-Piece Hook and Pick Set
- Scott Shop Towels
- Lumax 6-Quart Plastic Drain Pan
- Irwin Vise Grip Original Locking Pliers
Organizing your tools and gear so everything is easily reachable will save precious minutes waiting for your handy-dandy child or four-legged helper to bring you the sandpaper or blowtorch. (You won’t need a blowtorch for this job. Please don’t have your kid hand you a blowtorch—Ed.)

Here’s How To Clean a Lifter
1. Access the Lifters
The first step of this process is accessing the lifters. In my case, I already had the intake removed, which provides clear access to the lifter valley of this engine. Depending on the application, that may or may not be necessary, but you want to give yourself enough room to work cleanly and efficiently in any case.
2. Remove the Lifter
I personally prefer to leave the lifters in their respective bores and work one by one. I don’t mind giving it the extra time if it means I’m absolutely sure of lifter placement. You can pull them all out at once as long as you have a system that allows you to keep track of the lifters so you can return them to the bore they come from.
Removing lifters is simple on this engine, as I can pull them out by hand. That may not be an option on some engines, and a magnet on a stick is best to pull it free.

3. Clean the Exterior
Before tearing into the lifter, give it a quick cleaning with some degreaser. Getting oil and gunk off the exterior will make it easier to work with. It also gives you the opportunity to inspect the exterior for any irregularities or wear patterns that signal bigger problems are afoot.

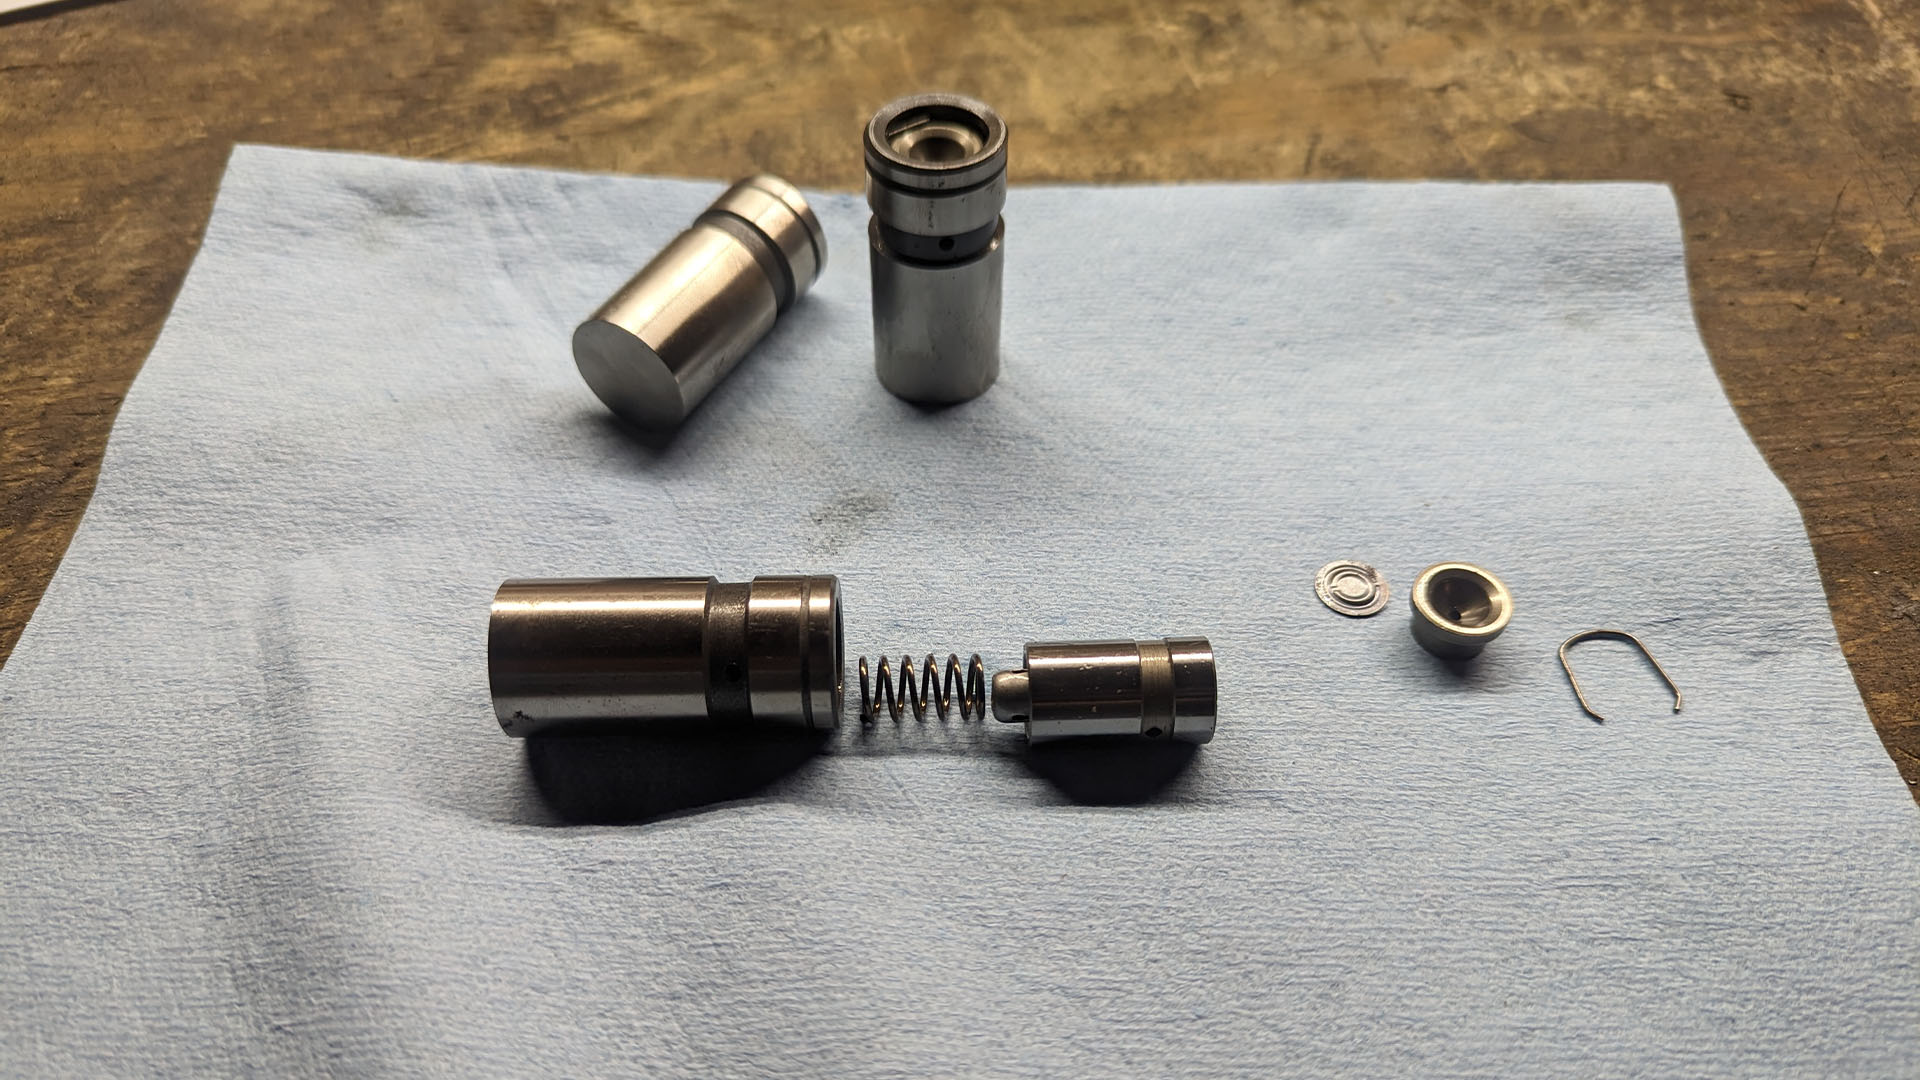
4. Remove the Retaining Clip
Set the lifter standing upright on your workbench. Take a spare pushrod and compress the internal plunger. It’ll be hard to get much movement out of it, but you only need just enough room for the retaining clip to easily be wiggled free.
I like to remove the outer edges of the clip first, then gently pull it free with pliers. You just need to be careful not to pull too hard and deform the retaining clip. Locking pliers are also useful in preventing the clip from springing across the room on you.
A bench vise is perfectly acceptable for holding roller lifters while removing the clip. Protective pads are always recommended, but the hard body of the lifter should be fine for light pressure. Forgo compressing the plunger for this as you will likely push the lifter out of the vise.

5. Carefully Remove the Guts of the Lifter
With the clip out of the way, the internals are free to come out. They don’t always come easy, though. You may need a little persuasion with non-marring picks. Take note of the order of everything as the internals come out.
6. Clean
Simply dip the parts in your solvent and work free any stubborn deposits with your brushes. Clean the internal portions as well as the exterior to ensure you’re leaving no debris or deposits behind. Now is the time to inspect the plunger and internal portion of the lifter for any signs of damage.
7. Assemble
Once the lifter is clean and dry, it’s time to reassemble. This is very simple, as everything goes in reverse order. Just be sure not to lose any of the small parts of the internal system, as the lifter will fail to work properly if it isn’t assembled properly.
8. Prime the Lifters?
My service manual specifically states that you are not to prime the lifters before installing them. That does not mean you don’t have to for your engine. Depending on the application and cam manufacturer, the process of priming may be necessary, which is one reason why you need to do the homework to determine what steps are necessary for the application.

9. Return Home and Repeat
Once you’re done cleaning the lifter, all that’s left is to return it to the bore you pulled it from and carry on to the next. I like to take a lint-free rag with some solvent and give the lifter bore a quick pass for good measure. Then I dab the lifter with some assembly lube, spread it around, drop it back in place, and move on.
Video
The guide above, while generally helpful, has a particular focus on the 440 the lifters are for. The process is bound to change based on the application, which is why I included the video below that follows a similar process for a different engine. Keep in mind that your best resource will be the one that’s a match for your application, but both this guide and the video below will serve as good starting points.
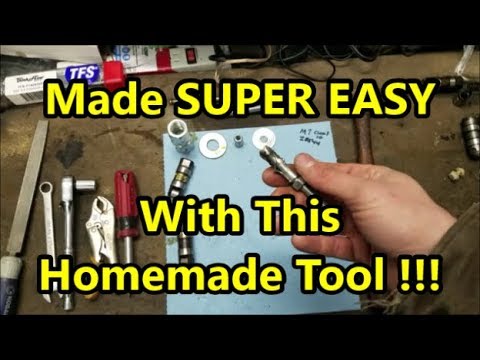
(TRICK REVEALED) Hydraulic Lifters Disassembly: Rebuild or Make Solid "Mock-Up" Lifter
More From The Drive
- Read Jonathon Klein’s heartfelt goodbye to Ken Block
- Nico Demattia tells us about a blasphemous diesel build
- Peter Nelson is here to tell you all about shock rebound
- Lewin Day covers the Camaro/Mustang monstrosity that you can buy
- Chris Rosales helps you enter the world of tire chains