We may earn revenue from the products available on this page and participate in affiliate programs. Learn more ›
Times are a-changin’, folks. 2010 was twelve years ago, and a lot of the affordable used performance cars available today are more technologically advanced than ever. And none of those technologies are more infamous than direct fuel injection. While a great concept for power, fuel economy, and emissions, it can truly suck to service anything related to direct injection. Some of you might have heard of the “special” seals that direct injection uses; I’m here to demystify them and show you how to replace them.

First things first, direct injectors do indeed use a special kind of seal. By nature, direct injection has to deal with the incredibly high temperatures and pressures directly from the combustion chamber, where old-school port injectors have nowhere near the same stresses or demands. Port injectors just have to prevent fuel leaks and air leaks under vacuum and boost pressure. Direct injectors have to seal the thousands of PSI from the combustion chamber. If direct injector seals leak, compression leaks out and you lose serious power.
So rubber O-rings won’t cut it. There are a few methods to seal the injector in the combustion chamber. But the main ones I’ve seen have been washers paired with extremely long injectors to mechanically seal the combustion chamber and nylon seals on smaller style injectors. We’re going to focus on the combustion chamber seals, which can be somewhat difficult to replace, and take some special tools or clever DIY techniques.

Our demonstrator injector today was graciously donated (read: rejected ) by my 2010 VW GTI and will work perfectly. This DIY applies to a lot of different DI cars like the Subaru BRZ/Toyota 86, Hyundai/Kia and most VW AG gasoline direct injection products. I recommend sourcing the specific toolset for this, which is normally a throbbing pain in the ass. As I have recently found out, you can actually rent the tools for this from AutoZone for free (part number 57383). You’re welcome. And it should work with a few different kinds of direct injectors, though that kit is specifically for VW and Audi.
Why would you replace this seal? Well, the answer to that is complicated. You will often hear forum-goers and shops insist that the nylon seals in any DI application are single use and should be replaced anytime the injector comes out of the head. I’m here to tell you that is partially true.

The official VW service literature for the EA888 Gen 1 states to always replace the seal. However, they don’t wear out or dry because they are made of Teflon or nylon, but they can get damaged during removal or installation. The truth is that these seals only require replacing if they get damaged or leak. It’s just good practice to do them during a major service like a valve cleaning. I’ve removed my intake manifold multiple times and reused them several times after replacing them once. Anecdotal, but I’ve encountered no compression loss issues or damaged seals.
If you’re like me and you’re constantly tinkering, taking major parts like the intake manifold off, you shouldn’t worry too much about always replacing these. But, for most folks who only want to do major stuff like this once in their lives, they’re simple to replace and will give you serious peace of mind when you finalize the job. Let’s dive right in.

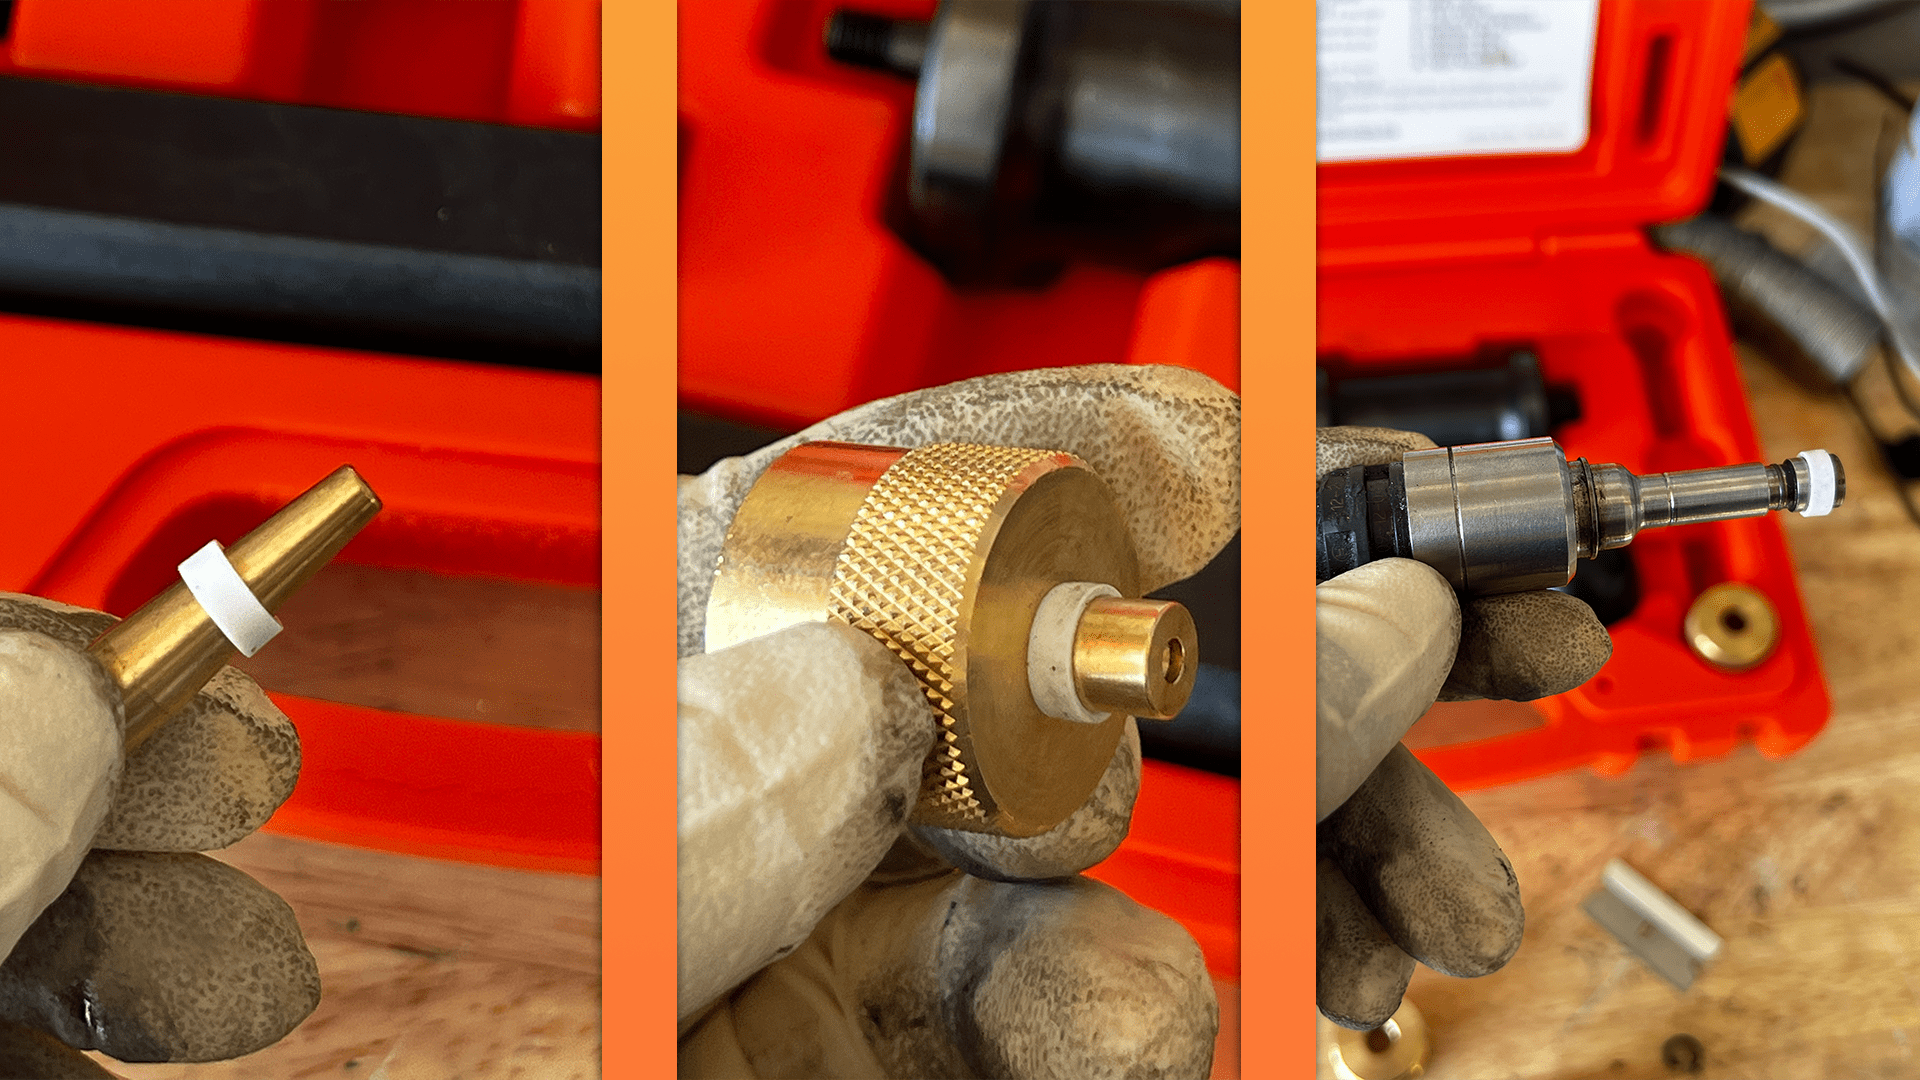
First, take a razor blade and cut the seal off of the injector. Be careful to not mar the metal and gently remove the old seal. Next, take the new seal and place it on the small cone-shaped tool in the kit. Use the largest die in the kit (the knurled metal donut thing), turn the knurled end towards the tip of the cone, place the cone on the tip of the injector, and gently push the seal onto the injector.
Now that the seal is on the injector, it should loosely sit in the groove where it belongs. This is the part that mystifies people; shrinking the seal. Take the same die you used to push the seal on and turn it so the knurled end is away from the injector. Use that die to shrink the seal by inserting the injector into the die. Be gentle and be careful to not use much force or else the seal will get damaged.

Once the first die is maxed out, move on to the next smallest die and shrink the seal all the way down to service size. The second die should do the trick. Now the injector is ready to go back in.

An alternative method of shrinking the seal is the overnight zip-tie method. Instead of getting this toolkit, you can apparently use a Bic pen cap and an ever-useful zip-tie to expand and shrink the seal right down to size. I see no reason why this method wouldn’t work, so if you can’t access the tool kit, this should work fine. Either way, once the seal is shrunken down you can opt to install the injectors into the head on their own or install them into the fuel rail on the intake manifold. I prefer to install them into the fuel rail so I have some extra leverage to seat the fresh seals into the head.
Start your car. If it runs well and makes no weird noises throughout the powerband, you have successfully swapped direct injector seals. Not so scary, right?