
We may earn revenue from the products available on this page and participate in affiliate programs. Learn more ›
Fuel gauges are fairly simple mechanisms. They point to “E” when the tank is nearly empty and “F” when it’s full. At least, until it doesn’t. Then you’re left in the dark, guessing how many miles you can squeeze from the last remaining droplet of fuel before the car sputters to a halt along the side of the road.
What people might not know is why and how that gauge goes up or down. It’s not a direct mechanical connection, it uses electricity to make it work. This setup can create some confusion as to what exactly is wrong when the fuel gauge starts malfunctioning.
Still, with a little patience and a multimeter, the home mechanic can diagnose the problem at home with a little elbow grease and understanding of the wiring. The Drive’s editors want to equip you with the knowledge you need to get the job done so you don’t waste money paying the pros.
Find your inner DIY spirit, and let’s get to it.
What Is a Fuel Gauge?
A car’s fuel gauge, whether digital or analog, informs the driver how much fuel is left in the tank.
How Does a Fuel Gauge work?
The fuel gauge displays the information that is conveyed from the fuel sending unit, which is attached to/on/in the fuel tank. Based on that information, an analog gauge will move a needle up and down across a dial or a digital gauge will display a set number of bars that show how much fuel is left. When the tank switches to its reserves, it will prompt a fuel light to display.
How Does a Fuel Sending Unit Work?
The fuel sending unit has a float arm that sits in the liquid gas. When that arm moves up and down, it changes the resistance to ground on a variable resistor. That resistance is then translated and sent through the car’s wiring and electronics to determine where the needle or digital gauge is positioned. When the tank is full, it registers a high resistance, and when it’s low, it registers a low resistance.

Symptoms of a Malfunctioning Fuel Gauge
If you notice these symptoms, you might have issues.
- Inconsistent Readings
- Reads Low When Tank Is Full
- Reads Full When Tank Is Empty
- False low fuel light
What Causes Fuel Gauges and Fuel Gauge Sending Units To Fail?
- Blown fuse
- Broken gauge
- Disconnected wires
- Damaged wires
- False grounds
- Failed or broken fuel gauge sending unit
- Stuck fuel gauge sending lever

Resolving the Problem
Use the process of elimination through testing to determine what your problem is.
The Basics of Diagnosing a Malfunctioning Fuel Gauge
Estimated Time Needed: Could be hours, depending on the location of and access to the fuel gauge sending unit.
Skill Level: Beginner
Vehicle System: Fuel
Safety Considerations
You’ll be underneath the hood, testing electrical wiring, and dealing with gasoline for this job. Make sure you prepare the proper safety equipment and precautions to ensure you leave the garage in one uninjured piece.
Tools You’ll Need To Diagnose a Malfunctioning Fuel Gauge
- Multimeter
- Screwdriver set, if necessary
- Socket set, if necessary
- Trim removal tools, if necessary
Organizing your tools and gear so everything is easily reachable will save precious minutes waiting for your handy-dandy child or four-legged helper to bring you the sandpaper or blowtorch. (You won’t need a blowtorch for this job. You’re dealing with fuel and fire is bad when you add fuel. Please don’t have your kid hand you a blowtorch—Ed.)
You’ll also need a flat workspace, such as a garage floor, driveway, or street parking. Check your local laws to make sure you’re not violating any codes when using the street because we aren’t getting your ride out of the clink.
Now, let’s get to the step-by-step process of locating your problem.
Check the Fuse
Find the fuse for your fuel gauge and check its health. If it’s blown, replace it, and you might be in the clear. If your fuse is fine, or you’re still having problems after replacing it, you have a different issue.
Run Your Car’s Self-Test
Most modern cars built beyond the early 1990s have built-in testing procedures. They are typically activated using some combination of the light switch, the trip button, and other dashboard buttons. Check your owner’s manual for the specific code. If you run the check, and the needle circulates through its up and down motions, then the gauge is okay, and you have a problem elsewhere.
Test a Fuel Gauge Sending Unit
Learn how to use a multimeter to test your fuel gauge sending unit in the next section. These are general steps that might not apply exactly to your car, but it details the general process.
- Check your owner’s manual to figure out how to access the fuel tank and fuel gauge sending unit.
- Remove the necessary panels and parts for access.
- Check the ground wiring for any physical issues.
- Read your service manual to determine the voltage standards and schematics for the fuel sending unit wiring or connector, depending on whether or not the unit is built into the fuel pump or outside of it.
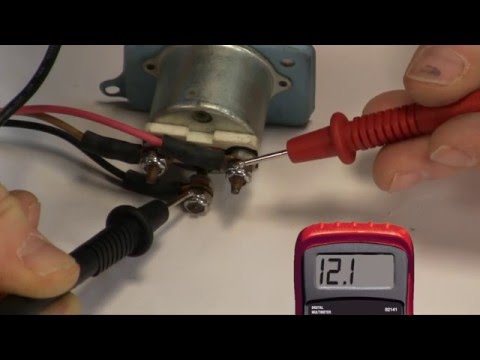
- With the ignition to “on,” use a multimeter to check the voltage of the wiring and/or the connector that provides power to the sending unit. If the readings are incorrect, follow the circuit back and test until you find the issue.
- The next step is to check for voltage drop. If you plug the connector back and test again, the fuel gauge sending unit should create resistance. If the voltage drops, the fuel gauge sending unit is creating the resistance it should.
- If there is no resistance, you might need to remove the fuel sending unit to inspect and test further.
- Once you have the unit out, set your multimeter to ohms.
- Check your owner’s manual or service manual to determine the ohms range in which the fuel sending unit operates. If the range, for example, is 0-70, it will read 0 ohms when the tank is empty and 70 ohms when the tank is full, or vice versa. With the unit out of the vehicle, you can further check to see if it’s a problem with the float, the resistor, or something else.
Fuel Gauge & Sending Unit Troubleshooting
FAQs About Fuel Gauges and Fuel Gauge Sending Units
You’ve got questions, The Drive has answers!
Q: Can I Drive With a Broken Fuel Gauge?
A: We don’t recommend it. Without knowing how much fuel you have, you could not only end up in a perilous situation yourself, you could create a dangerous situation for other motorists and/or pedestrians.
Q: Where Is the Fuel Gauge Sending Unit?
A: The fuel gauge sending unit is attached to/on top of/inside the fuel tank. It might or might not be integrated into the fuel pump.
Q: How Do I Reset My Fuel Gauge?
A: Your car should have a self-test/reset that you can run. Check your owner’s manual for specifics on how to do it.
Q: Is There a Fuse For the Fuel Gauge?
A: Yes. Check your owner’s manual and the fuse box for its specific location.
Video
Learn more with this video about diagnosing fuel gauge issues.
Fuel Gauge & Sending Unit Troubleshooting
Let’s Talk: Comment Below To Talk With The Guides & Gear Editors!
We’re here to be expert guides in everything How To related. Use us, compliment us, yell at us. Comment below, and let’s talk! You can also shout at us on Twitter or Instagram, here are our profiles. Got a question? Got a pro tip? Send us a note: guidesandgear@thedrive.com.