We may earn revenue from the products available on this page and participate in affiliate programs. Learn more ›
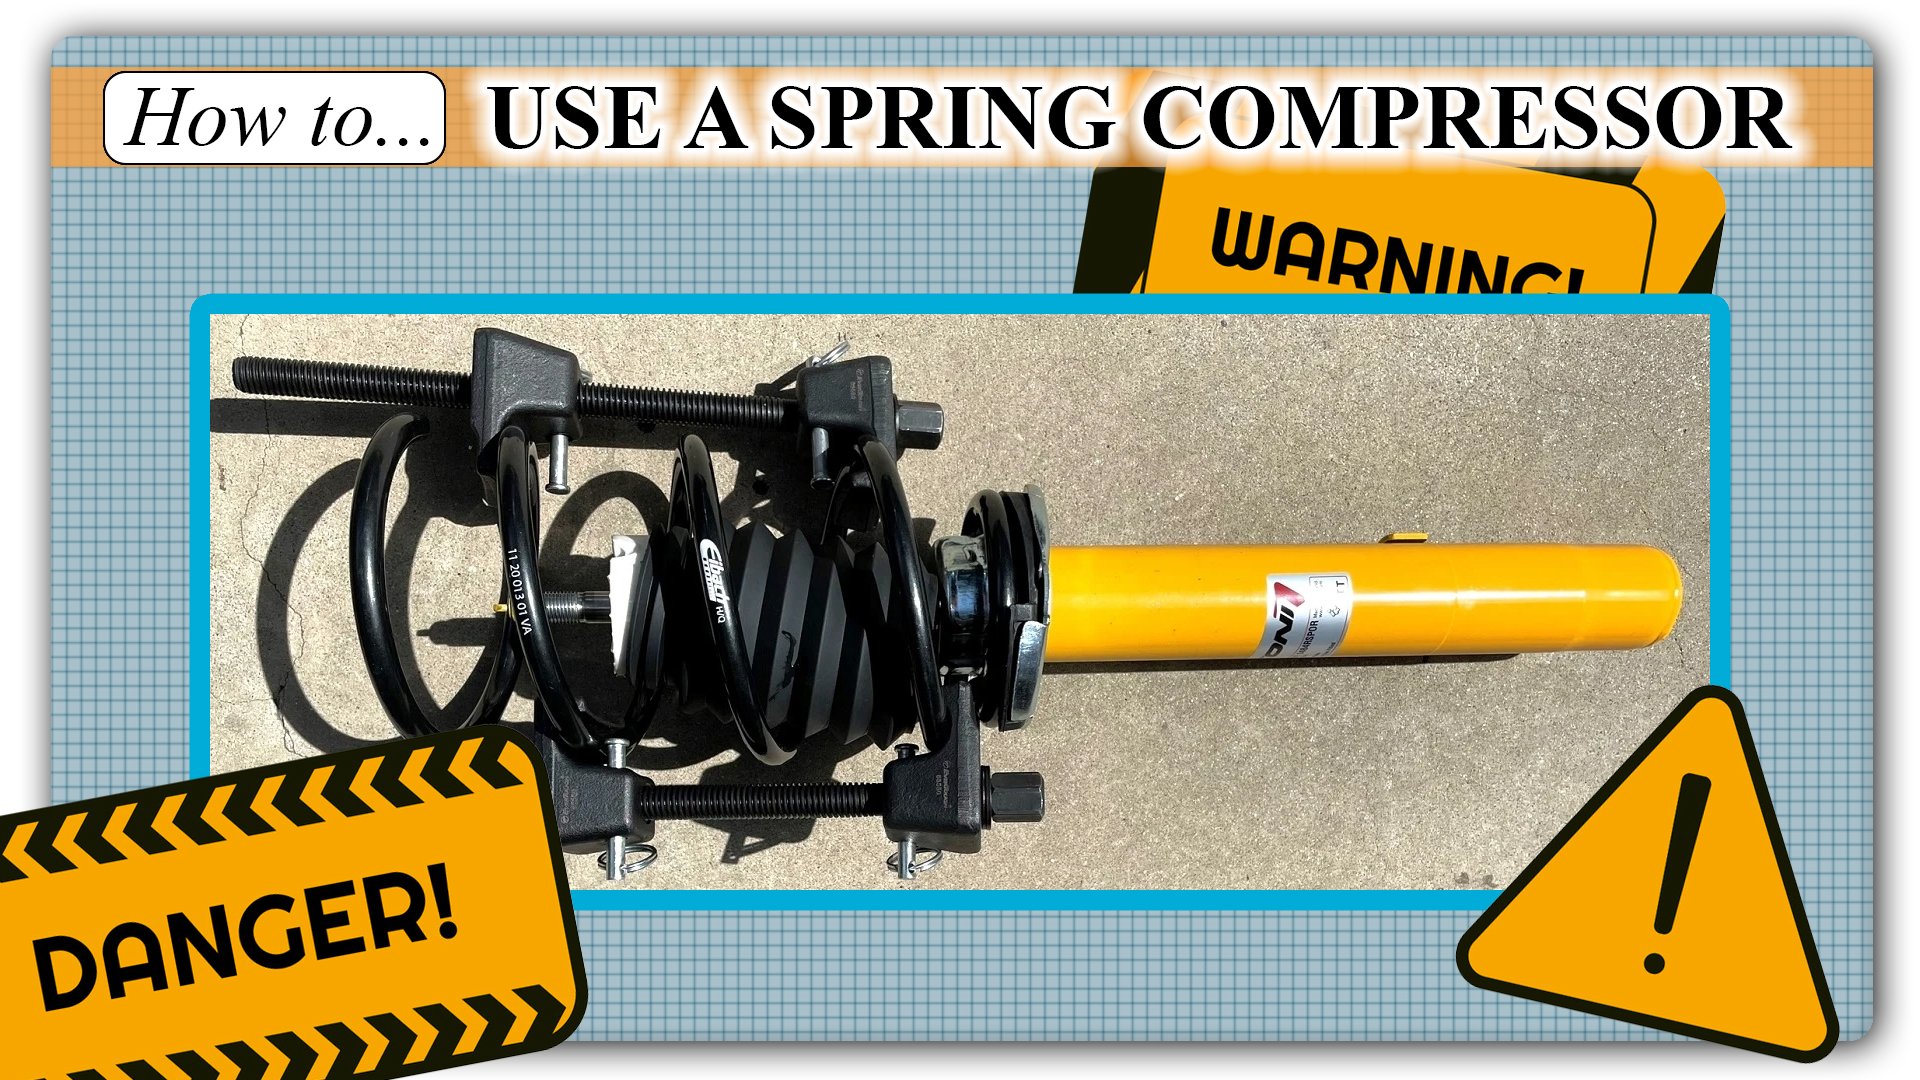
A spring compressor is among the most infamous tools available to home auto mechanics. Its job and operation are straightforward: It just squeezes a spring so that you can remove or install it from a car. But remember, those springs are tight enough to bear the weight of an entire car. If you don’t squeeze it exactly right and it escapes, you’ll suddenly have a metal missile bouncing around your garage.
Obvious name aside, you’ll need a spring compressor for shrinking down an extremely strong spring to be small enough to fit onto its accompanying shock. You’ll find that setup at the front of a car, usually, as in Fig. 002.
Where a Spring Compressor Is Necessary

Here’s a blown-up diagram from Honda’s parts catalog (Fig. 001) with the spring highlighted in red, giving you an idea of how a spring-and-shock combo goes together.

Pay close attention to the image above (Fig. 001) to get an understanding of why exactly a spring compressor is necessary. The spring (highlighted in red, numbered “1” and “2”) needs to go between the bearing and top of the shock mount (numbered “13” and “14” respectively in Honda’s diagram) and the seat of the shock itself (the flat part on item “5” and “6” in the picture). Don’t worry about “9,” “10,” that’s just a boot. And the reason each part has two numbers is to denote left and right — you needn’t worry about that, either.
Anyway — if you were to try and stick the spring into its home without a compressor, you’d have no chance of being able to screw the shock together because the top and bottom would be too far apart. Similarly, if you tried to dismantle the shock without putting a compressor on, the spring would explode upward like a missile assuming you were somehow able to loosen the bolts with the spring’s pressure below them.
Using that same Civic as an example, you can see in Fig. 003 that shocks and springs are sometimes altogether separate — this isn’t uncommon in rear suspension sections. In that situation, you might be able to get the spring out by simply hyperextending the lower control arm (easy to do once the shock’s unbolted).

Back to business: Spring compressors are very simple by design. They’re generally very long bolts threaded into two claws that clamp onto the spring. When the mechanism is tightened, it compresses the spring. Conversely, the spring expands when the tool is loosened.

I (Peter) recently installed performance aftermarket suspension on my 2011 BMW 128i, and it was a perfect opportunity to demonstrate how to properly go about this simple yet incredibly terrifying process.
Spring Compressor Safety
Due to the force that the spring is under while compressed, misuse of a spring compressor can result in severe injury or death. Think blunt-force trauma to your eye, skull, chest, etc. from a fast-moving hunk of steel. Or something gorier.
So, let’s discuss how to properly use a spring compressor so that doesn’t happen!
Safety goggles aren’t necessarily included to save your life, but rather increase your chances of staving off an injury in case a spring goes flying. Heck, if you own an SA-rated racing helmet, such as one used for a track day, why not wear that to help protect your head/face?
Impact-resistant safety goggles
Mechanic gloves
SA-rated helmet (optional)
Everything You’ll Need for Using a Spring Compressor

It’s best to prepare your tools and get them in order before you start a job. Here’s what you should have.
Tool List
- Spring compressor
- Wrench set
- Ratchet and socket set
- Vise (optional)
And then, the spring, shock, top hat mount, and any other parts that are required to properly assemble a shock and spring combo for your car.
Though, above all, keep the spring and shock positioned so they won’t hit you if they go flying. Meaning: Aim the top hat away from you as you properly bolt it down.
Here’s How To Use a Spring Compressor

We’ve gone over the horrifying scenarios that could happen, let’s discuss how to properly use the spring compressor so that your chances of them happening are greatly reduced.
1. Gather your safety apparel.
Put on the safety goggles and gloves, and put your helmet on if you’ve got one.
2. Position the spring on the shock.
Position the spring on the shock so that the bottom coil is seated properly. Follow your vehicle’s repair manual to figure this out, as the mating surface is not always a perfectly flat surface.
If you have access to a vise to hold the shock in place, that will make the process a lot easier.
3. Position the spring compressor.
Install the two pieces of the spring compressor as directly across from each other as possible. Clamp each end on opposite inner coils, meaning the top hat mounts to the top coil, and the spring seat sits against the bottom coil, so the spring compressor should clamp one coil inboard from each.
4. Begin tightening.
Lightly tighten the compressor pieces so they’re just resting against the coils. If there are pins that lock the coils in, push those in. With the top hat aimed away from you, begin slowly tightening the compressors in an equal amount, one then the other. Think half a turn on one, then half a turn on the other. You can use either a conventional wrench or ratcheting wrench with a socket, just do not use an impact gun. You want to keep the force distribution between the two as equal as possible, and an impact gun will make this very hard to do and should be avoided altogether.
Remember: Always have the top and bottom of the spring/shock combo aimed away from you.
5. Compress the spring until the threads at the top of the shock are above the top coil.
Once the shock’s threads are above top coil, put the shock’s top hat mount on, and use the top nut to tighten it down on the center shaft as far as it will go. If you’re unable to get the top nut on to tighten it down, or can barely tighten it down, you’ll have to compress the spring more.
Tighten the nut until it cannot be tightened any further.
6. Begin very slowly loosening the spring.
Do the opposite of what you did to tighten the spring compressor pieces: Begin ever-so-slowly loosening them, ensuring to loosen them equally. As they loosen, ensure the top and bottom coils seat properly against the top hat mount and lower spring seat.
The compressor can be removed after the spring compressor pieces are fully unloaded and the spring’s coils are seated firmly against their respective surfaces.
Voila! You have safely and properly used a spring compressor!
To Properly Remove a Spring From Its Accompanying Shock

Removing the spring itself is a very similar process to all of the above but involves compressing the spring so that the top nut and hat can be safely removed. Just be sure to tighten and loosen the spring the same way, and with its ends pointed away from you, such as laying the spring and shock combo on the ground. See the video below for a better visual.
Crucial Tips For an Easier Experience
I’ve performed this job quite a bit over the years and have come up with a few tips to ensure safe and easy operation while using a spring compressor.
- Make sure the spring compressor is in good condition. Keep the spring compressor threads oiled, and double-check that there aren’t any cracks, bits of rust, or other signs of wear anywhere. You don’t want one of the metal pieces to break while the spring is under pressure. Always examine the spring compressor carefully before use.
- Follow the instructions when it comes time to tighten the top hat nut down. The shaft of the shock almost always has a provision to put an allen key in, which is used to keep the shaft from spinning while tightening down the top hat nut. This is another part of the job to prepare for and become familiar with, follow what your service manual says should be used to do this.
- More tightening might be needed. We’ve encountered having everything all reassembled and properly bolted up, including the wheel re-installed properly, and the vehicle being safely lowered back onto the ground with a jack, only for the front suspension to make a clunking noise during a test drive.
This could be as simple as the top nut not being fully torqued down. This is an instance where you can use an impact wrench: Put an impact wrench on the top nut from underneath the hood and tighten it down further. It might only need a couple more threads, so actuate the impact gingerly.
Otherwise, a ratcheting wrench and socket or box-end wrench, plus the properly sized hex key (or Allen wrench) can be used. The weight of the vehicle makes this easier to perform, too.
The Visual
Photos and descriptive writing can only go so far, so here’s a great video that covers all of these steps.
ToolPRO Coil Spring Compressors
Since there are actually dozens of spring compressor videos on YouTube, we recommend searching for your specific car or tool brand for more visual insights. In fact, whatever brand compressor you’re getting might have its own specific video, so search for that if you’ve already got the tool handy.
Keep in mind that there are much larger, commercial-grade spring compressors out there (the type used by shops) — that’s really just another reason to be sure you’re looking at the right type when you watch a video.
FAQs
You’ve got questions and The Drive‘s got answers. Allow us to clear up any further questions about using a spring compressor.
Q. Are there different-sized spring compressors out there?
A. There are! If you’re compressing springs that are more heavy-duty, such as those meant for a truck’s spring and shock package, keep an eye out for a spring compressor that can accommodate the spring coils’ larger diameter. In fact, it’s a good idea to test fit spring compressors before getting to work. If they don’t grab onto the coils securely, don’t use them, and try different types or sizes. There are also different spring compressor lengths depending on the number of coils in the spring.
Q. Is a spring compressor safe?
A. Yes, but only when used properly and when it is in perfect functioning condition.
Q. How do you compress a spring without a spring compressor?
A. You don’t, please don’t do it. It’s not safe.
Q. Do you need a spring compressor for lowering springs?
A. Great question: Not always. Last year, when I installed aftermarket springs on aftermarket shocks on my Mazda 2, I was able to thread the top nut onto the spring hat and mount without compressing the spring, and then torque it down. However, this usually isn’t the case.
Q. What is the purpose of a spring compressor?
A. A spring compressor’s job is to shrink the spring down so that it can be safely mounted up to its accompanying shock, thus creating a vehicle’s spring and shock combo.
Got a tip? Send us a note: tips@thedrive.com