
Ever seen a car bathed in stark, dramatic light with no obvious source lit up under a dark sky? This is light painting, and it’s a fairly common style of night photography, especially for cars—but the process of making a shot like that can seem like an advanced skill, especially given the nearly-magic quality of the lighting in the photos. Light painting does require a bit more planning and post-processing to pull off than just shooting a car at night with ambient light. Luckily, the whole process is really quite straightforward, only requiring a little extra (but still basic photo editing) and legwork to get the best possible results. And beyond the cool effects, light painting is great at making older cars with rough paint look fresh and new. Ask me how I know!
The list of gear needed for light painting is minimal as well: a light, a tripod, and a camera with a long-exposure feature. You don’t need some fancy light wand or expensive camera lights either—your smartphone’s flashlight will do the trick. The biggest investment in the entire process is time, but with a little practice it’ll only take about 15 minutes in Photoshop (or the layer-equipped photo editing program of your choice!) to put together the kinds of photos you see here. So for this installment of Picture Perfect, let me walk you through how to take some of the coolest night shots of your car you’ve ever imagined.
The Principle

This photo of my old Supra and my friend’s Civic Si is what a light painting shot looks like straight out of the camera, before any Photoshop magic has been applied. In this photograph, I put my camera on a tripod and set the self-timer so I could get ready with my light. When the camera fired—a long exposure of 15 seconds—I walked in a circle around both cars while holding a battery-powered workshop lamp over my head. The white light trail shows exactly where I walked, and the light streaked smoothly and lit the cars evenly because I kept moving at a constant pace and held the light steady the whole time the shutter was open. That’s genuinely all there is to the base layer of the shot; I used a Ryobi folding workshop LED lamp that I grabbed out of my garage for lighting this photo, but I’ve also used actual photographer-intended lighting equipment, battery lanterns, regular flashlights, and even cell phone flashlights before for the same purpose.
No matter what light you grab, there are just a few simple things to remember in your camera settings as you take a shot like this. You’ll want a long enough exposure to walk fully around the car(s) in the shot before the shutter closes. In the photo above, 15 seconds was plenty of time to make a circle around both cars with a brisk walking pace. There’s unfortunately no hard-and-fast rule for exposure settings, though, because your light meter—which dictates the automatic exposure and aperture settings in the camera—won’t be able to know how bright your light is. When I took the above photo, I used trial-and-error until I found a combination of camera settings that gave me enough time to get around the cars while also not overexposing my light source, which is why I used such a low ISO (50) and a relatively closed aperture (f/8.0) for a nighttime shot.
As far as for you, the photographer, once the exposure is dialed in your job is pretty easy. Wear dark clothing, because it helps minimize how much the light will show you in the shot. Try to walk at a steady pace, so the lighting is relatively even, without “hotspots” (areas of overexposure). Hold the light over your head and above the car, because you’ll want the lighting streak as far out of your way as possible—it’ll make the next step much easier.
The Setup

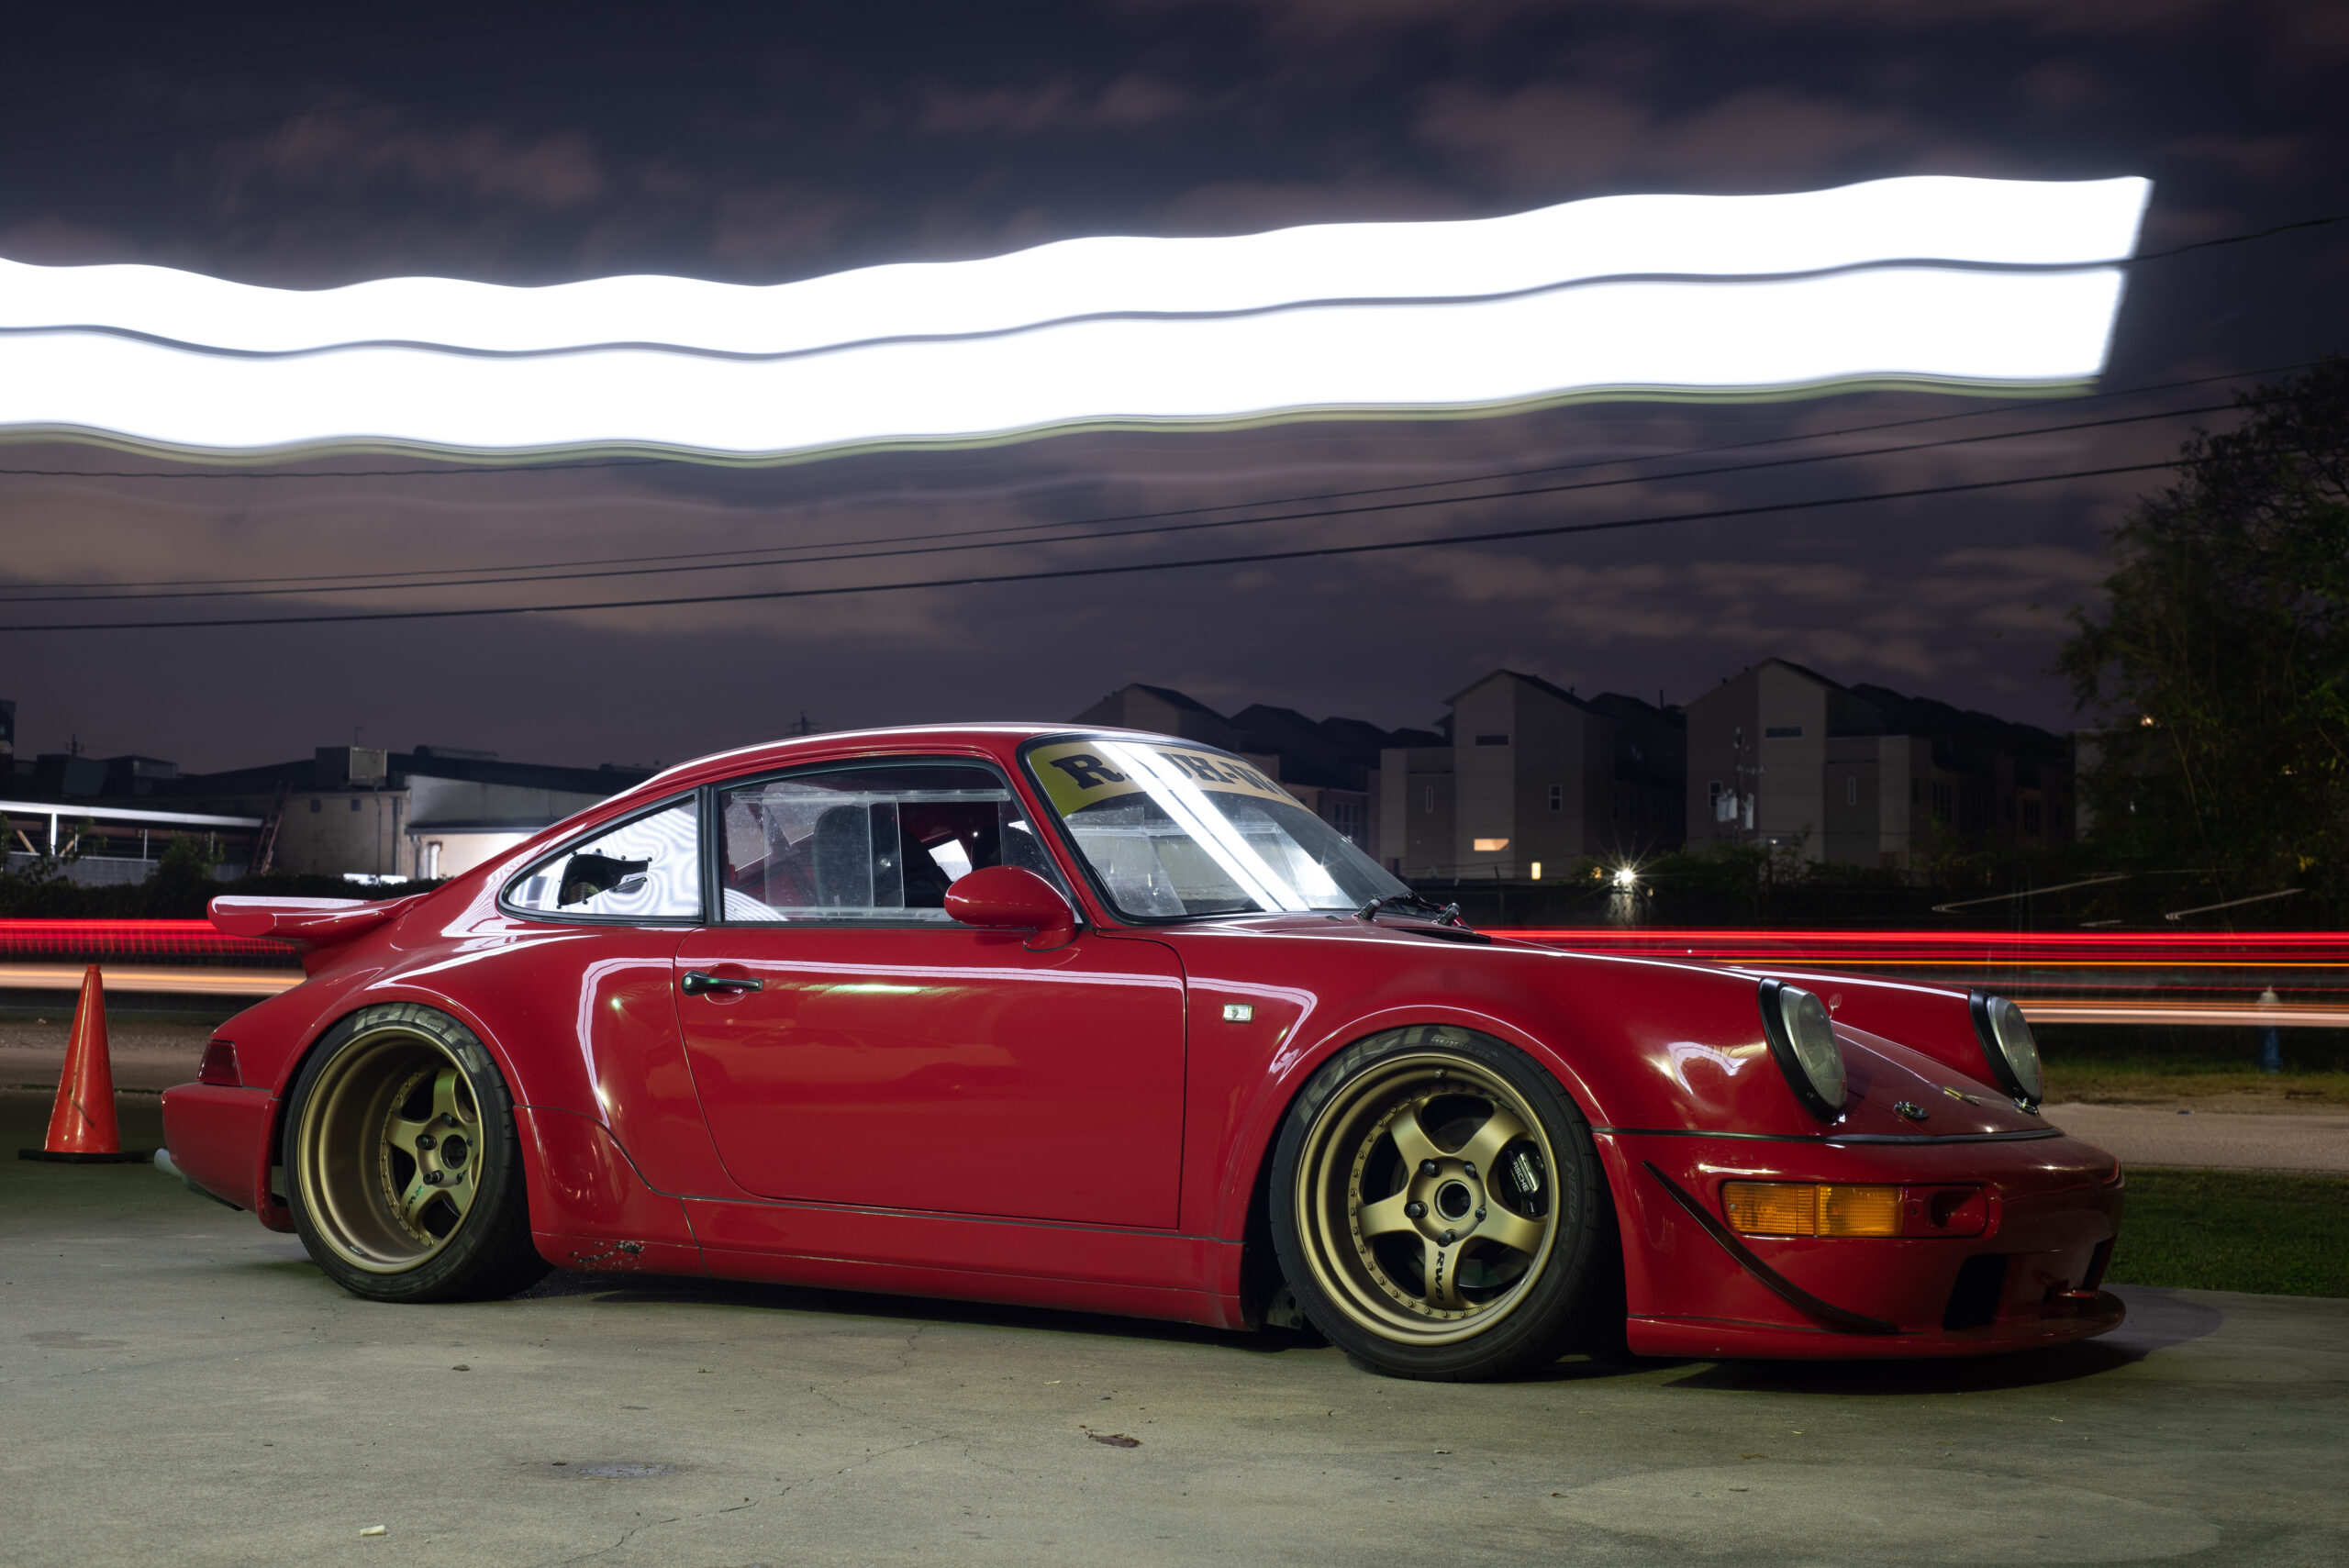
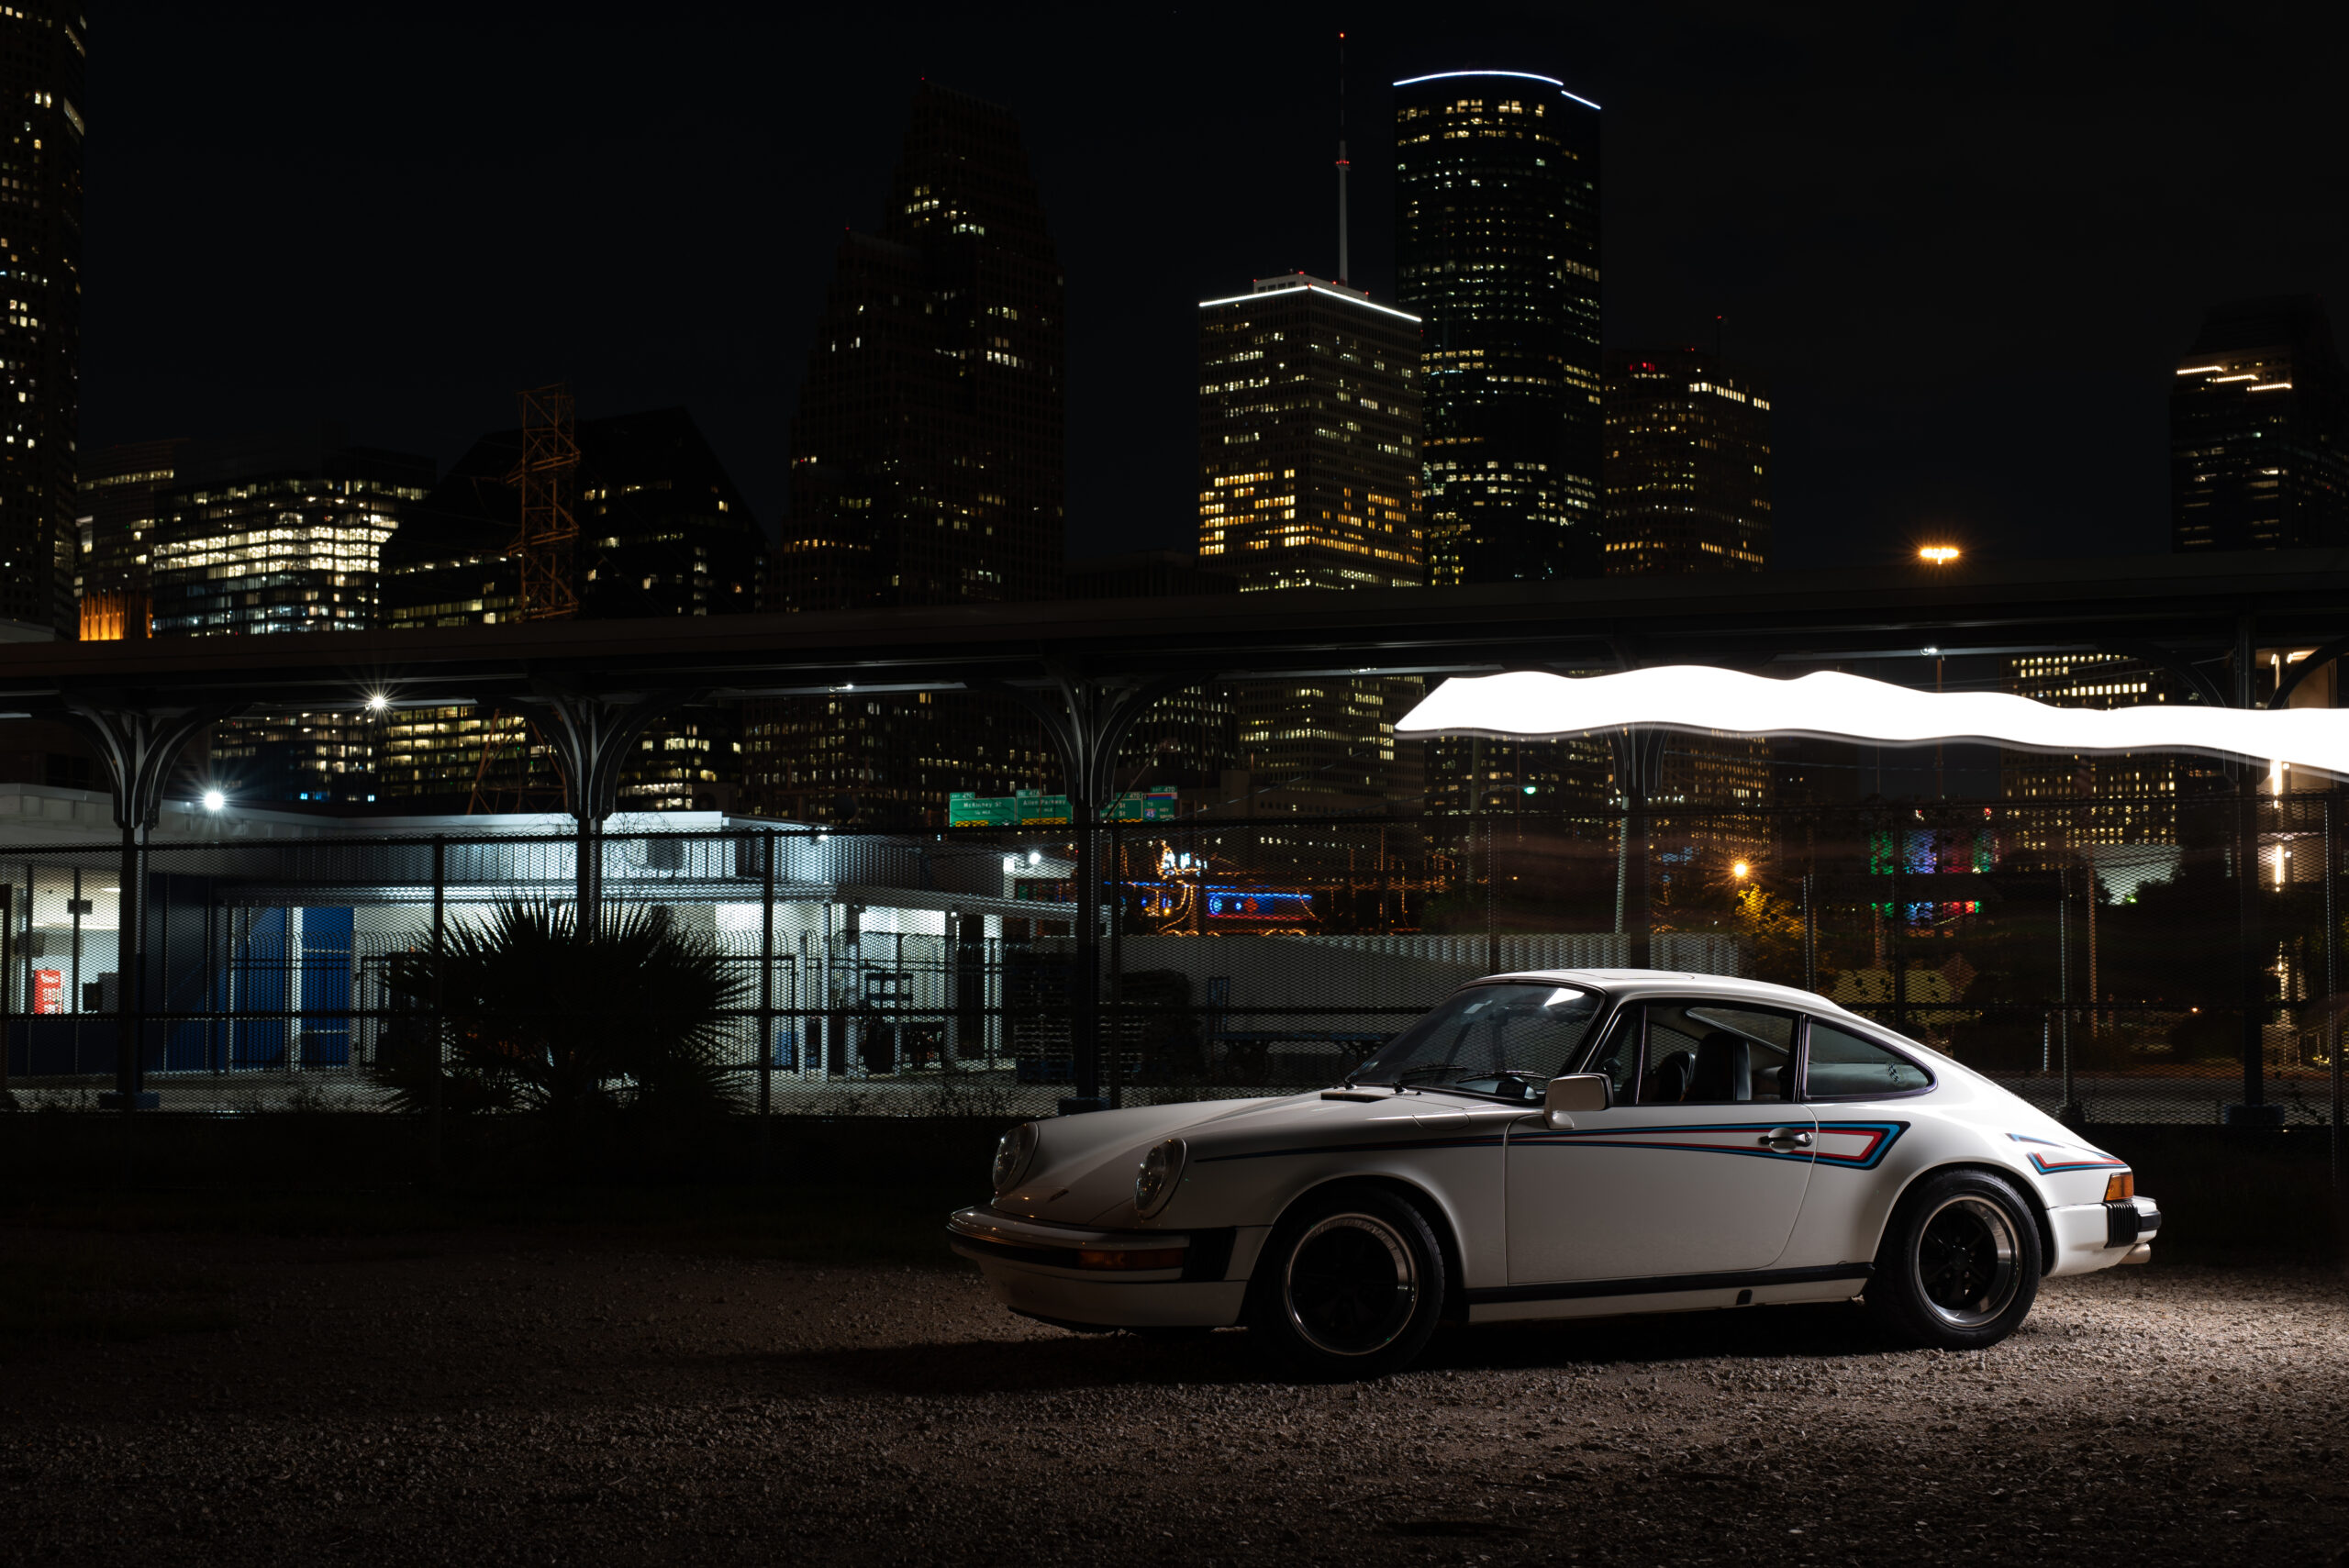
This shot above, of a RWB 964 911, is taken with the exact same method as the shot of the Civic and the Supra together (heck, I even used the same Ryobi workshop lamp for it). To get this mysterious lighting without streaks or an apparent source, however, we’ll need to take two photos and perform a little editing magic, but it won’t take much.
Victoria Scott
Victoria Scott
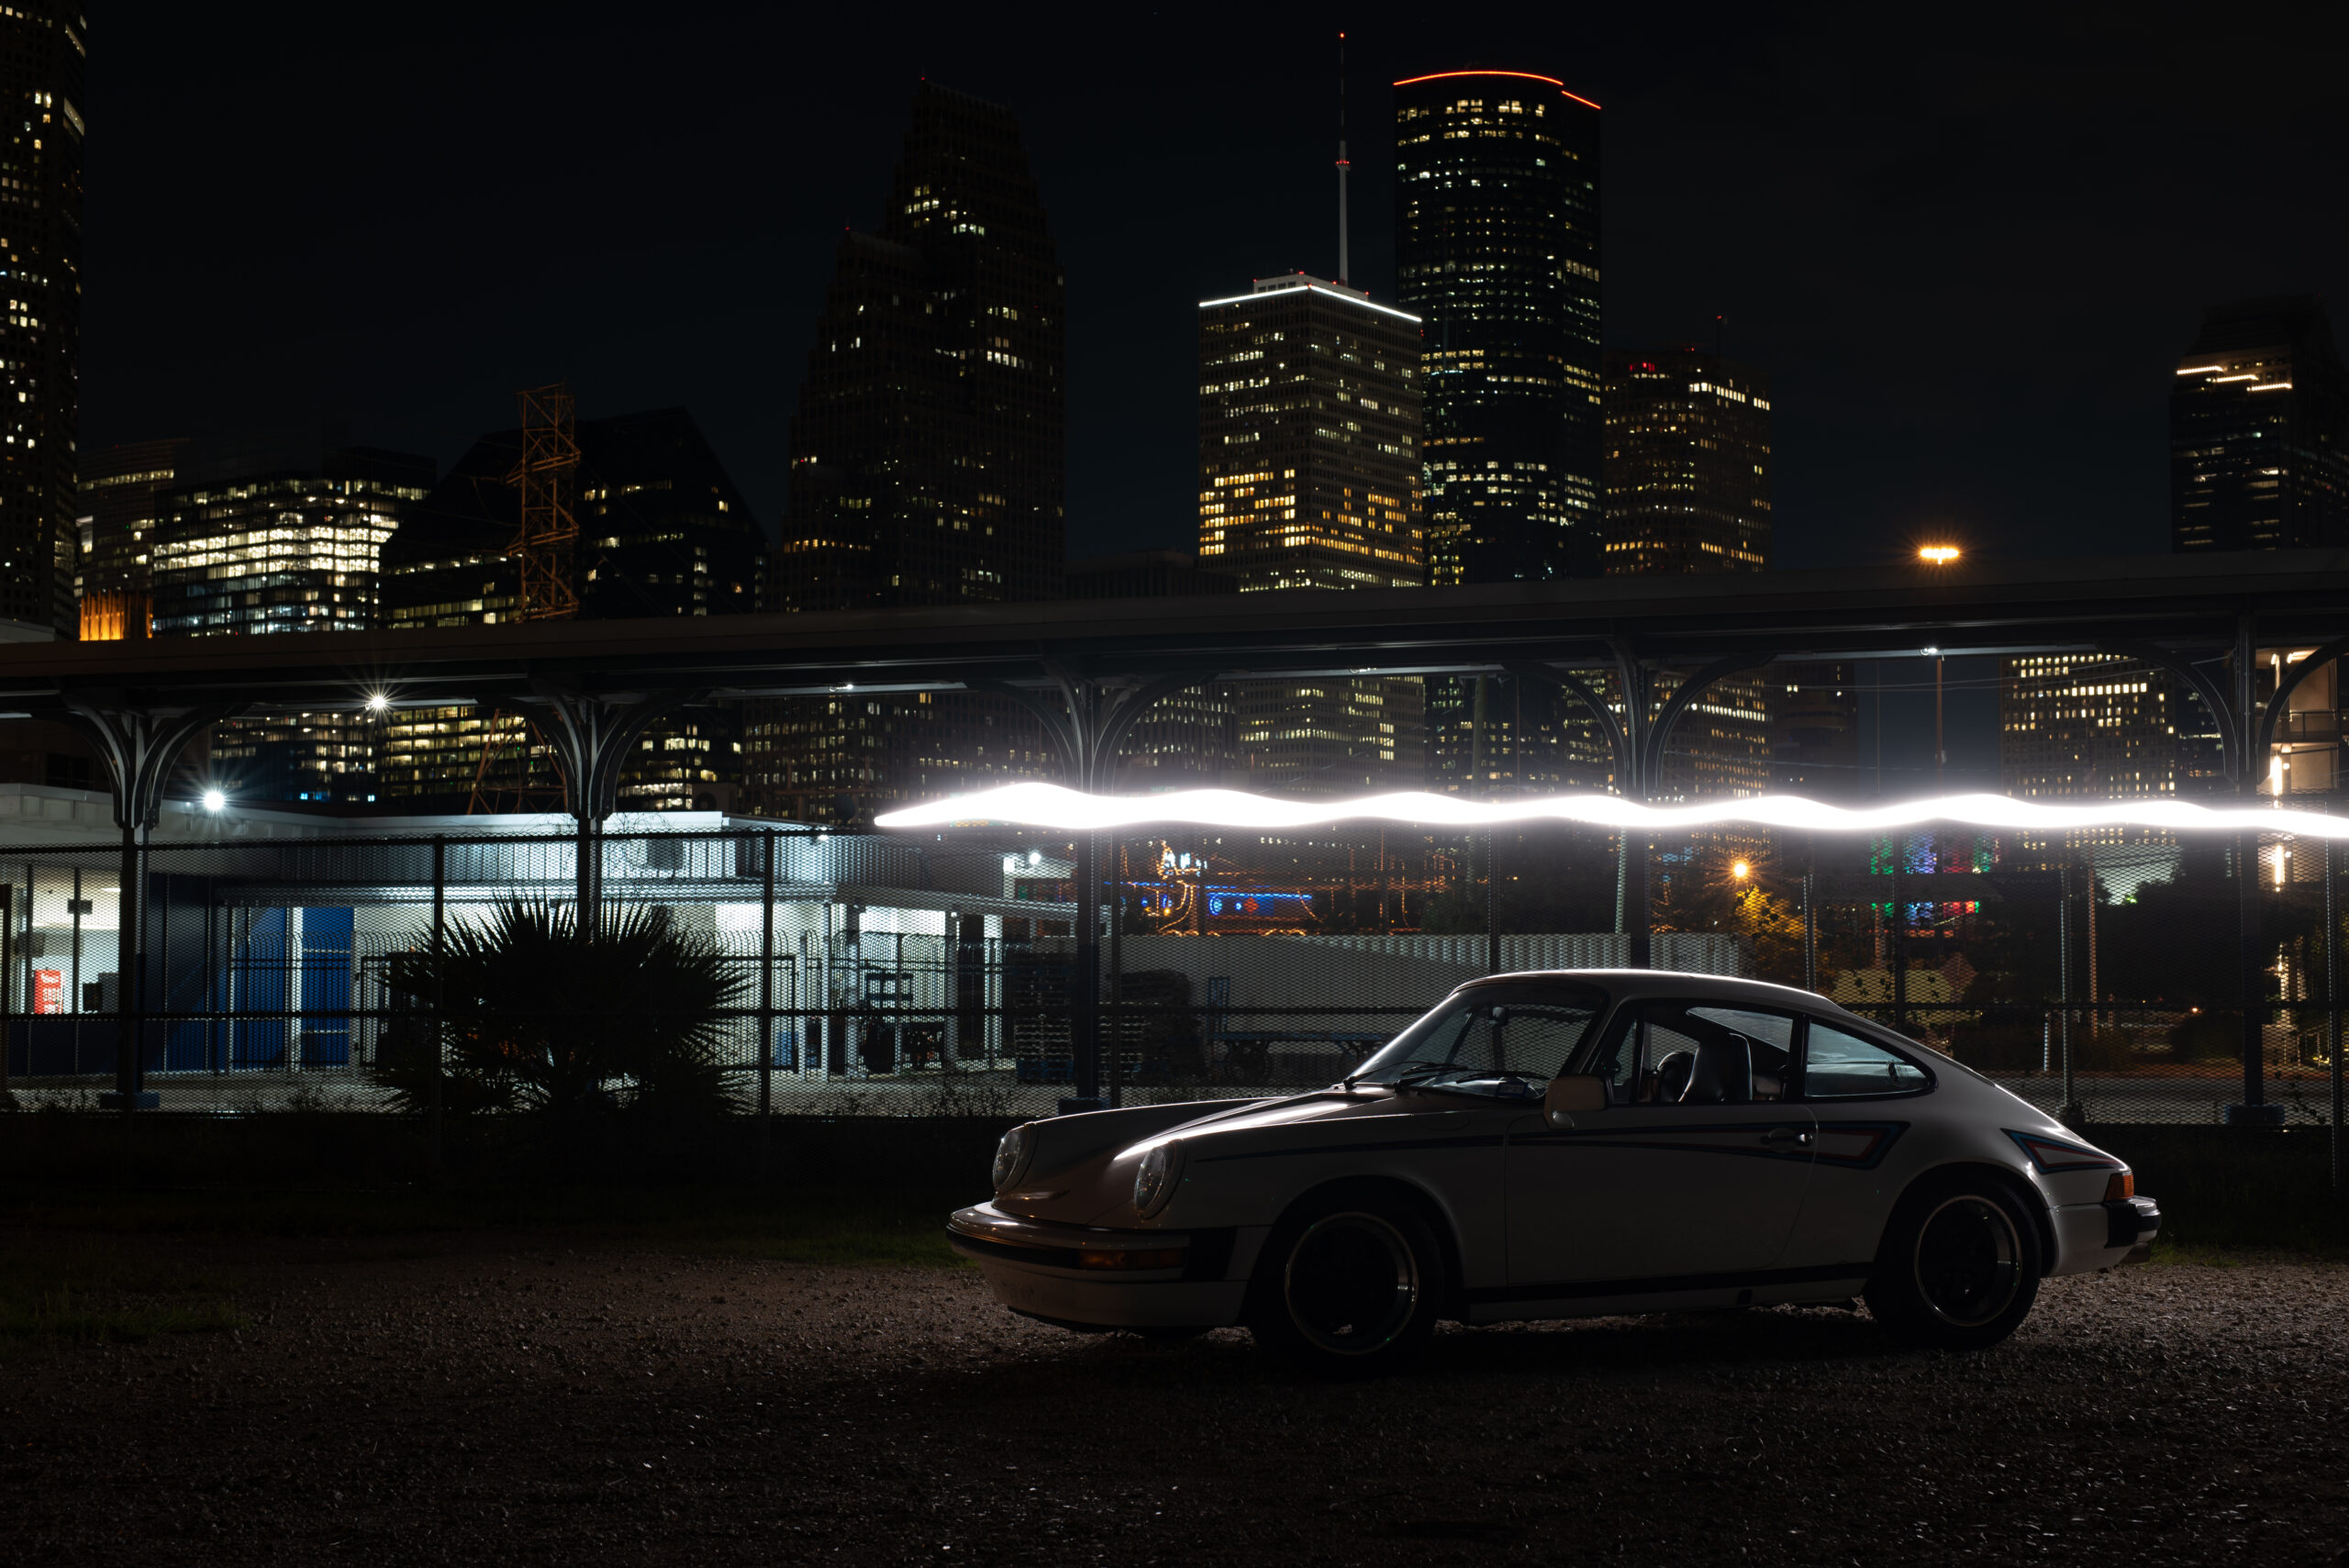
The final in-camera step to removing the light streaks from your picture is to simply take another shot. For the photo of the Porsche, I stitched it together from two photos: one where I walked around the car with my workshop lamp, and another where I just let the camera take a normally exposed photograph. The car is obviously too dark and lit poorly in the second photo, but that’s okay—the only part we need of that shot is the sky. Editing from here is relatively simple.

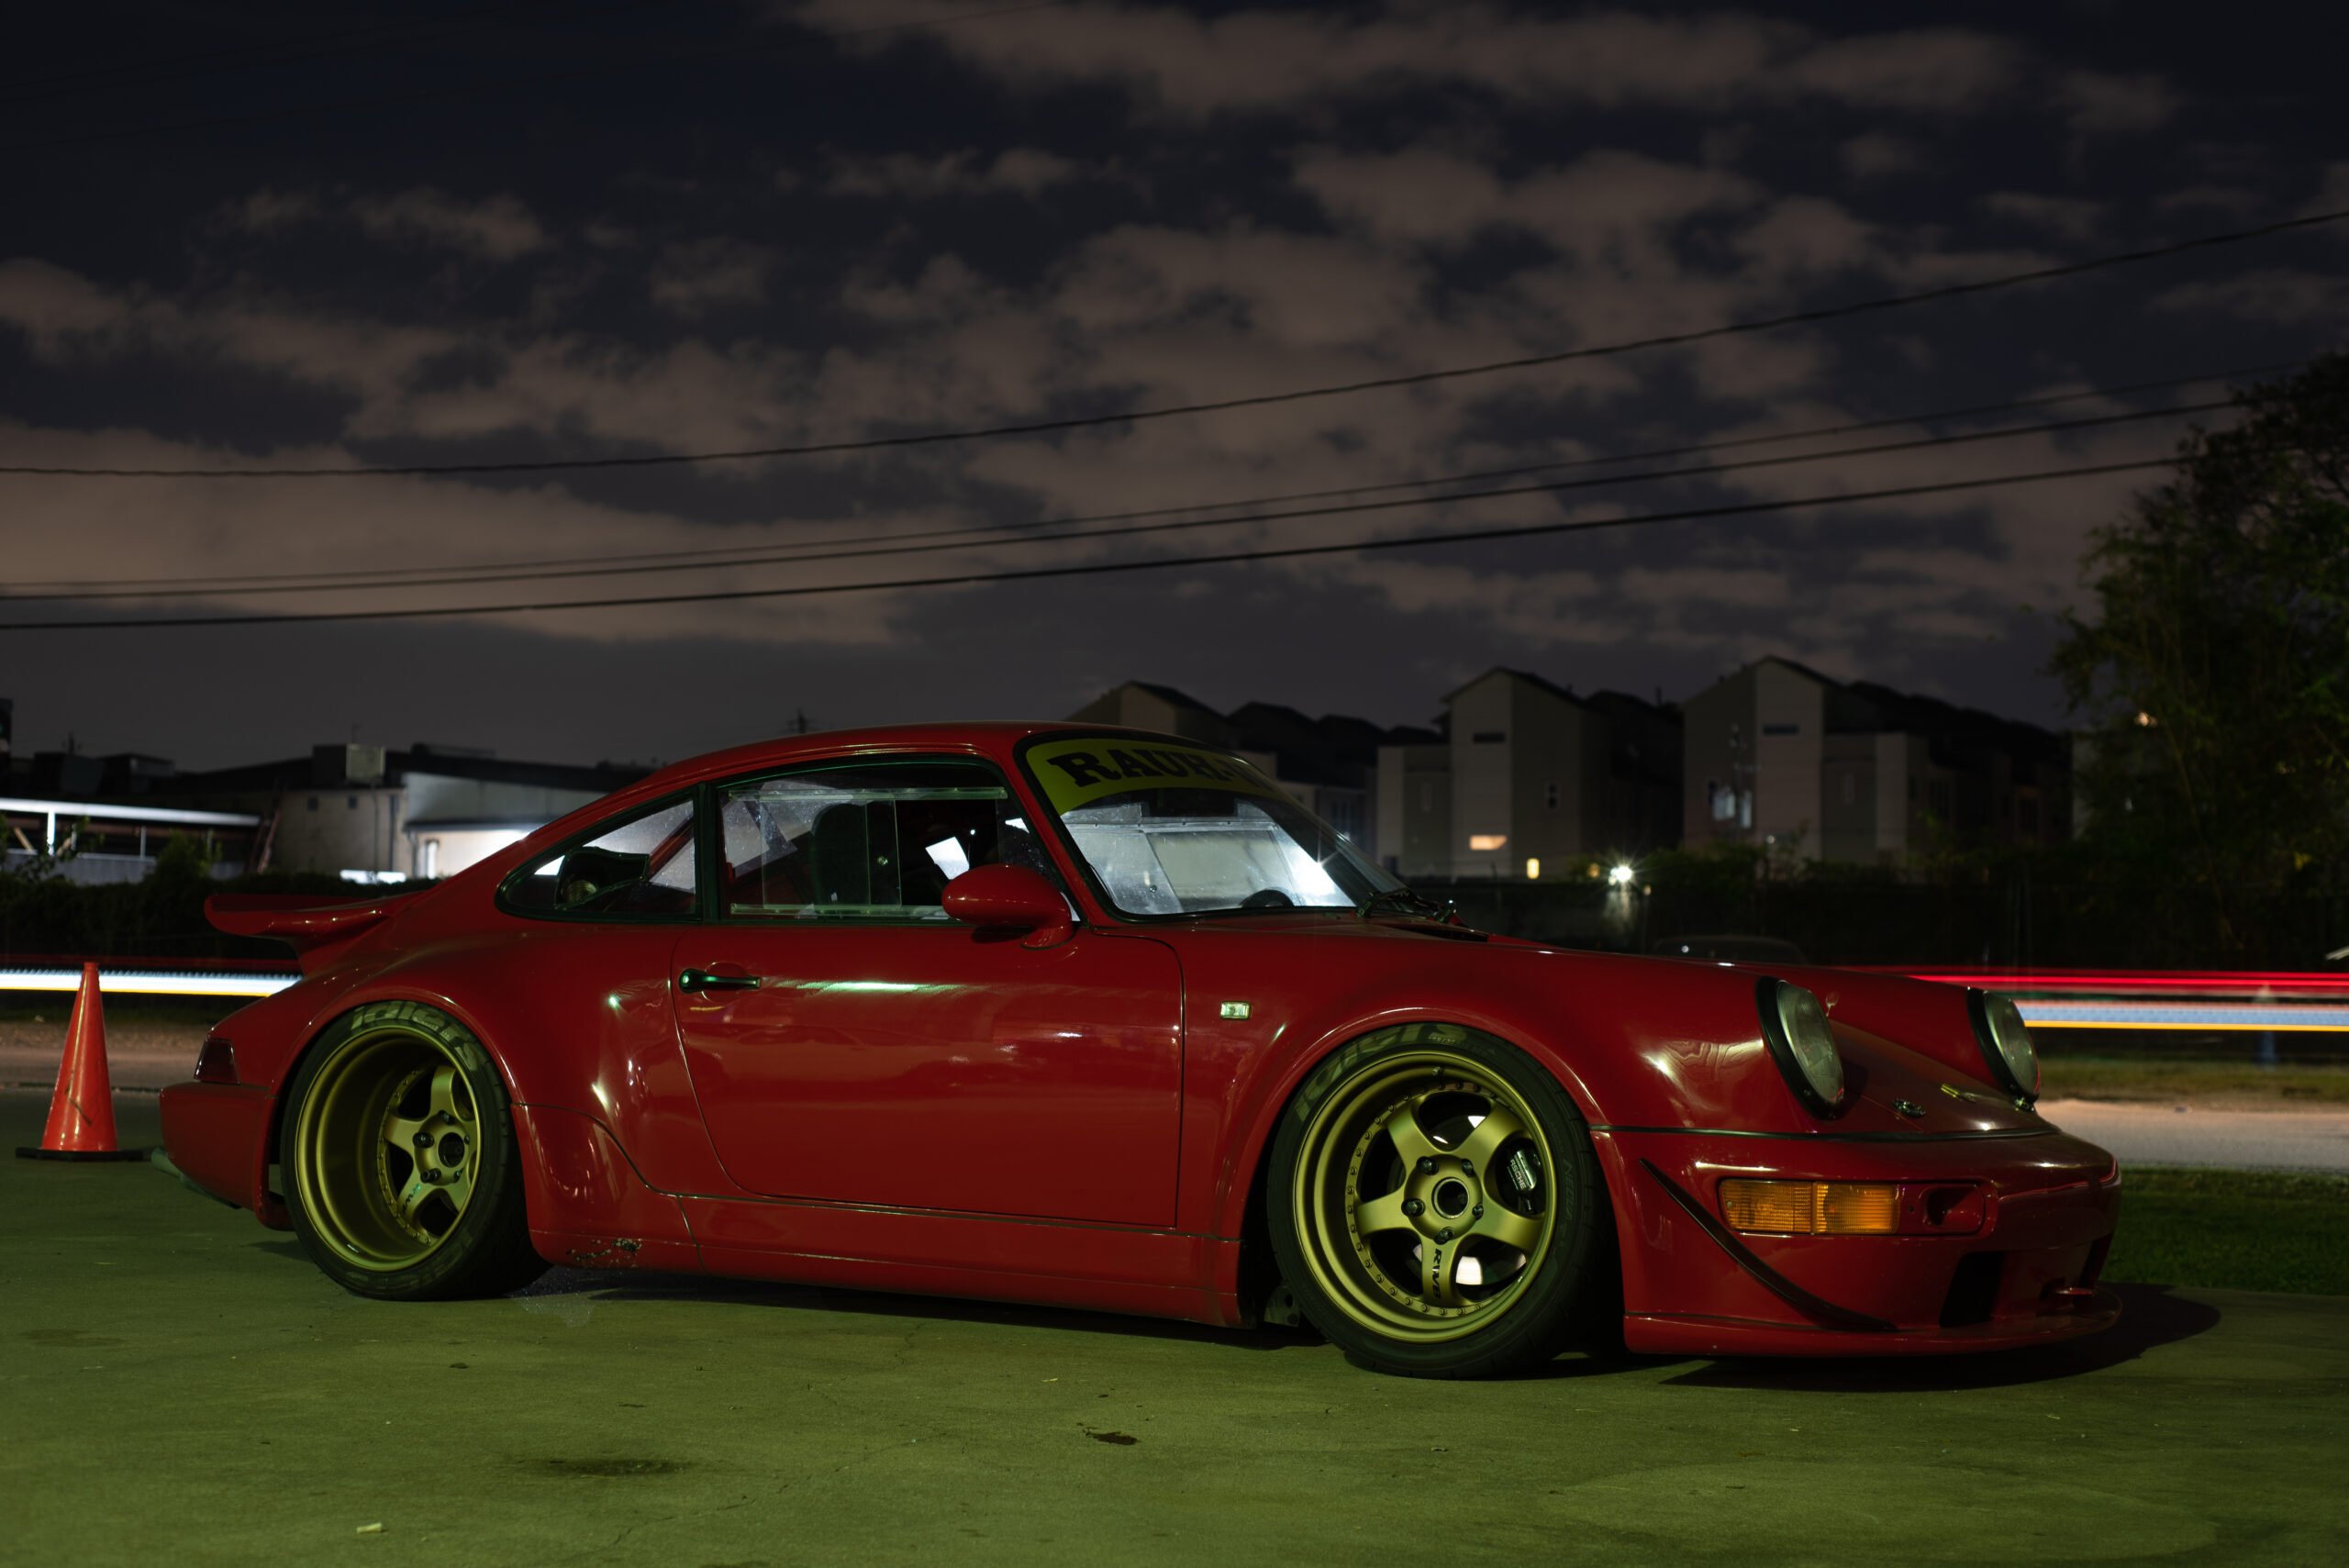
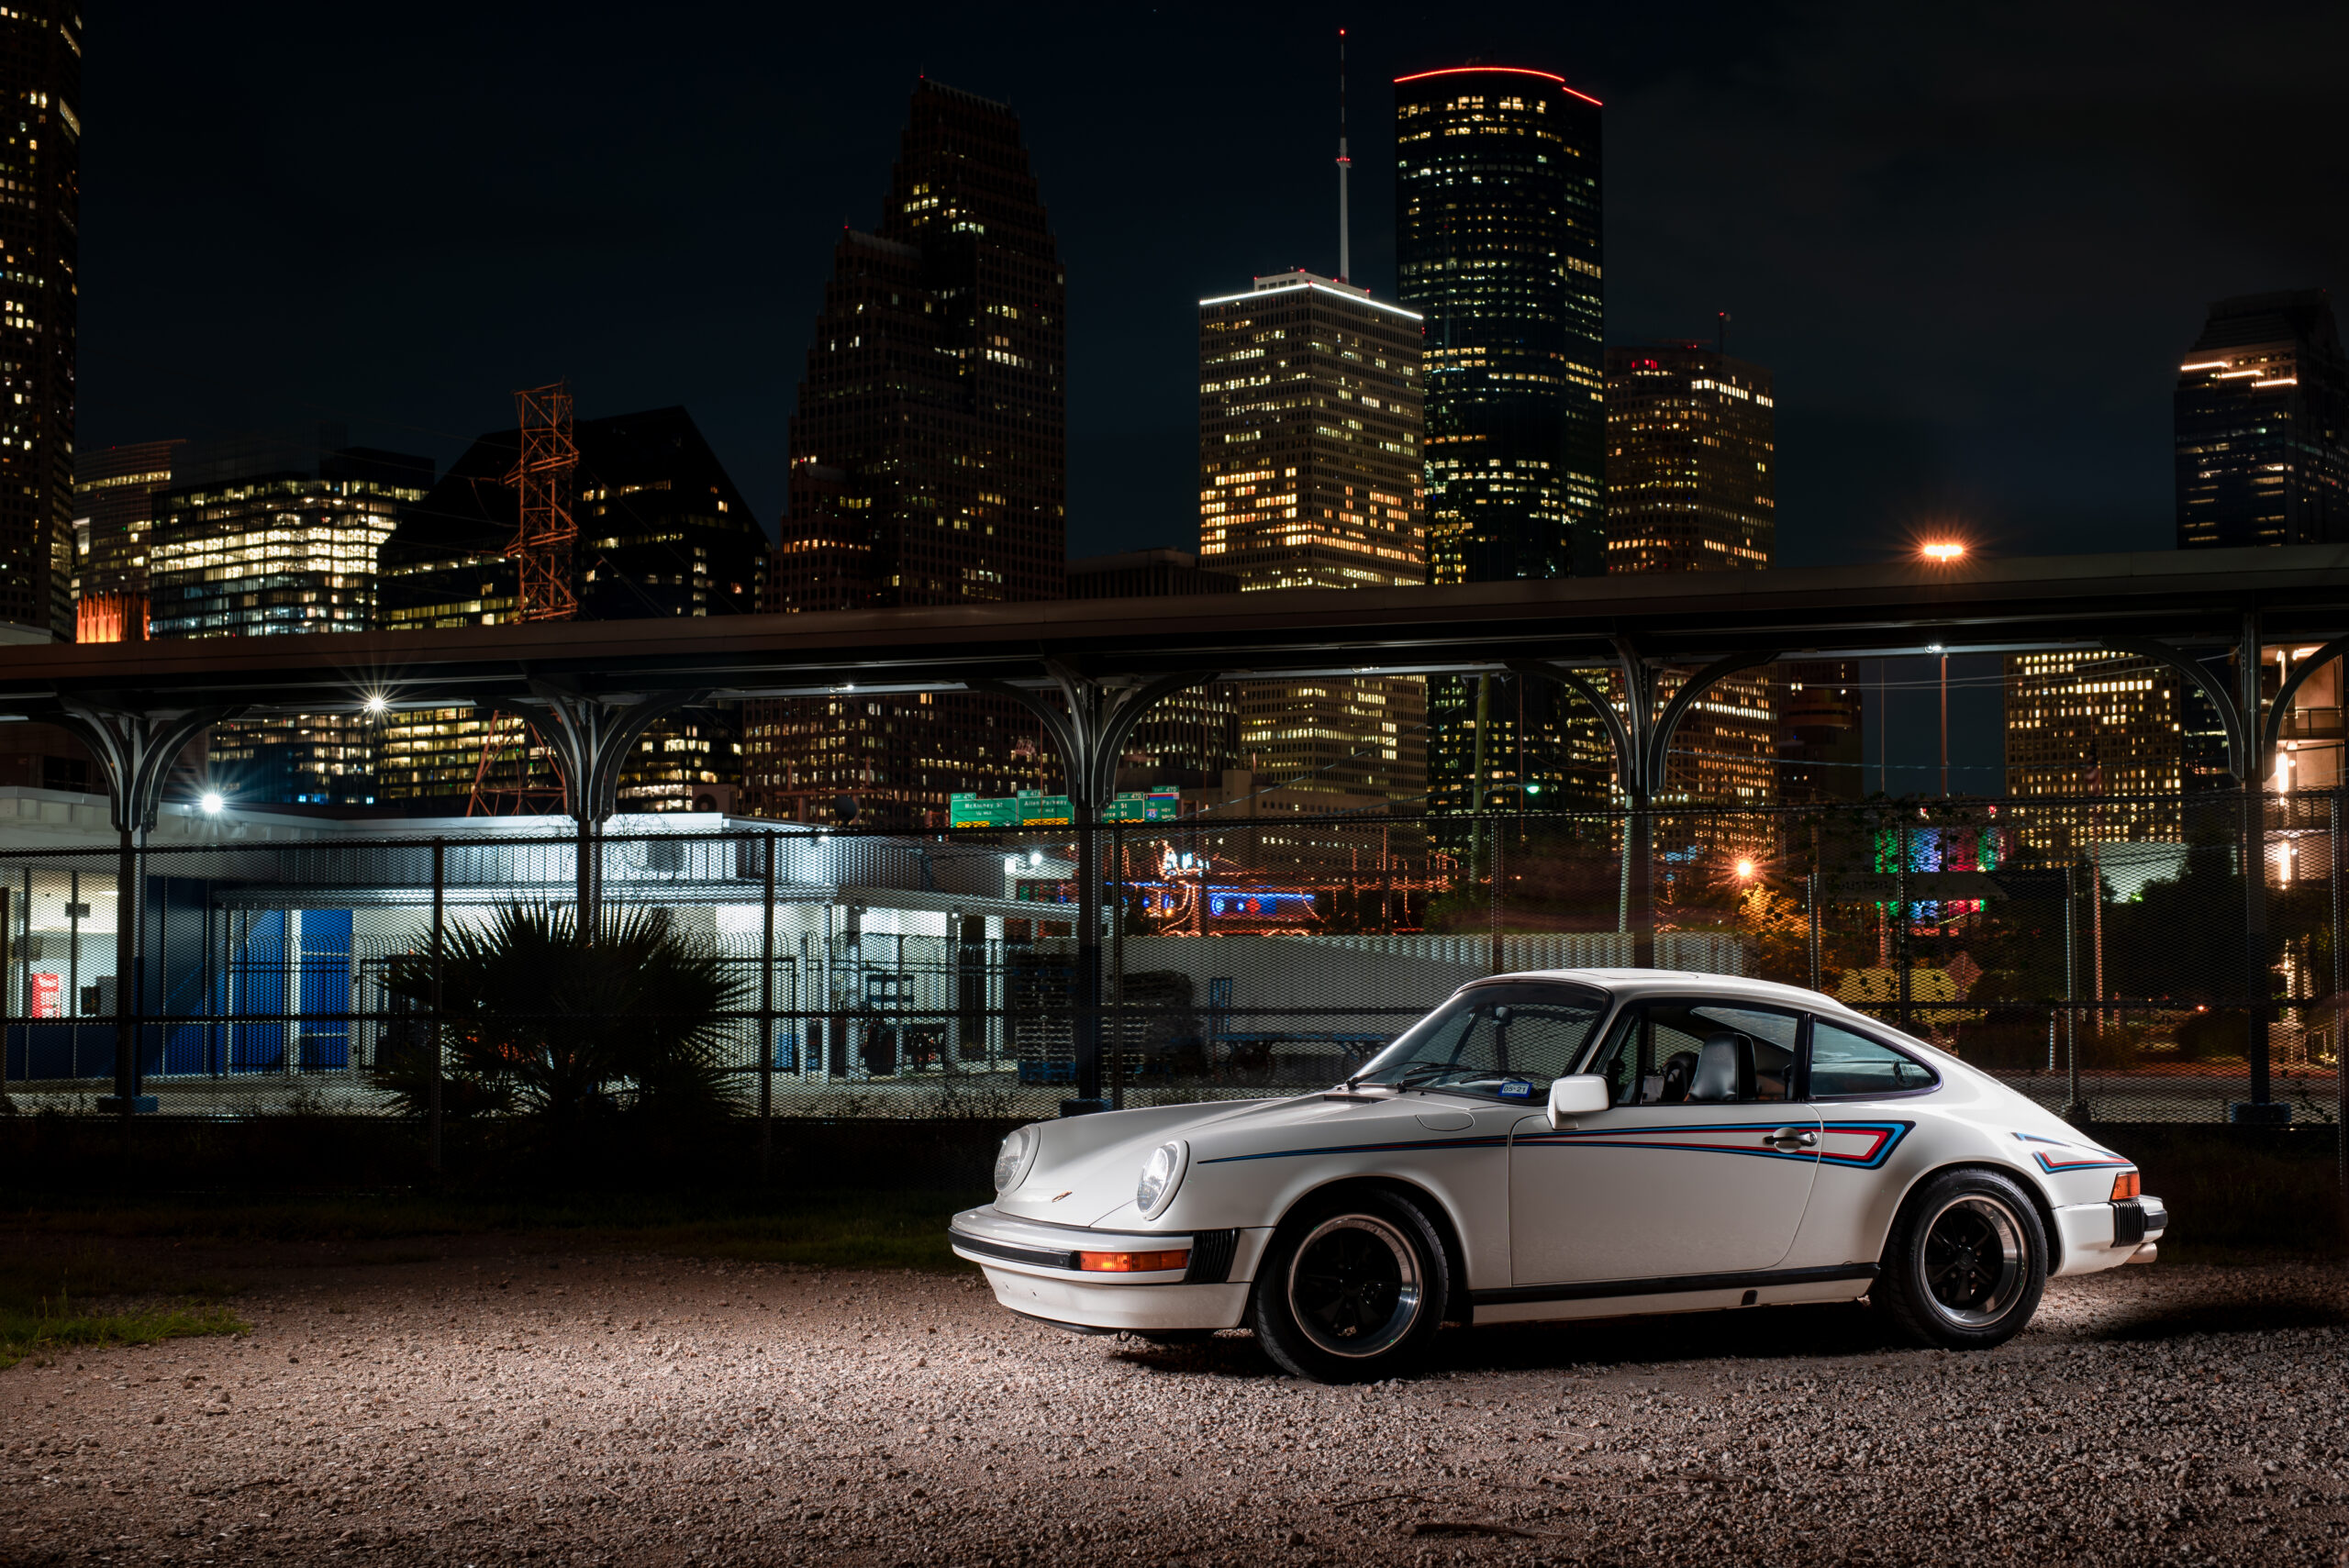
Take any layer-ready photo editing program and stack your lit shot on top of your background (unlit) shot. Keep in mind some fine adjustments to positioning might be needed if the tripod was moved at all in between the two shots; I put the top layer to 30% opacity and make sure I line up details, such as the bolts on the two-piece wheels, absolutely perfectly. Once your shots are lined up, use an eraser or selection tool, and remove the sky and the light trails from the shot. Save your final shot in a full-data format (such as TIFF) and then make any final edits to the stacked shot, and congratulations, you’ve light-painted a perfect shot!
Getting Even Fancier With It
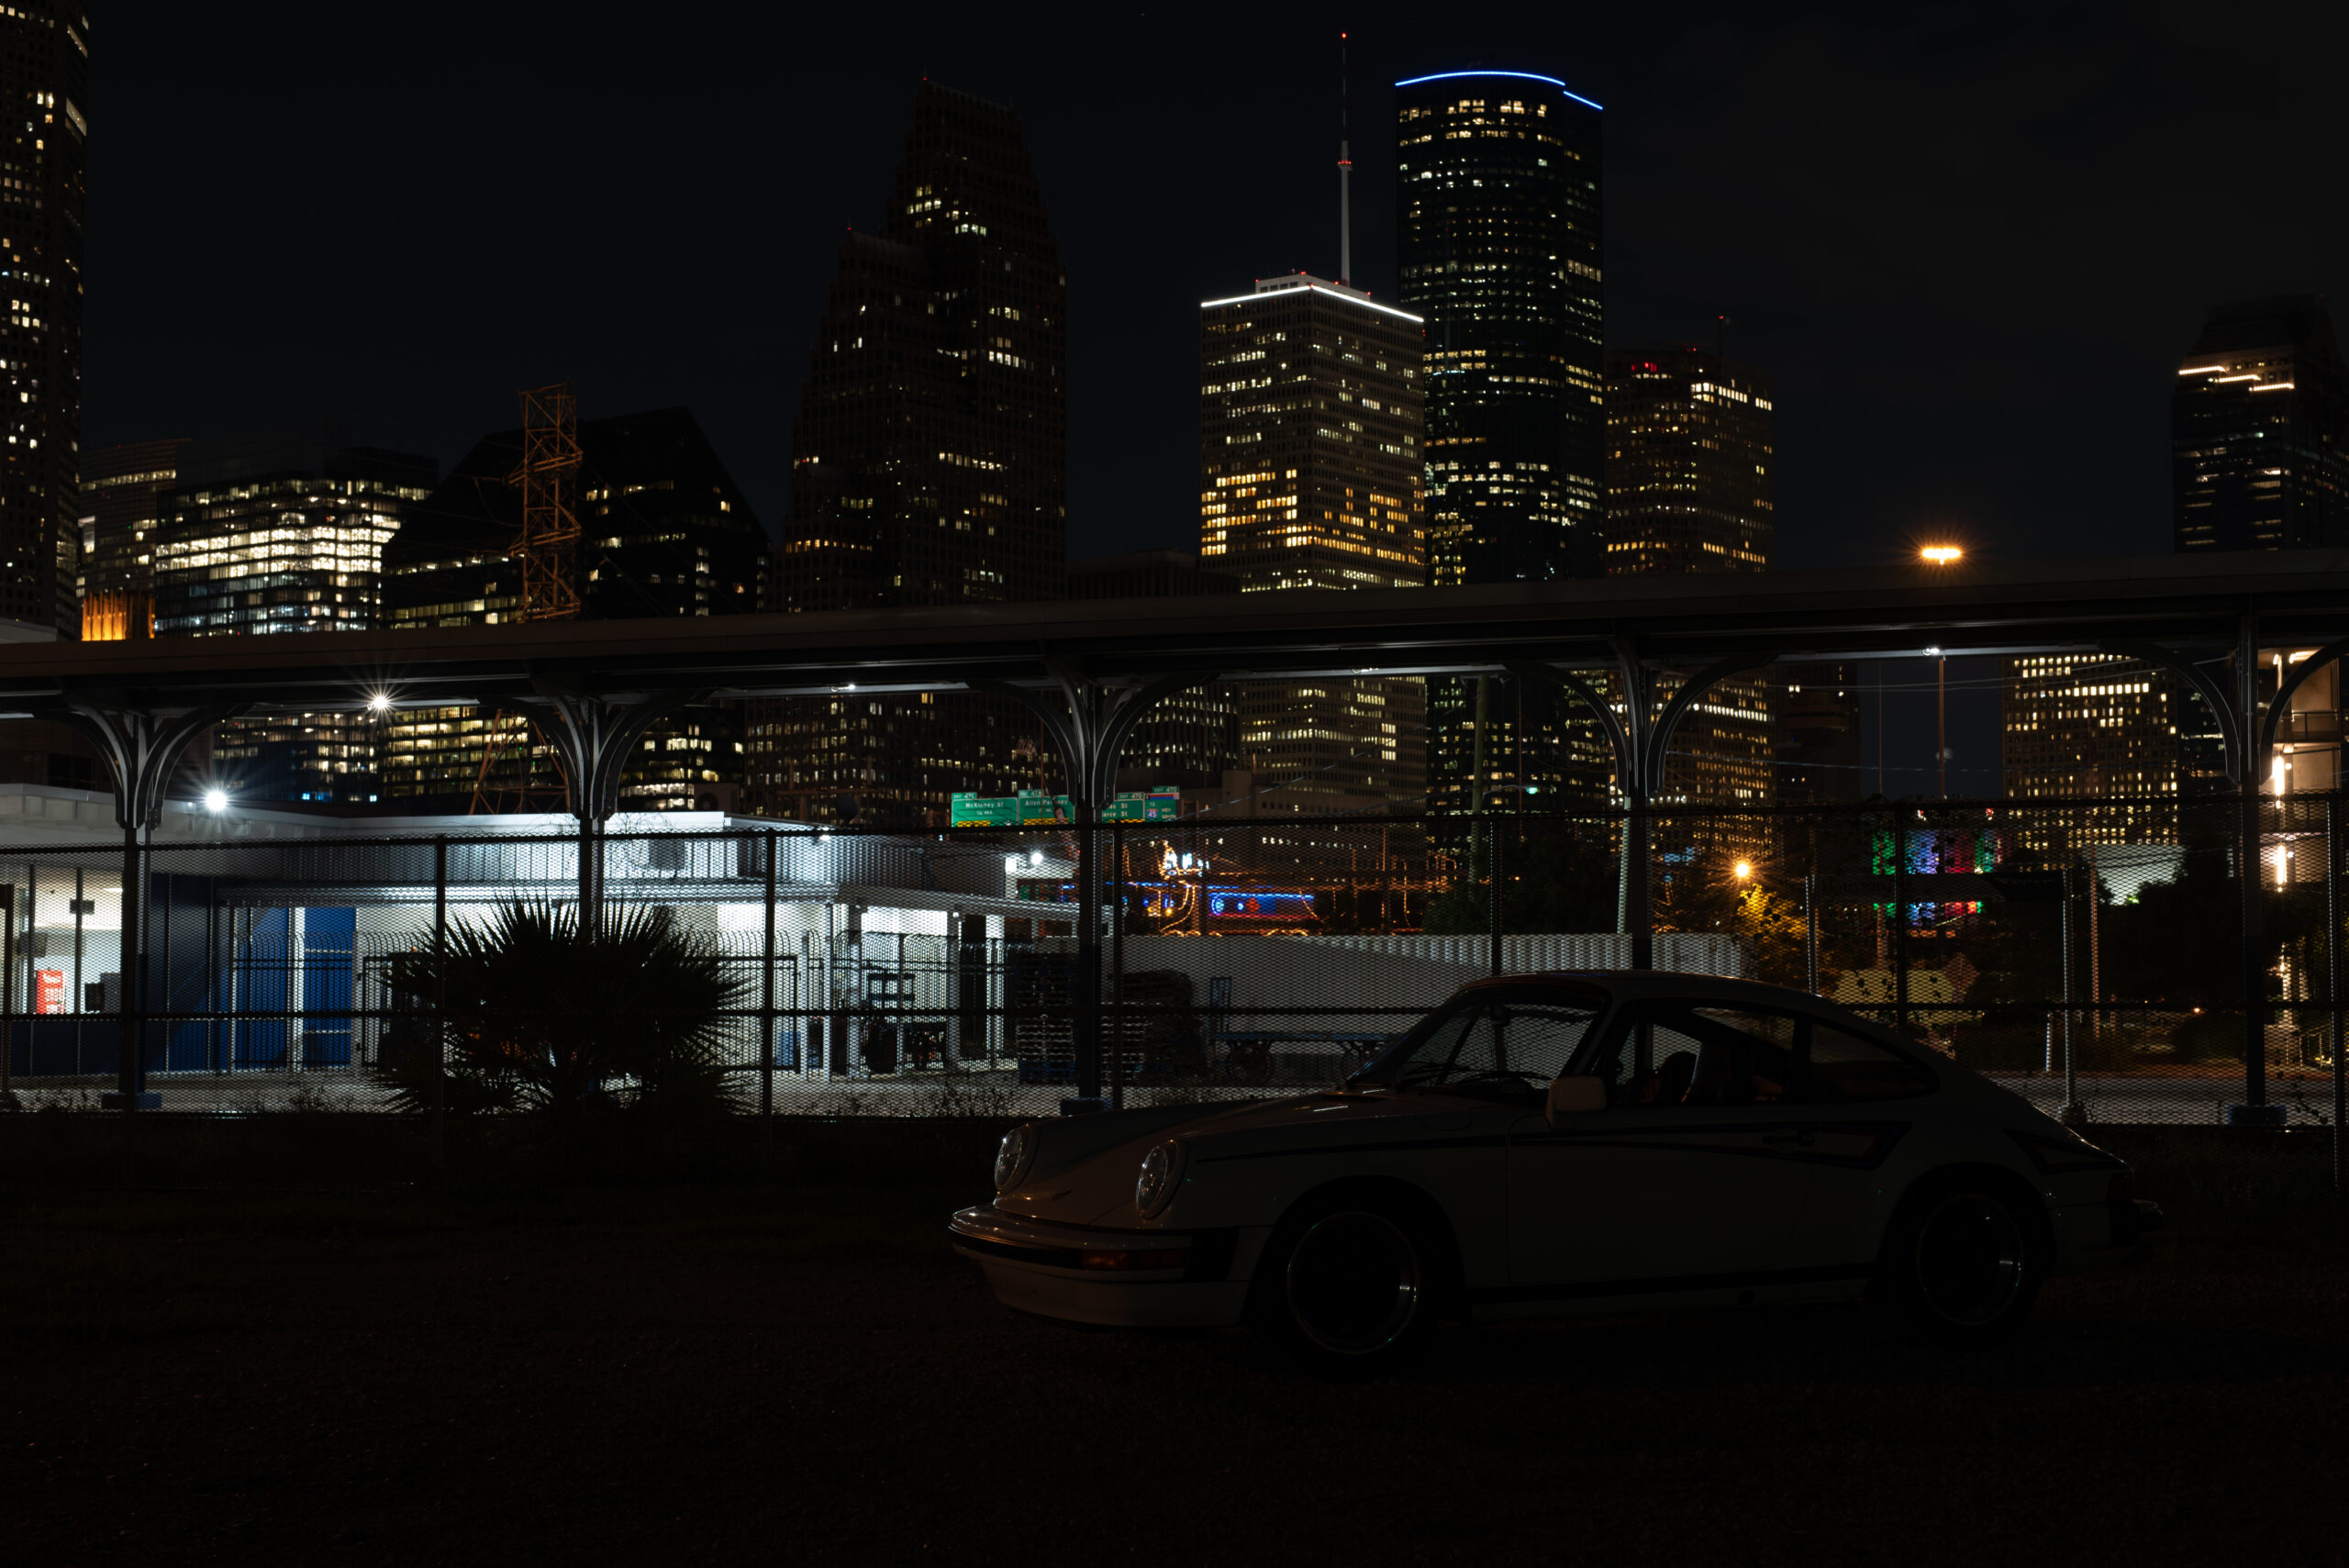
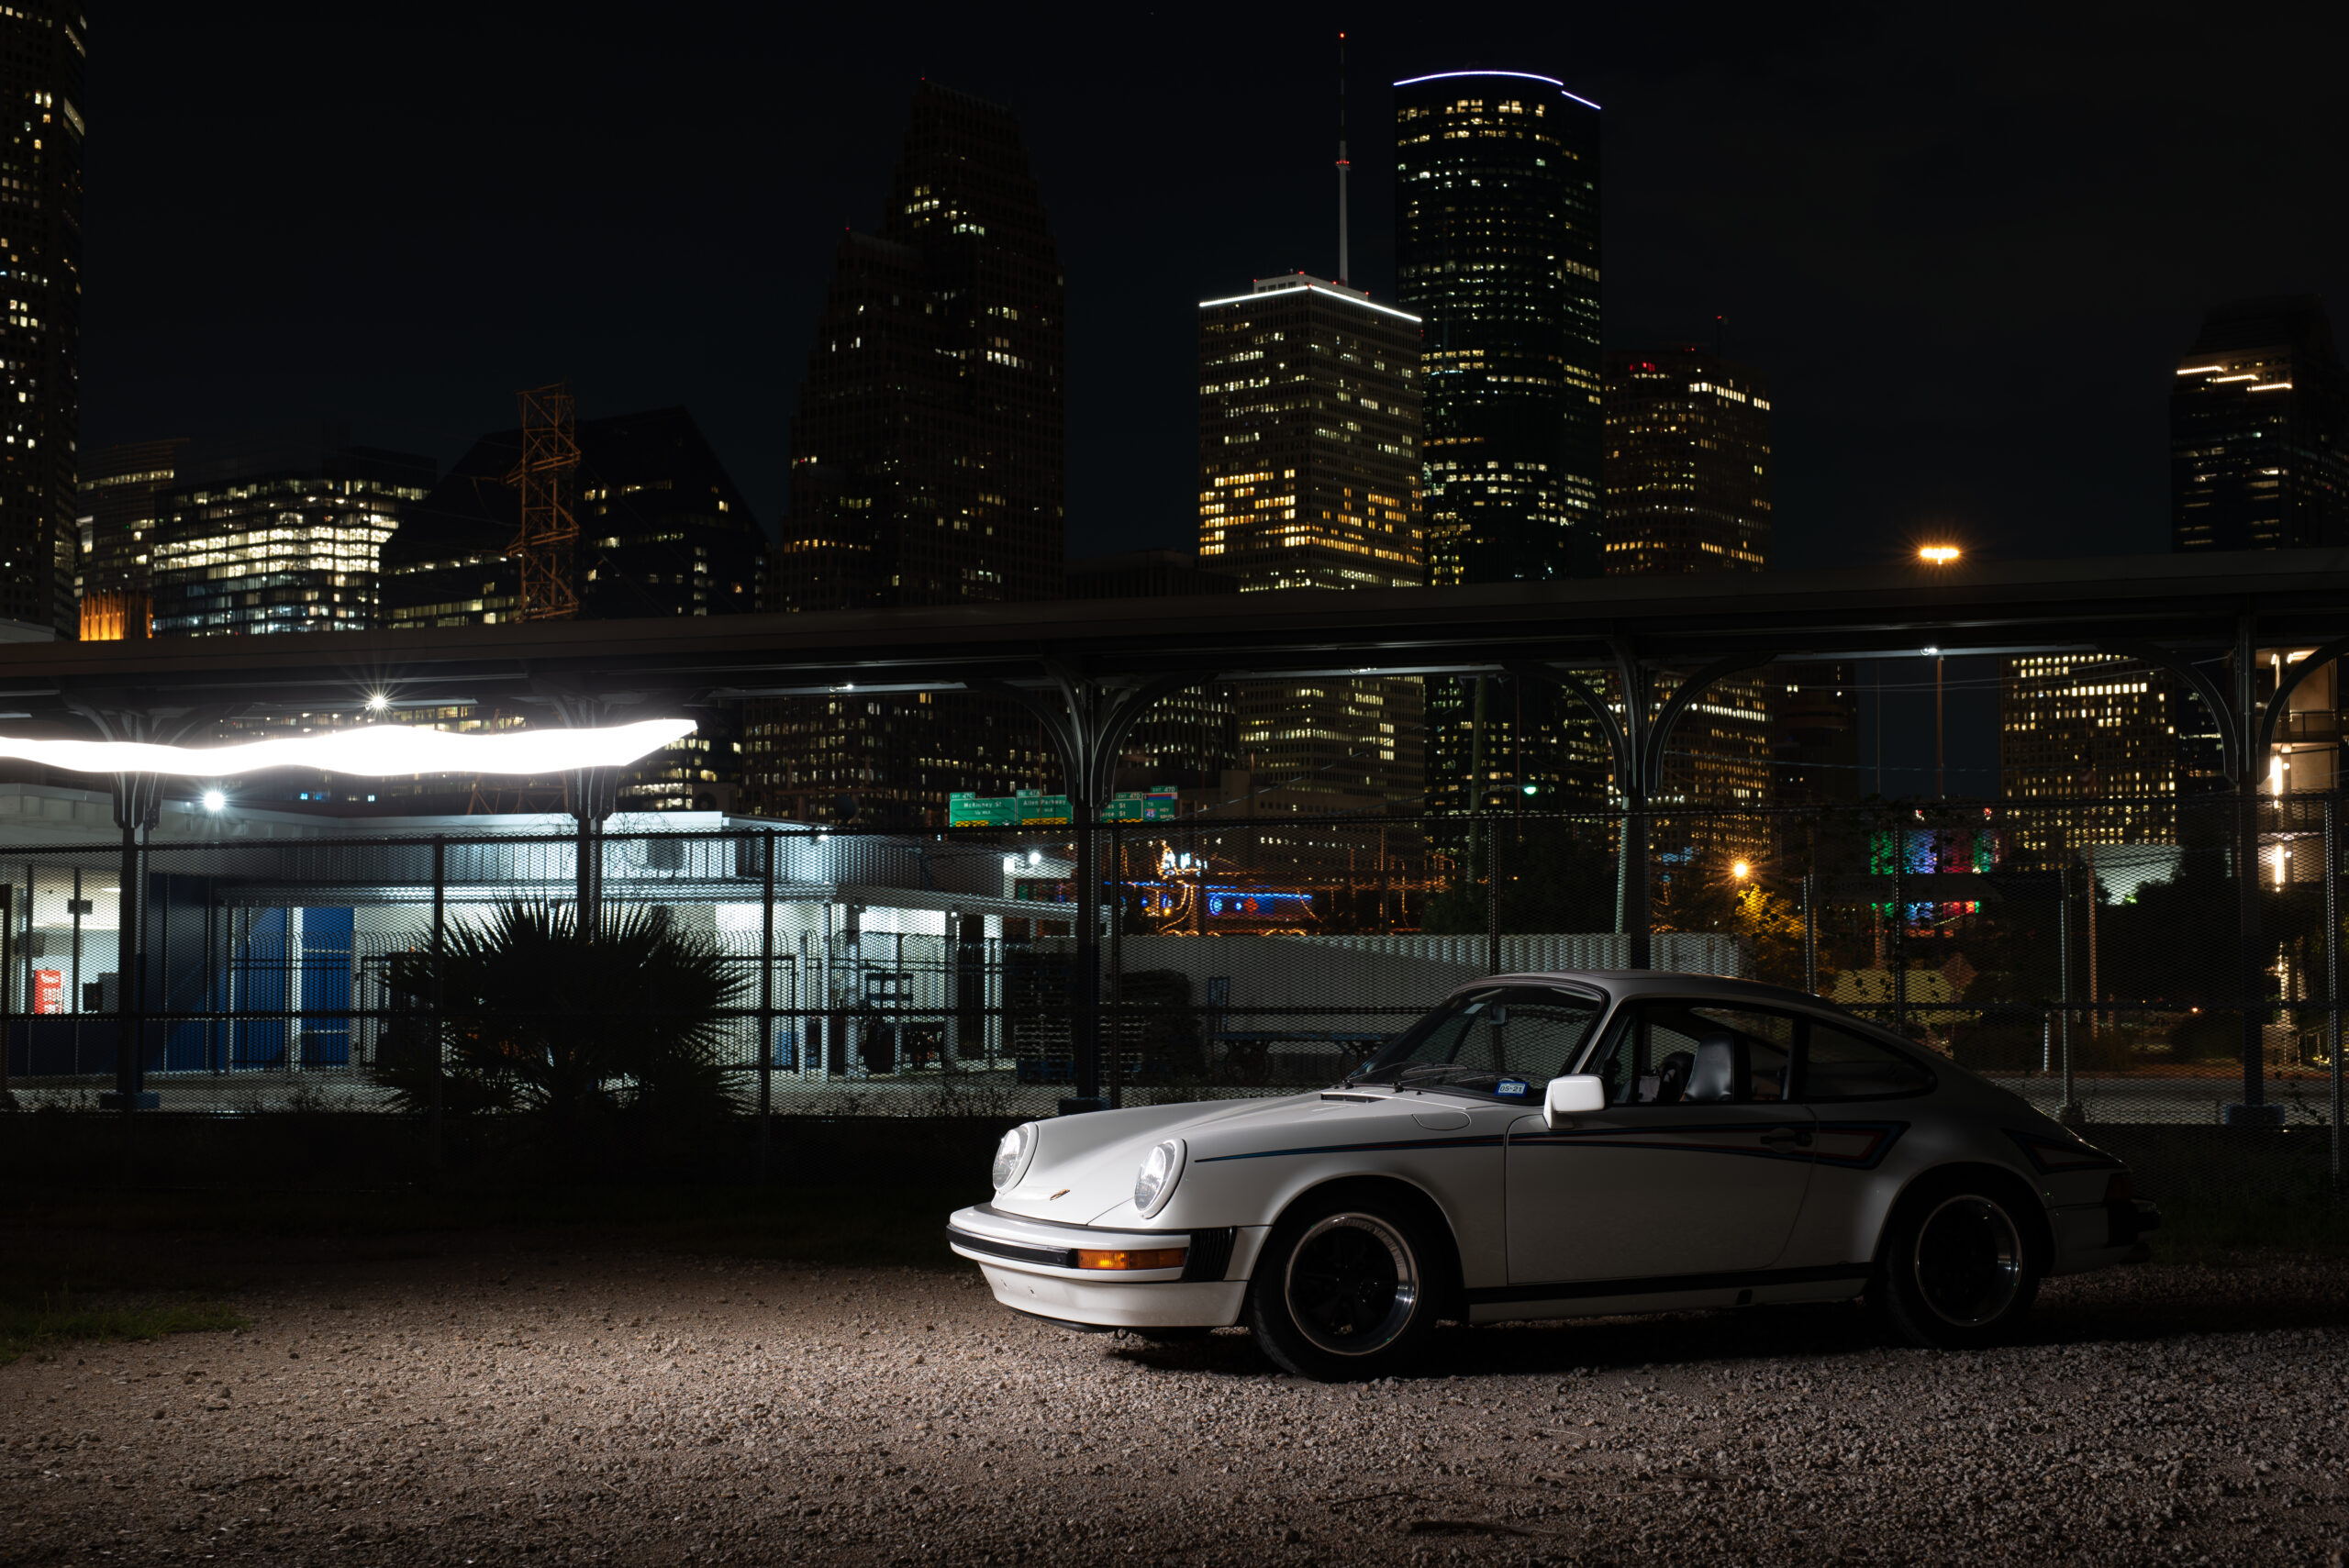
Once you have the basic ideas of light-painting down, you can get more intense with your stylistic choices. For this shot of a Porsche 911, I used more than one shot, and selectively erased the sections of each photo that I wanted to use for each segment of lighting. I could have tried to get this look in a single shot, but I wanted to move around the depth of the lighting source so I could get different reflections on the car. For example, in shots one and two, I walked past the car with the light directly held over the car; in shot three, I walked about 15 feet behind the car so I could get the more dramatic reflections on the fenders and glass of the car. It requires careful erasing of strategic sections of the car to seamlessly blend the shot like the final product, but the results can be incredible. The only real limit is how much time you want to spend in editing, because once the camera is set up on its tripod, taking extra shots and walking around for a few more photos only takes an extra minute or two.
No matter how simple or complicated you want to make your shot, light painting is a fun and inexpensive way to get incredible, studio-esque lighting with just a little planning and effort. Just remember to watch your step when you walk around in the dark to the light the car, and as always, happy shooting!
Got a tip? Send us a note: tips@thedrive.com