We may earn revenue from the products available on this page and participate in affiliate programs. Learn more ›
I’ve spent the last six months waging war against rust that plagued my beloved 1969 Dodge Charger. Between the triumphs of patching the roof, rebuilding the unibody, fixing up the doors, and squaring up the fenders, I’ve had my share of tribulations. I’ve been on fire, had metal embedded in my eyes, and ran myself to the ground on more than one occasion. Saying I’ve put my blood, sweat, and tears into this project is anything but a metaphor.
Now that the end is finally in sight, I am getting the sense that it’s all been worth it.

We last left off with a hefty undertaking to handle before we could give this classic warhorse a new hue. It was the kind of work that would take me out of my comfort zone and push me to my limits one last time.

Project Outline
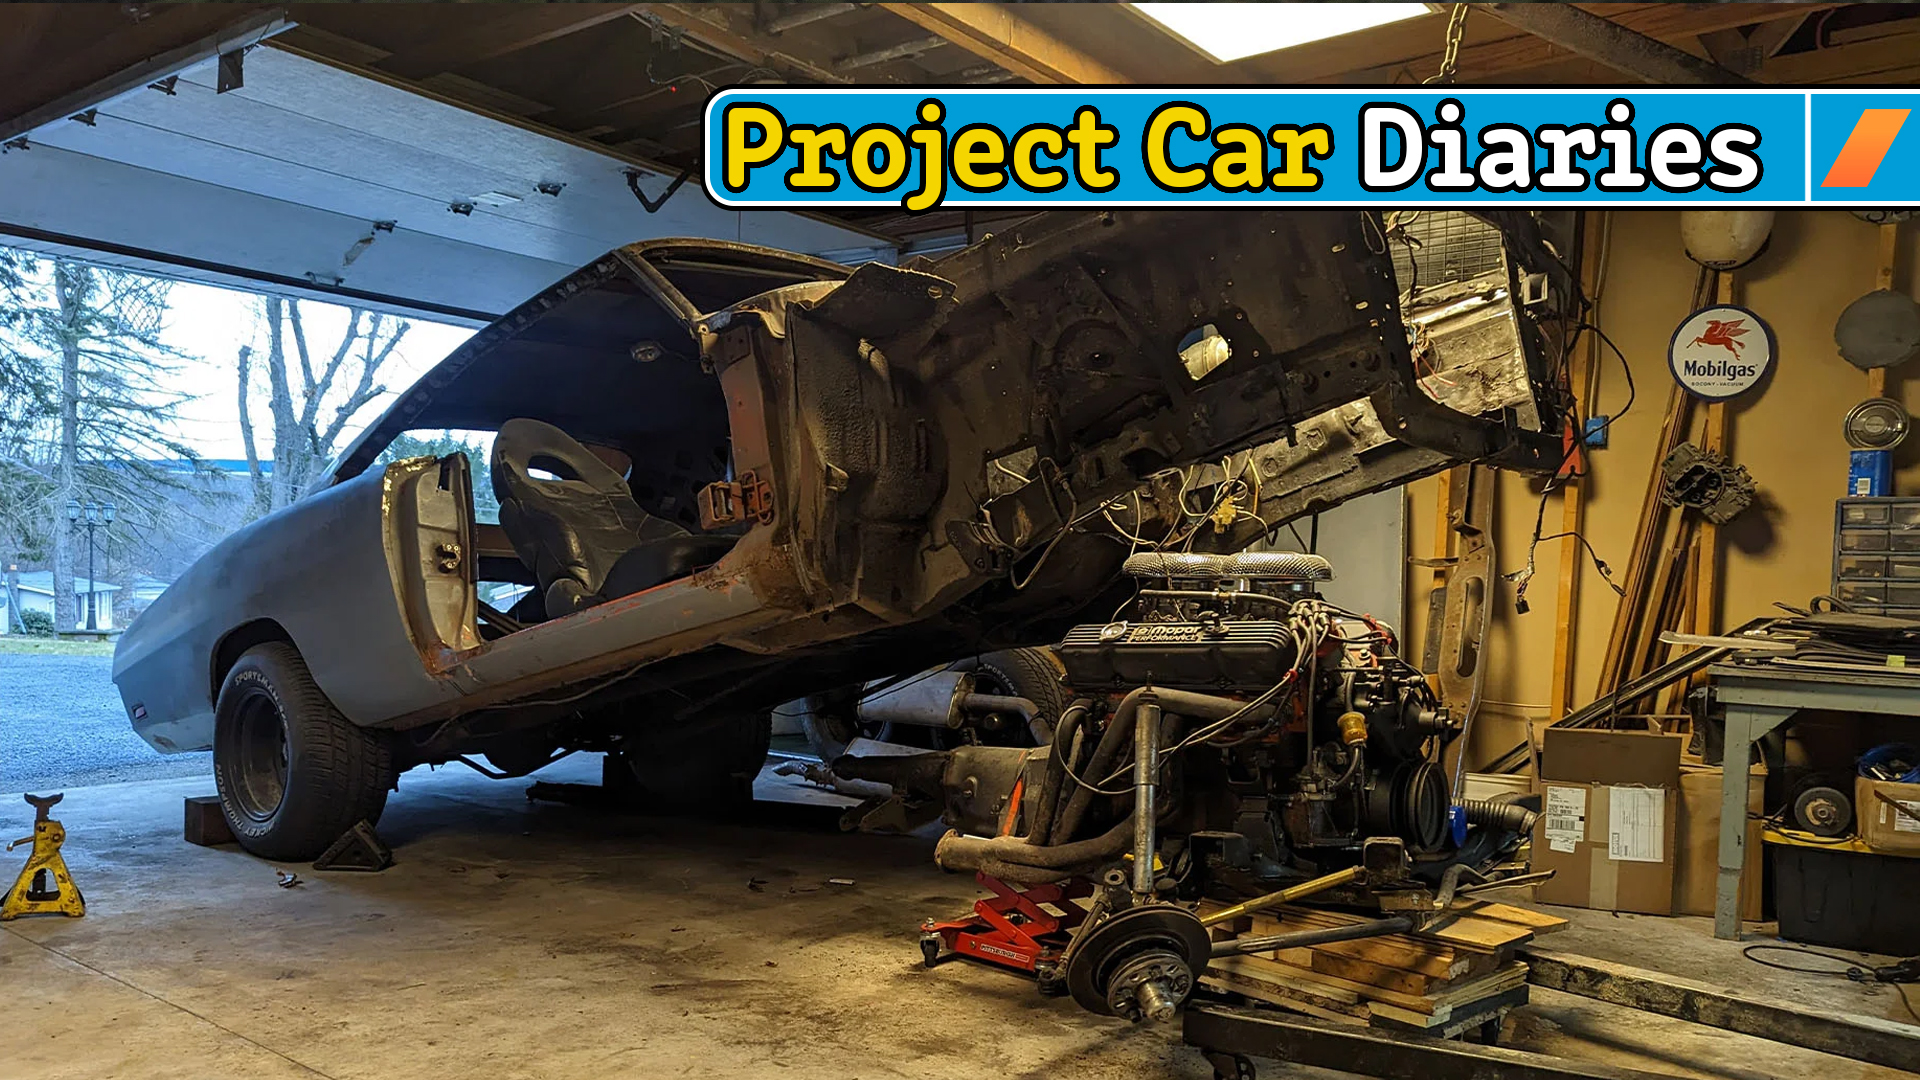
In the last 1969 Charger project car update, I mentioned that the engine needed to come out to access some rust on the firewall. The rust was minimal, but it was tucked down just far enough that the engine absolutely had to be absent for me to properly repair it the metal.
That seems like a pain, but it was something I was happy to do regardless. Since I had multiple opportunities to cure the rust over the years but instead let my laziness get the best of me, it only seemed right to teach myself a valuable lesson about doing things the right way the first time around. On top of that, it’d make life a little easier going forward.

DoorsDoor jamsRocker PanelsFender PatchesRoof SupportsRoof SkinTrunk- Inner Fender
- Firewall
- Paint
Removing the engine simplified the logistics of some other jobs I had yet to handle. For example, the driver-side inner fender had also rotted away. Not having the engine in my way would only make it easier to weld in the donor patch I snagged from another B-body.
I also had a new clutch z-bar bracket that I needed to install and plan to swap over to a new brake proportioning valve before I slam it all back together. Having the mechanical guts out of the way makes it much easier to achieve a fit and finish that won’t drive me out of my wits later on.
Tools and Supplies
- WD-40 Specialist® Degreaser and Cleaner EZ-Pods
- Spray Bottle
- Engine Hoist
- Two Moving Dollies
- Transmission Jack
- Milwaukee M12 Grinder
- 3-Inch Cut Off Discs
- 3-Inch Flapper Disc
- Chicago Electric 125 Flux Welder
- Body Filler
- Sanding Block
- Sand Paper
Going Old-School: Dropping the Engine
Driveline removal is never a small job. Even if these classics offer a lot of space and minimal electrical and plumbing concerns, it’s always a major production. Now, this isn’t my first rodeo, but I still wanted to cut down on as much work as possible, considering I’d be doing it all on my own.
I knew right away that there is a method that simplified the entire ordeal: Drop the engine out of the car, as opposed to lifting it up. These classic Mopars are actually designed so that the K-member, transmission cross-member, and lower steering components can all be removed from the car as a single assembly. After you unbolt a few things, you’re free to lift the body right off of those components and move them out of the way.
My biggest obstacle is that a lot of the equipment you should be using to pull this off is no longer in production. But after watching a couple of YouTube videos on how it’s done, I had rigged up a system in a way that would make Wile E. Coyote proud.


I took a pile of scrap wood, two moving dollies, and a transmission jack to create a monster. I used two dollies as I’d take the castors off of one to add extra support to the other. From there, I screwed scrap wood to the dolly until it was high enough to reach the bottom of the K-member. I paired it with the transmission jack and birthed a rolling platform that the drivetrain could cruise around on. Once everything was disconnected, I simply lifted the body off the guts with an engine hoist. Probably not the safest thing I’ve ever done, but it worked.
If nothing else, it was amazing to see the car come apart that way. It was a bonus that it really was easier than pulling the engine up out of the car. I didn’t have to wrestle with an 800-pound pendulum, there were no oil puddles, and I didn’t bang anything up along the way. I’d definitely recommend this method, just maybe with the right tools for the job and not repeating what I did.

Welding and Cleaning the Engine Bay
Once the engine was out, I moved quickly through the small patches the engine bay needed. I honestly was done so fast that it’s hard to remember the finer details. The firewall was stitched up within minutes, I had the inner fender patched up in less than a day, and I smashed out some unexpected rust-related finds without spending a significant amount of time in there. All in all, it was a smooth experience for once, which was greatly appreciated by my weary self.

Repairs moving quickly didn’t change the fact that this was a triumphant moment. Removing the last bits of rust here meant that I could finally retire my welder for the remainder of this project. It may not be to the standard of a pro-level shop, but having pulled that all off had me welling with pride.
That’s not to say my work in the engine bay was done, though. It should come as no surprise that this thing has had an oil leak or two over the years. That means I’d be looking at a good bit of scrubbing to actually prep the surface for paint. A wire wheel did do the heavy lifting for the most part, but there are some areas where power tools wouldn’t be an option.

Since a gas-soaked rag wouldn’t be an ideal option for cleaning something this big inside of a garage, this was a good opportunity to try out the new WD-40 Specialist® Degreaser and Cleaner EZ-Pods. Rather than fuming myself out, I just tossed two of these dissolving pods in a 32-ounce bottle of warm water and sprayed it on the surfaces to clean.
Two particularly cool features of this cleaning product: It’s super versatile, and safe to use just about everywhere. You can customize the degreasing strength by dropping in one pod for everyday needs or two pods for even stronger power, and of course, choose your method of application. Using a standard spray bottle was the move for me, but you could also dissolve the pods in a bucket and dip a rag in if you wanted to.


Being able to spray this degreaser on pretty much anything is also a big plus. WD-40® Brand promises it’s safe to use on plastics, rubber, neoprene, stainless steel, carbon fiber, copper, aluminum, chrome, and painted areas. You could even use it in your kitchen and stovetop without worrying about poisoning yourself. Check out WD-40 Brand’s site here for more details and specs on this stuff.
It worked much better than I initially thought it might, and ate up caked-on oil pretty impressively. Not having to worry about it eating up rubber hoses or harming anything it’d accidentally leak onto on the other side of the firewall was a nice touch as well.
Under the hood is where all the intricate, hard-to-work surfaces of the car are. Having something to cut through the grease and get me out of there in a hurry. I’m glad I saw it through to give the car the look it deserves in the end, but I’m way happier that it’s behind me now.
Filling and Leveling the Joints
Once the engine bay was squared away, it was time to shift into getting the rest of the body in shape. Thankfully, I only needed to give my attention to a few key areas.
The joint where the roof panel meets the sail panel was where most of the cosmetic rust damage was on this car. It’s also what I find to be one of the most iconic pieces of sheet metal. That’s where most of my time was spent.

The ’68-’70 Charger is packed with signature styling from front to rear and the sail panel is one of the key areas. Like the flared rear quarters, scalloped doors, and swooped fenders, it’s a component that commands your attention and defines the roofline. Though I’m not shooting for perfection, flaws here must be minimal as any blemish is magnified by the flow of the metal.
Getting the joint just right was made difficult by the nature of the repair I made here. One, my welding skills aren’t great, so I had some warping to contend with. Two, I had to double up on the work as I’d have to correct not only the natural joint on the body but the area where I spliced in the patch as well.
I started by adding a layer of lead to the joint, which is the way Dodge did it back in the day. On top of that, I added a layer of metal-reinforced filler. Definitely overkill, but these joints are prone to cracking, and I wanted to prevent that as much as possible. Then I went over all of that with some filler, and by some, I mean a ton.
I easily used up two quarts of plastic filler on these patches alone. Not because my bodywork is atrocious, but because I obsessed over getting the right shape. I drove myself nuts, adding and sanding layers for weeks until I got it to where it felt just right.
Luckily, I had a nice break to give myself some distance from the car. I’d taken a trip down to Talladega, where I had the opportunity to check out the International Motorsports Hall of Fame. It was there that I stumbled upon a fabled champion that would give me the reality check I needed.

Inside the Hall sat Buddy Baker’s 1969 Dodge Charger Daytona. Though it’s many tiers above what I’m aiming for in terms of performance, it reminded me that my original goal was to match the appearance and vibes of these classic race cars. They’re presentable and that’s about it. That’s not to say pride isn’t taken in workmanship, but you can tell that they are meant to be driven, and aren’t overly shinned up because of it.


I want my car to look like a real performer of the era, with road rash to match. I don’t want to it feel sterile or too nice to let the car be what it is. That’s why I made sure to get a look at the sail panel on this old hero. I’m glad I did. Time may have shrunk and cracked the plastic, but the shape was still there, and it showed the level of workmanship that went into it.
I’m not trying to compare myself to the legendary crew that put this piece of machinery in the history books, but getting up close and personal certainly made it clear that I had met my goal, and I could move onto the remaining stages with peace of mind.

Sanding My Life Away
That same level of attention was given to the rockers, tail panel, and quarter extensions … I know, hiding the seam there isn’t correct. They all presented a unique set of obstacles, but none were as long-winded as shaping up the sail panels.
Now that the filler and rust repair work is all behind me, it’s time to sand until I can’t lift my arms. It’s nice to know that there are no major repairs, but sanding cars is about the least fun thing I can think of. Thankfully, it’s all in preparation for paint, which is exciting enough to keep me moving. It’s only a matter of weeks until this thing boasts its new colors, and I really can’t wait to see it.

That doesn’t mean the hard work is over. I don’t want to dampen the excitement that’s coursing through me as I near the finale of this six-month thrashing session, but I still have a good bit to sort out with that motor-mount-eating heart I pulled from it. The paint is chipped and nearly non-existent, it’s leaking a bit of oil from the pan gaskets, and, of course, it twisted another set of stock mounts to death.
Let’s also not forget that I still have to put the rest of the car together when I’m done. Though, that’s all familiar territory, and once I’m back there, I have no doubt I’ll be cruising through the checklist like never before.