I wanted to change the wheels on my Honda Civic. I didn’t want to buy junk, but I didn’t want to spend a lot of money either. Then I got a curb-rashed set I wanted to clean up, but couldn’t be bothered to spend a lot of effort. Tales as old as time, right? Believe it or not, I managed to satisfy all the above with imperfect (but acceptable) results.

Changing wheels and tires is probably the most appreciable single change you can make to alter a car’s behavior. Handling, acceleration, braking, steering feel, fuel economy … so many parameters can be affected by messing with the size and weight of wheels. Naturally, you’ll perceive those changes a little or a lot (or not at all) depending on how different your new set of wheels is from your last. Other factors apply too—like of course, a lower-HP vehicle will seem to benefit more from a minor wheel weight reduction than a powerful one would.
But basically—wheels are important. I usually wave off cheap aftermarket options because they’re often heavy, weak, or both. If you want to swap wheels without spending too much, grab some used OEM (stock) wheels from another car. You’ll often find these are robust without adding excessive weight, and as a bonus, it’s typically easy to find tires that fit them. Naturally, you’ll want to verify that a wheel’s size, bolt pattern, offset, and center bores are compatible with your car before buying.
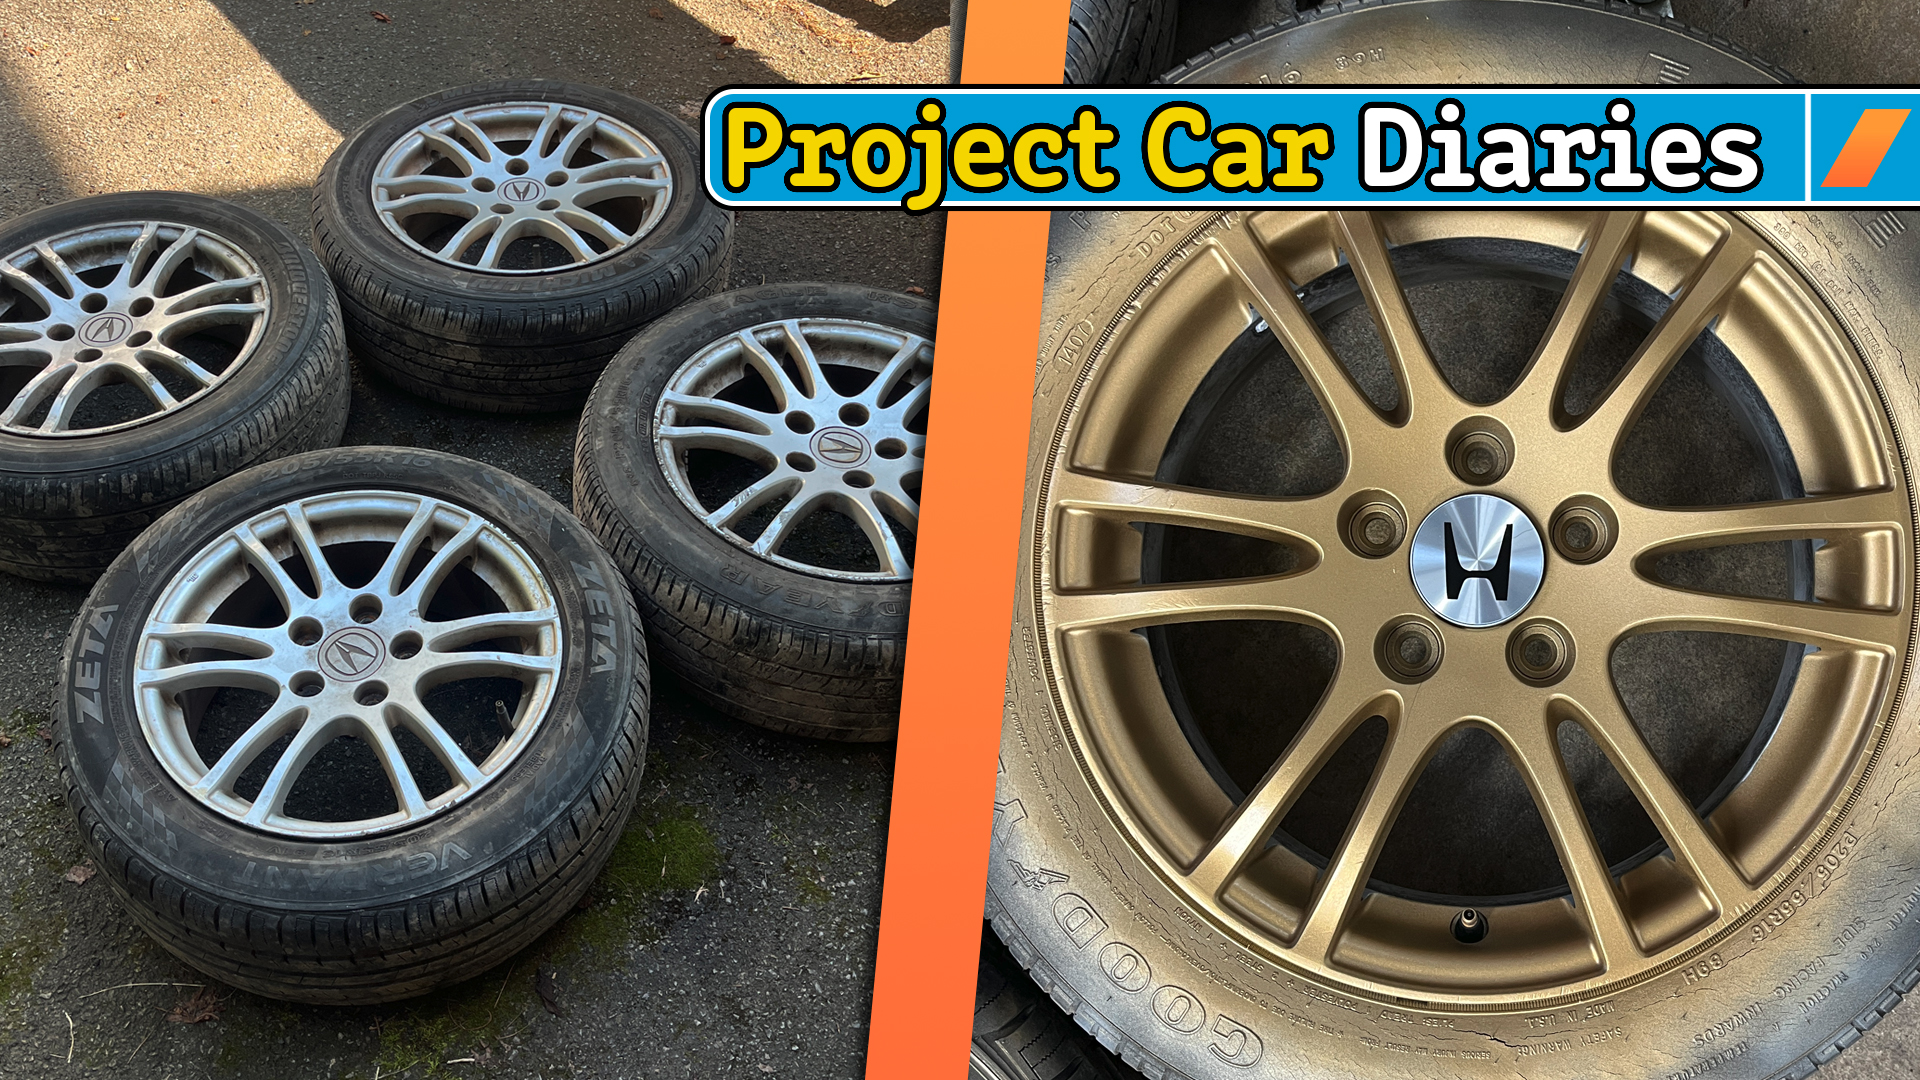
If you look closely, you might even realize that some stock wheels are actually made by your favorite aftermarket brands. That’s the case with this old set of Acura wheels I scored off Facebook Marketplace, which are made by Enkei and look vaguely similar to the RPF1 model.

The Enkei RPF1 is one of the most popular aftermarket wheels you’ll see. Despite my colleagues Adam Ismail and James Gilboy saying they’re ugly (they’re wrong but still good dudes) the RPF1 hits a great combo of being light and well-made with a relatively modest price tag. They’re not cheap, though—you’re still in for at least $1,000 a set.
I love RPF1s and, unlike many wheels, they come in 16s. I really wanted to try 16-inch alloy wheels on my eighth-generation Civic Si. The car came stock with 17s, and downsizing is not particularly common because most people think it looks weird. I was/am hoping the smaller wheels will make the car look older, more ’90s than ’00s, and feel faster but was hesitant to drop almost $2,000 (I’d need tires too) for an experiment.
Wheel Selection (Low Budget)
Being a nerd about Hondas, I immediately thought of the split six-spoke wheels that came standard on base-model Acura RSXs when I first saw Enkei RPF1s. “I should just order some of those and get the look for less,” I thought. “If I love it, maybe I’ll splurge on the aftermarket wheels later,” I said to Bramble the dog who was hanging out in the garage with me.

But while those RSX wheels are abundantly available online, they’re not all that much cheaper than the RPF1s I had in my cart at Tire Rack. I had slightly better luck seeing bargains on eBay, but lightning really struck when I saw a set of dirty, beat-up RSX six-spokes listed for $200 near the Pennsylvania/New Jersey border.
For me, this was a triple-bonus situation: Cheap wheels, plus a great opportunity to try my hand at casual wheel restoration, and a lovely route for a summer evening road trip from my Hudson Valley basecamp. When the seller got back to me quickly and intelligibly (a rare treat!) I was all about it.
The two-lane cruise by the Delaware Water Gap National Recreation Area and Stokes State Forest really is nice—I was happy to pass through twice. When I got home with my wheels, I was pleased to see that cleaned up better than I’d expected but winced at some damage I found.


Here are a couple of tips for anybody who might be buying used wheels, especially cheap ones or old ones in some kind of late-night Craigslist meetup situation. One way to establish that the wheels probably aren’t cracked is to see if the tires hold air. That’s not a guarantee that the wheels are perfect, but it helps establish their credibility. Then I recommend doing a cursory cleaning if they’re dirty. This won’t always be practical—but at least take a look for cracks, bends, or curb rash with a flashlight so you know what you’re getting into.
I looked at my RSX wheels in the dark, under about an inch of dirt, so I was pretty much rolling the dice on these bad boys. But at least the ancient mounted tires were managing to stay inflated.
Wheel Restoration (Low Effort)
Once I got the hose out and a few rounds of hardcore brake dust-cleaning soaks, I got a good look at the rolling stock I’d acquired. They all looked round and uncracked, but the curb rash level was comical. Like somebody had tried to park this thing inside a soup can or something. On the spokes, there were a few shallow but nasty gashes and even a few small chunks missing.


I completely understand that many people wouldn’t run these, but honestly, dings mostly only bother me when I cause them. Still, I wanted to try and see how much bling I could get out of these old things and I really wanted them to be gold.
Off I went to one of my favorite instructional YouTube channels, ChrisFix, to find a useful tutorial on DIY wheel repair from deep in his catalog. He solved the “chunks missing” problem by using body filler which I found quite surprising—would Bondo really survive the brutality I was planning on making these wheels endure? After all, my Civic’s mission designations are “four-season backroad attack” and “amateur motorsports.”


I ended up doing kind of a quick-and-dirty job, combining methods from ChrisFix and a few other mechanics. And maybe I cut some corners.
Ultimately my strategy was this: Coarse sand damaged areas, clean, moderate sand damaged areas and nearby areas, clean, light sand entire wheel, clean, revisit damaged areas if necessary, even out as much as possible … and then spray paint on. Spray, spray, spray … three coats of primer, five coats of paint, and two of clear per wheel.

I skipped using filler altogether. I simply didn’t think I’d be able to do a good enough job to justify the time and figured (correctly) that priming the wheels with a high-quality filler primer would soften the scratches enough for me.
DIY Wheel Painting
After years of using many paints, sprays, and brush-ons, automotive and otherwise, I feel that paying for quality is worth it. In my experience, more expensive paint is richer, more consistent, and more forgiving of some of the sins of an amateur (like painting in suboptimal conditions or not allowing enough drying time).


I ended up grabbing a few cans of VHT Wheel Paint in Matte Gold Flake (SP193) and Matte Clear (SP190) for the brand’s good reputation and the availability of true gold, not bronze. I’ve already got bronze wheels on my Montero and they look great, but this time I need something a leprechaun would love. For primer, I just ran something called U-POL Gray Anti-Rust Filler Primer from off the shelf at AutoZone. Here’s an Amazon alternative. That’s not like a magical spray-on Bondo, but it does smooth out scratches, even big ones, in a small way that you’ll see.
Everybody who’s into auto body work at all will tell you “painting is all about prep” and they’ll be absolutely right. I know I could have prepped better and maybe even created a damn-near-perfect-looking wheel, but time is valuable and my aesthetic standards for this car are honestly not that high. My friends at Donut Media did a video on DIY wheel restoration and our host Zach said something about “eight hours per wheel…” yeah, nah, as much as I love arts and crafts that’s not happening.


The last piece of prep I did do, and even this is a kind of corner-cutting, was a masking job. A proper and correct wheel painting would involve removing the tire and scraping every last molecule of dirt off the wheel before spraying the whole thing. Well, I did my best, but at a certain point some of the dirt on the backside of the wheel was just so deeply baked on I couldn’t see removing it.


In this situation, you could just paint over it. But the color would never truly settle right on top of grime. Then you’d have a little bubble of poor adhesion, which could spread to other spots, and ruin the look rapidly. I decided, instead, that I’d just mask off the entire backside of the wheel. This way, yeah some silver would be poking through, but it’d look deliberate and would save me the trouble of having to do more cleaning. Hey, if BMW can do two-tone wheels maybe so can I!

I didn’t bother masking the tires because those things are so decrepit I won’t even roll them down my driveway. I specifically wanted to “fix” the wheels before getting new tires so, for one, I wouldn’t sweat overspray and two, so the weight balance would be more accurate. Remember, if you’re sanding metal off a wheel, or using body filler to patch gouges, you’re altering the wheel balance.
Details That Matter
Silver and gold together feel like a very old-school modded car look to me, so I really wanted some simple, shiny Honda center caps and OEM lug nuts to complete these wheels. For about $20, you can easily find standard H-logo center caps in such a color.

The set I really wanted, with an H but without the outline surrounding it, was selling for more like $50. I’m embarrassed to say that I splurged on the spendy ones. I just really wanted to invoke the EM1 Civic Si from 1999 which had those!
Next: Tires
The reason you’re not getting the satisfaction of a “wheels on the car” picture is that I can’t decide what kind of tires to put on. My first instinct was to look for a summer high-performance tire, especially since I have a set of Blizzak winter tires mounted on steelies for cold months. But I also want to still be able to rip around in medium-temperature months and bad rain, which makes me think about getting a high-performance all-season tire.
If anybody’s got tips, you know where to find me! In the meantime, I’ll just enjoy how these wheels look in my garage.