Go-karts are beautiful things. They’re effectively stripped-down minicars with no pesky legal restrictions. The appeal is almost universal. At some point in our lives, we’ve all wanted to drive one or buy one or even build one, and I’m no different. Thing is, there’s a reason your parents never got you one for Christmas: go-karts are expensive. Those that won’t fall apart in a week, at least.
High-dollar toys for rich people are great and all, but stuff that regular people can buy, use, and love—those are the items that really matter. Yet so many things sold for an affordable price today are of poor quality or utility, and quite literally become garbage in short order. On that note, a good electric go-kart (not a hoverboard attachment) that will comfortably accommodate an adult can’t be found for under $1,000. You know, we used to be a country. That’s where my new project comes in.
Spending a grand is too much for an electric go-kart, so how hard could it be to make one for less? In a quiet moment of deep thought, I realized I’m the perfect person to figure that out. I have the means to try, and I’m also dumb enough to think I can actually pull it off. Starting last fall, I set out to design and build a decent adult go-kart that anyone can assemble with basic tools at home for under $1,000. And ideally, I’d get it closer to $500.
I’m not saying I’m doing anything groundbreaking. But three months later, what I found is that yes, it is possible to build a fun, homebrew electric go-kart from stuff I just had to bolt together, with all expenses coming in under a grand. There are strings attached, though. Design compromises had to be made. This first attempt does not look like it costs what it costs. It perhaps could’ve been cheaper. But all in all, the plan worked. In this opening installment of a two-part series, I’m going to show you how the first prototype came together.

The Key Constraints
When I set out, I didn’t want to scavenge for parts or cobble something together from what I had laying around. Finding a washing machine motor that fell off the back of a truck and using wheels from a Radio Flyer wasn’t an option. From the beginning, I wanted to make my kart a brand new machine that anyone with basic tools could assemble with no welding, cutting, or grinding. Just a bunch of stuff they ordered online, and a fair amount of patience.
The first big constraint is the powertrain. I decided to go electric. You could buy a 6.5-horsepower engine from Harbor Freight for around $160, but add in everything else needed to build a competent adult kart around it and it would be roughly the same price as an EV (if you can call what I built an EV). Also, gas karts are loud and messy. Electric carts are quieter, lighter, and they can be used indoors. Since I’m going for maximum availability and convenience here, it just makes sense to go electric. Keep in mind, I don’t have a garage and I built this whole thing in my apartment.
That runs straight into the second main limitation, which is that without access to a means of mass production, making a cheap electric kart with four wheels is basically impossible. Even small batch production doesn’t apply here; is a guy supposed to order materials for 20 karts and amortize the upfront cost by selling the rest to his neighbors?
A three-wheel setup is best, and honestly, I didn’t want to believe it at first. My thinking going into this was that a kart has to have four wheels to really be a go-kart. That’s basic, right? But a four-wheel setup creates a lot of additional expense when you have to buy every individual part separately. I’d need to find an axle that would accommodate a brake to stop the kart, sprockets to deliver the power from the motor, and the wheels of my choice (the cheapest) to keep it all rolling. I’d have to buy bearings to mount the axle to the frame. Then there was the army of small things lurking in the background, all the hardware needed to keep the axle and wheels located where they should be in time and space. This stuff added up in a serious way.
To support an adult, my axle would have to be around an inch thick, but the cheap wheels don’t have a 1-inch bore—most of them are 5/8ths. If I wanted to go with a 5/8ths axle, I had to support it close to its ends near the wheels, or else it would snap. That meant that this part of the kart would have to have its own rigid structure, further piling up the costs.
The alternative to using wheels that slip over a shaft is using wheels that bolt to hubs that slip over a shaft, but those are relatively expensive and the wheels themselves are costly, too. On top of all of that, the chain connecting the motor to the wheels must be tensioned properly, and the rear sprocket size/pitch is largely dictated by what comes on the motor you buy, assuming it comes with one. I ended up with a few workable options, but none of them were as cheap as I wanted.

Another alternative here is there are kits from abroad floating around that offer all of this stuff for cheap. Without any sort of detailed diagrams on how to mount these kinds of things, though, they’re effectively useless. Also, any broken parts or bad quality control can’t be accounted for. I decided against using them for these reasons.
I Saw the Face of God and It Had Three Wheels
The breakthrough for the cheap kart was going with three wheels. The three-wheel solution is really a beautiful thing—I teared up a little bit when I calculated the savings. A real eureka moment. It was kind of a religious experience watching it all fall into place.
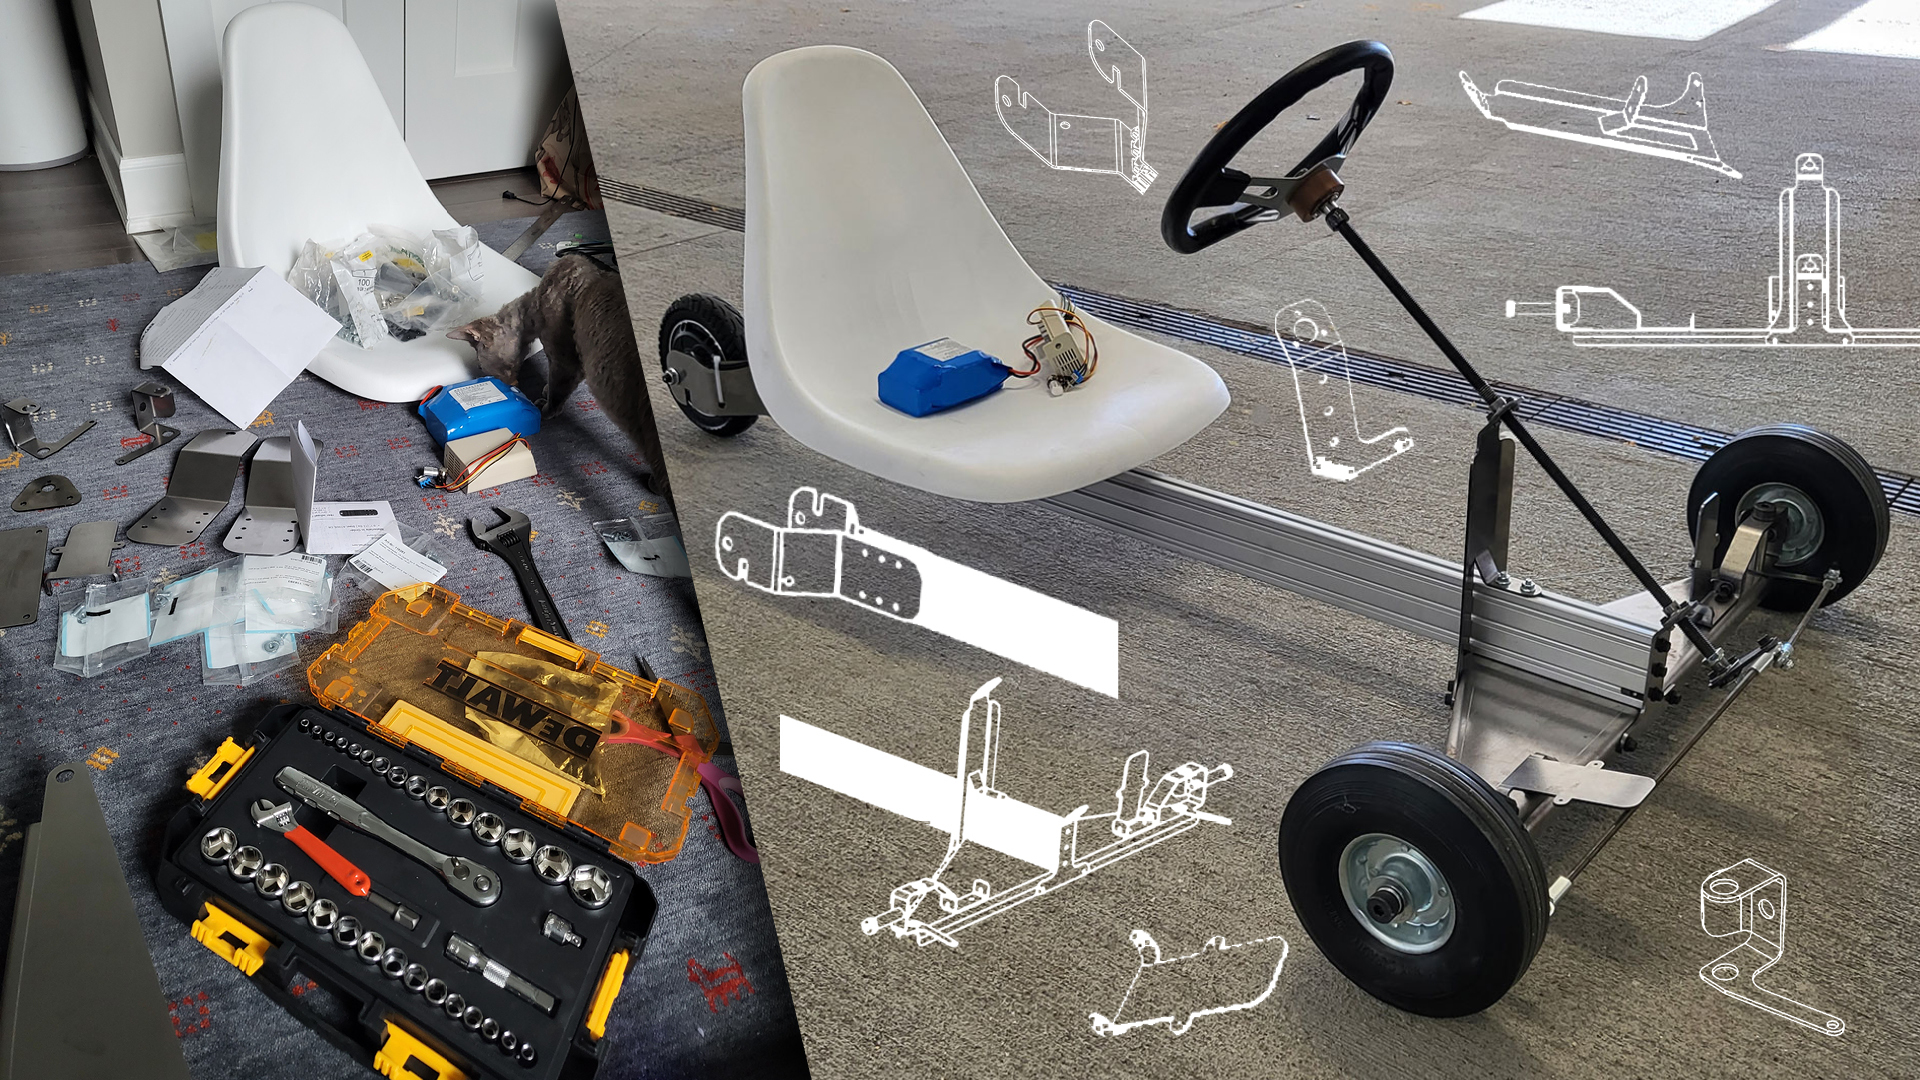
The first great thing about a single rear wheel is that you can get it as a hub motor, meaning that the motor is inside the wheel itself. Just like that, the axle, sprockets, chain, and even the two rear wheels I would’ve had to buy separately were gone. BAM! The specs were right to push people around without any sort of reduction drive. Supply isn’t an issue; there are also a fair amount of good hub motors for electric scooters for sale on sites like eBay, AliExpress, and Amazon.

The really appealing ones, like the one I got, even have an integrated drum brake (on the back side in the photo above). What a slam dunk! Now, the single unit I’d bought effectively replaced half a dozen other major components and a slew of associated hardware. I can’t stress enough how important the single rear wheel is.
Shipping Costs Are the Devil
Now is also a good time to mention another big killer here that the single rear wheel (partially) solves: shipping. An item might be $8 but shipping is just as much, if not more. That killed so many possible solutions. Sure, the individual pieces are cheap and that’s all well and good, but you better hope all of that stuff is from one warehouse and comes in the same box. If not, you’re going to get smacked with shipping costs and they’re always over $10. Every. Time.
When you’re designing something this cheap, another $10 is a punch in the gut. I considered cheating by adding a section to the assembly manual where a buyer first must move to live close to the largest supplier of kart components and pick them up in person. My obsession with cutting shipping costs led me to consider more unreasonable options, like waiting until Black Friday to buy particular parts, or signing up for a particular company’s credit card.
In the end, however, I was able to get an 8-inch hub motor for a scooter with an integrated drum brake, wheel, tire, everything for just $64.98 including shipping. If you can find a cheaper, better solution, send me an email. And before you come at my throat, if you try to build something similar, prices for these motors have gone up since I bought mine. Expect to pay at least $90 these days. There’s something going on called… expansion, I think. Could be wrong.
The Frame
With the motor issue sorted, I now had to figure out how to make a frame. It had to be cheap enough to hit my budget, large enough for 5-foot-11 me to be comfortable, and strong enough to not buckle under my weight. In some dark moments, reader, I admit I considered using two-by-fours from Home Depot. In the end, that was a bridge too far.
Wood was tempting, though, because the structure presented a few key demands. I needed a rigid front axle, a steering column/shaft, and a stiff beam around four feet long to attach the front axle to the rear drive unit. In theory, all of this could’ve been done for a song with wooden parts. But ultimately the biodegradable solutions wouldn’t be strong enough, and I couldn’t order them cheaply to the right lengths and sizes. I also just didn’t want to use wood; it seemed like too much of a caveman-brain solution. There’s a reason we don’t build cars out of it anymore.
For the chassis spar—the central beam connecting everything and supporting the driver—I determined the best solution was an aluminum extrusion. They can be ordered to precise lengths, are tapped on the ends, and they can also accommodate a lot of cheap hardware like T-nuts in a very flexible way. I maintain this is probably the best way to do a kart like this and within budget. Steel tubes or other structures like that have to be cut, welded, et cetera. An extrusion is lightweight, rigid, and other assemblies can be attached to it with ease—like eyebolts to route a brake cable.

I eventually found out that the particular extrusion I picked (1 by 3 inches) isn’t actually all that rigid in one key area, but I’ll get to that later.
For the front-axle solution, meet my single biggest supplier for this project, a company called Oshcut. It does great work. Oshcut offers a lot of services, but its bread and butter is laser-cutting metal and bending it into various shapes. Since the metal is cut with a laser and bent over a brake, there’s no specific tooling for any of the parts. This means I could order just one of something and it would still be cheap. The front axle is a piece of 10-gauge (0.135 inch) laser-cut mild steel with several bends in it, most of them for rigidity.


The first image above was my first attempt the parts. The front axle wasn’t nearly strong enough, though it did save even more money by integrating the front steering support into the axle. It turned out a single steering support wouldn’t be adequate, and there were other problems with that setup. The second picture shows the second run of parts, which created a much stronger setup, and they’re what ended up on this first prototype. I added more support for the steering kingpins, a second steering shaft support, and generally beefed everything up.
Most of the other functional parts are also from Oshcut. The motor mounting solution is comprised of two identical bent plates to cut costs. The pedals, the knuckles that hold the front wheels, a few structural components, and the steering pitman arm are also all laser-cut mild steel. Most of it is the same thickness—which saves money—although some pieces are 12-gauge steel (0.1 inch) due to other constraints in part design.
Steering on a Budget
But let’s get down to business here. With all of this stuff figured out, I could start ordering the pieces and putting them together. There was just one last problem to solve, which was the steering column. Have to say, I give myself a lot of credit for this solution.
The ideal steering column is just a keyed shaft, right? Half-inch keyed shaft, get some collars to keep it in place, bolt a steering wheel and a pitman arm to it, all done. As usual, assembling it in this manner would cost more than I wanted and would require more hardware than I felt was necessary.
In order to make this kart cheap, it would ideally only use one size of nut or bolt. You usually have to order hardware in bulk, so this would save money. Using a single size or type of fastener is not possible for everything, of course. Some bolts just have to be thicker or thinner. But I wanted to minimize the size variety as much as I could.
To do this, I ended up just buying a 2-foot-long, half-inch threaded rod. Threaded rods are by far the cheapest way to get usable shafts. Rebar—which is typically used in construction—is cheaper but requires welding. The beauty of the threaded rod is that you can fix it to other stuff with just nuts and it still spins freely. I found some screw-mount nuts that I could bolt to various parts of the kart. The threaded rod was locked in laterally, but it could still rotate.


Affixing things to the threaded rod and keeping them fixed to the rod’s rotation was as simple as threading them on and pressing them in place with locknuts. Yes, this meant that the entire steering assembly moved forward and backward a little bit with left and right turns, but the steering is only a half-turn lock to lock anyway and the steering links use ball joints on the ends. It didn’t make a practical difference.
Another cost-saving measure on the steering was using the weakest possible, pre-cut threaded rods as steering links. They are plenty strong, but the front axle width was dictated around the cheapest length, which was 12 inches. They cost just $0.87 each; however, the result was that the front axle was just too wide for a normal-sized doorway when everything was put together. When you live in an apartment, that’s a big deal.

Adding the Accessories
Minor foibles aside, though, I had all everything I could working in CAD. It was now time to pile on the necessary accessories. The cheapest seat I could find was meant for boats—I think—and cost $20. I experimented with some bent metal alternatives but they were the same amount of money and looked like medieval torture devices. Likewise, making my own steering wheel seemed appealing but ultimately required more 3D-printed parts than I thought was reasonable. My kart only has one 3D-printed part and it adapts the steering wheel to the threaded rod used as the steering column. I ultimately ordered a steering wheel from Amazon for $23.99.
From there I had to find front wheels. The cheapest wheels by far come from Harbor Freight. There are no real alternatives to Harbor Freight on this front. The ones I ordered are 8 inches in diameter and solid rubber—which was a mistake. They arrived at my doorstep in a completely destroyed box which reeked of cigarettes. I got two for $23.97, shipped, but you can save a little more by just going to Harbor Freight and picking them up yourself. They’re fixed to the knuckles using 5/8th shoulder bolts, which form stub axles. The same shoulder bolts are also used for the steering kingpins.

The final things to figure out were absolutely vital, and one of them I didn’t get right initially thanks to my goal of staying under budget. The first was the battery; that was pretty simple. I got a 36-volt, 158-watt-hour battery from a hoverboard. It cost me $45.68 (shipped) and I had to solder some new connectors to it. Overall, it works fine.
What screwed me was the motor speed controller. I didn’t want to order a VESC—a programmable electronic speed controller. They all cost around $100. Instead, I ordered a mystery controller that said it could do the job. What, would they just lie? It was $16! If that worked, I could’ve met my ambitious price target, which was closer to $500 than $1,000.

Putting It All Together
So there I was. Near my cost target with everything assembled, things were looking good. Keep in mind, if this worked, I could order a single unit of this custom-manufactured vehicle for roughly $600. With more vehicles would come greater cost savings. I was, in short, right on the cusp of victory.
I took my vehicle out in the hallway of my apartment complex after shuffling it through the door, plugged the battery, controller, and motor together, and turned the knob.
I was immediately let down: The kart made some funny noises but did not accelerate. It could sort of maintain a speed if it was pushed or unladen, but not for long and not without sounding like it was trying to topple the walls of Jericho. The mystery controller didn’t work.
Here’s what it sounded like:
I, of course, didn’t give up there, though. I had to bite the bullet and buy a VESC. I was confident that this controller was the issue. As soon as that was replaced, I would be in a world of go-karting heaven. It would be a few more days before it showed up in the mail.
Fortunately, you don’t have to wait that long. Tomorrow, I’ll show you how it all came together.
Got a tip or question for the author? Contact them directly: peter@thedrive.com