
We may earn revenue from the products available on this page and participate in affiliate programs. Learn more ›
Your home is your own private sanctuary, a place of cozy warmth, enticing aromas, and calming interior design. Your garage, however, garners comparisons to an old-fashioned outhouse, as its cold, dark, and smelly nature has the kids believing it’s a breeding ground for spooky spirits and festering creatures. It’s time to change that.
Unfinished walls, thin metal doors, and concrete floors make the garage a chilly place to hang out, but with some ambition and a weekend DIY insulation plan, you can turn that around. Not only will your garage feel more like a part of the house, but installing insulation will save you money on energy costs and make for better storage space.
Dig in deeper below as The Drive partners up with our friends from BobVilla.com to provide all the information you need in The Drive’s guide, How To Insulate a Garage.
Benefits Of Insulating a Garage
The goal of insulation is to insulate or protect something with a heat- and sound-resistant material, the inside of the garage from the harshness of the world outside. Basically, it keeps it hot inside when it’s cold outside and cold inside when it’s hot outside. The key benefits include:
- Prevents air leakage
- Stops heat transfer
- Saves energy costs
- Temperature regulation

Types of Insulation
There isn’t just one type of insulation, despite what big box stores and their name-brand insulation would have you believe. Let’s dig in.
Blankets (Batts and Rolls)
The most common type of insulation is seen in the form of batts or rolls, which are generally called blanket insulation. The main difference is a batt is a pre-shaped and cut rectangle, while a roll of insulation comes wrapped up like a Fruit By The Foot.
Loose Fill
Unlike blanket insulation, loose-fill has no shape, as it resembles the stuffing from inside a teddy bear. It is typically blown into spaces on top of a barrier and is great for filling odd shapes or spaces.
Sprayed or Foam-In-Place
One of the easiest methods, spray or foam insulation is literally spread over and throughout areas by shooting the insulation at the wall like a hose.
Rigid Insulation
Added to the frame of the building, rigid foam insulation boards are typically used when remodeling or building a house.
Reflective Insulation
As the name suggests, reflective insulation reflects heat. It helps cut down on downward heat flow.
Radiant Barrier
A radiant barrier is made to keep spaces cooler, with special designs that protect against consistent intense sunlight.
What Is R-Value?
The Department of Energy states R-Value is the measurement of the ability of insulation material to reduce heat flow. The higher the R-Value, the better the insulation.
What Are The Pros and Cons of Various Types Of Insulation?
“Insulation is rated by its thermal value (R-value), and the higher the number, the greater the insulating effect.”
- “The most common type of insulation, fiberglass batts, offer R-11 to R-13 insulating value, depending on the brand, and installing them can be a DIY project.”
- “Blown-in cellulose is popular for garage attics, and this type of insulation is also DIY-friendly. Cellulose insulation has an approximate R-value of 3.5 for each inch of insulation. For instance, a 10-inch-thick layer would add a value of R-35.”
- “Rigid foam panels can be cut to fit inside stud walls, and they come with an R-value of about 4.5 or 5 per inch. They are slightly less DIY-friendly because they can be difficult to cut precisely without leaving gaps.”
- “Spray foam insulation is dense and offers an R-value of about 6.2 per inch, but it can be tricky for a DIYer to install, and some types require a certified installer.” – Taylor
What Is The Best Insulation For a Garage?
Due to its solid R-Value, wide availability, relatively low cost, ease of installation, and relatively unmessy nature, we recommend fiberglass batts or rolls for your DIY project.

Garage Insulation Basics
Estimated Time Needed: Approximately 1-2 days, depending on how big the garage is
Skill Level: Beginner
Garage Insulation Safety
Working in your garage can be dangerous and messy, so here’s exactly what you’ll need to ensure you don’t die, get maimed, or lose a finger—hopefully.
- Safety glasses
- Gloves
- Fiberglass-proof mask
- Pants and a long-sleeved shirt
Everything You’ll Need To Insulate a Garage
We’re not psychic, nor are we snooping through your toolbox or garage, so here’s exactly what you’ll need to get the job done.
Tool List
- Hammer tacker
- Box cutter
- Ladder or stilts
- Knee pads, if desired
Parts List
- Fiberglass batts of insulation for walls
- Spray foam insulation for nooks and crannies
- Blown-in insulation for the ceiling
- Garage door insulation kit
Organizing your tools and gear so everything is easily reachable will save precious minutes waiting for your handy-dandy child or four-legged helper to bring you the sandpaper or blowtorch. (You won’t need a blowtorch for this job. Please don’t have your kid hand you a blowtorch—Ed.)
You’ll also need a flat workspace, such as a garage floor, driveway, or street parking that’s also well-ventilated. Check your local laws to make sure you’re not violating any codes when using the street because we aren’t getting your ride out of the clink.
Here’s How To Insulate A Garage
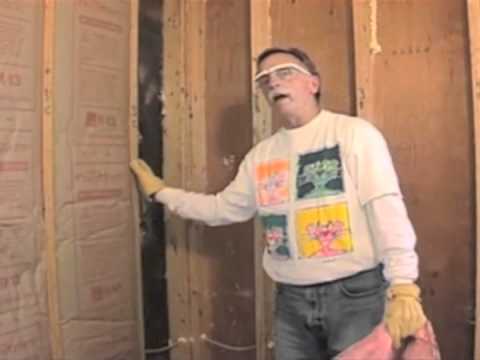
In this example, we will use fiberglass matts as the primary method of insulation. We assume the exterior walls of your garage have typical wooden stud framing and are without drywall. Let’s do this!
The Walls
- Clear out the garage and remove any obstructions that could get in the way.
- Locate any small or odd spaces, measure them out, and use the box cutter to cut these specific shapes from a batt. Always use custom pieces and do not smash, squish, or shove insulation into a tough spot. The insulation needs to be flat, evenly distributed, and securely in place to work to its fullest potential.
- Fit the odd shapes into the wall like pegs into holes. The insulation should be appropriately deep to fill the entire space between the wall and the edges of the frame. Do this until only tall straight openings remain.
- Nail or staple the insulation in place, if necessary.
- Measure and cut the batts to the necessary size and shape of the wall studs.
- Pick a corner, start there, and work your way around the garage.
- Place the insulation near the floor and slowly press the insulation in, but do not smash it. Work your way up the wall.
- If there are gaps remaining, cut pieces of insulation to fill the gaps.
- Add a vapor barrier, if necessary.
Note 1: As mentioned, some insulation needs to be stapled or nailed in place. Others, however, use friction and force to hold in place. Check the insulation for instructions.
Note 2: Some garage walls might have electrical lines running through them. Do not place the insulation over the wiring or electrical lines. Instead, cut small slits into the insulation and tuck the electrical wiring inside of the insulation.
The Garage Door
- Measure your garage door.
- Buy a garage door insulation kit.
- Follow the instructions in the kit.
The Ceiling
- Prepare a sturdy and secure scaffolding, platform, ladder, or set of stilts. If necessary, grab a friend to hold the ladder.
- Before installing the insulation, install baffles into the eave space to ensure ventilation within the ceiling and avoid moisture damage.
- Measure, cut, and install insulation in small or odd spaces.
- Measure the stud spaces you will be filling and cut the rolls or batts to the appropriate sizing.
- Install the roll or batts into the ceiling, pushing the insulation up into the joists before pulling it back down into place for full and even coverage.
- Make sure all edges are flush and there are no gaps.
- Fill any gaps by cutting custom pieces of insulation.
- If required by code, staple the facing of the insulation into the joists to keep them in place.
Note: Keep insulation at least three to five inches away from any light sources. Insulation installed too close to a light fixture could result in a fire.

The Ceiling
“The simplest way to install insulation in a typical garage attic will be to blow it in. The ceilings in most garages will already have drywall installed or plywood panels and there’s also probably an access door, in order to get to the wiring, etc. The homeowner will need to be able to get into the attic to blow in the insulation. Where he has to be careful is to step only on the joists, he can’t step between them on the underside of the drywall, or his foot will go through. He can cut some 2-foot-by-4-foot pieces of plywood to lay across the joists to step on if he likes. That’s a bit more secure.
“The other thing he has to be careful about (and this is all on the bag of insulation) is not to block intake vents in the eaves with insulation. When you blow-in insulation, it actually comes out pretty slow and drippy, so it’s not difficult to avoid the vents. Some builders like to cut a strip of batt insulation and use it to block the eave vents and then pull it out after blowing in the insulation.
“Oh, and it’s a two-person task. One person remains in the garage and loads insulation into the hopper while the other holds the end of the long flexible hose and directs the flow of insulation.” – Taylor
Do I Need a Vapor Barrier?
A vapor barrier, also known as a vapor diffusion retarder, prevents moisture buildup. Its ability to help stop the rate at which vapor can transfer through a material is measured in “perms” (permeability).
For example, glass, sheet metal, a polyethylene sheet, or a rubber membrane are Class I vapor retarders with a rating of 0.1 perms or less. Class III vapor retarders, greater than 1.0 perms but less than 10 perms, include unfaced fiberglass insulation, cellulose insulation, brick, or concrete blocks.
In general, vapor barriers are needed in areas with cold or mixed climates. Some insulation has facing already built-in, so check which type you have. Check with local building codes and consult a professional while buying your insulation to determine if it’s needed in your home and in your area. When installing, be sure to seal any openings where air could potentially leak.
BobVila.com says:
“Vapor barriers are highly controversial because anything that can keep moisture from seeping into a structure can also keep it from seeping out, which can lead to mold and mildew growth. There may already be a vapor barrier (like Tyvek) between the sheathing and the siding. Some communities require a vapor barrier on the inside of the insulation in living spaces, and some don’t. They may want to check with the local building authority but it’s probably just a matter of choice since it’s a garage. Now, if they were converting it to a living space, stricter rules would apply.
“The facing on faced insulation will form a vapor barrier. Whenever you’re insulating with faced insulation, the faced side goes toward the climate-controlled part of the structure–toward the inside of the garage.”
Should I Seal My Garage Floor?
Painting a garage floor will not help with temperature regulation, but it makes it look a whole lot nicer. For more information, read The Drive’s guide, How To Paint a Garage Floor.
Pro Tips to Insulate a Garage
Our pals at BobVila.com have performed dozens of garage projects and have knowledge and experience with insulation. Here’s what they had to say:
- “Address any moisture problem before insulating since water from a leaky roof or window will damage insulation.
- “Seal all gaps around doors and windows to keep drafts out. If you take the time to insulate your garage—do it right—block the drafts while you’re at it.”

Video
We’re not all reading learners. So here’s a helpful video to get you on your way.
Right Vs Wrong: Installing Insulation Batts In Exterior Walls – Part One