We may earn revenue from the products available on this page and participate in affiliate programs. Learn more ›
I’ve hit a wall in my car-modding career. In my imagination, I can see custom parts that would make my Civic look like a Singer Porsche. But I don’t have the design skills to cook them up and even if I did, I don’t know how I’d get them made. This is why I’ve been spending so much time on SendCutSend’s website and talking to its Design Services agents lately. These guys can turn your napkin scribbles and cardboard prototypes into real parts, in a wide range of materials from cork to carbon fiber.
OK fine, my track-beater/perennial-project Civic Si is more than a few little trim pieces away from resembling a million-dollar reimagined Porsche. Nevertheless, working with SendCutSend has let me make parts that don’t exist—even stuff I can’t properly design myself—and helped me take my project car beyond what’s possible with off-the-shelf stuff.
If you have any interest in invention, whether it’s car modifying, workspace optimizing, or building something else entirely, SendCutSend is an amazing resource for custom-part creation. Now that it offers Design Services in addition to its online Parts Builder and laser-cutting from prototype and one-offs to full production runs, you can get complex three-dimensional objects almost straight from your mind and into your hands.
What is SendCutSend?
SendCutSend is like the world’s neighborhood machine shop. The idea is that you send them your CAD file, dimensioned drawing, or even a cardboard template, and they laser cut it (or bend it, or shape it) out of your material of choice, then send it to you in the mail. Send, cut, send, savvy?

In addition to a variety of plastics, metals, and softer materials in which to make your designs, SendCutSend also offers services like bending, powder coating, hardware, tapping, and more to add refinement to whatever you want them to make.
You’ll find SendCutSend’s catalog of services right here, and a batch of examples here.
Our Demo Project: Off-Road Lights on a Civic, but Make It Look Clean
Fitting a set of KC Hilites Flex Era 3 fog lights on my Civic Si, in a way that’s clean and classy, took some creativity and a few of SendCutSend’s services. The meat of this project was about putting square pegs in round holes. More specifically: Putting a triangular light in an ovular hole, and a round toggle switch in a rectangular hole.

I got some of what I needed by hacking up hardware store supplies. But SendCutSend’s Design Services and Parts Builder came through in the clutch to give the project the polished look I was dreaming of. Without any computer-aided design (CAD) software of my own, or any tooling remotely capable of professionally shaping heavy materials in my garage, I got away with a pretty tidy little installation thanks to SendCutSend.
Using SendCutSend’s Parts Builder
Mounting my new KC units in the car’s factory fog light slots gave me two prompts to address: The lights had to be rigidly mounted and they’d need some kind of bezel to prevent awkward holes in the front bumper.
Since secure light mounting was priority one (wobbly lights make the road look like a rave), I started there. Pulling the bumper revealed that each of the eighth-gen Civic’s factory fog lights is mounted on an asymmetrical tripod frame which is screwed directly into the bumper plastic from behind.

I did the best measuring I could to try and extrapolate where I’d need metal, holes, and bends to build a new bracket that would connect the KC light to the Honda factory bracket mounts. But I must confess, I just couldn’t figure out how to accurately measure an imaginary 3D object by hand.
Then, a light-bulb moment: Instead of trying to build a whole new bracket, I’d just make an adapter for the existing one. And to give myself more flexibility, I’d make that adapter universal so I wouldn’t have to commit to the light’s position yet.

This is where SendCutSend’s Parts Builder comes in. The Parts Builder is basically a light-duty design tool you can run in your web browser. You select a starting point from a crop of template shapes, then tweak dimensions, hole positioning, bending, shaping, and materials as you move through the site.
This is a great tool to play around with if you need something relatively simple but not readily available. Ever go to a hardware store, pick up, say, an L bracket, and think something like “Shoot, if only this were an inch longer on one side and the hole was two inches closer to the center?” The Parts Builder is the perfect place to make those wishes come true.


So here’s what I did to make a “universal” fog light adapter—instead of trying to exactly match where the KC light would need a mounting point, I simply designed a little pegboard with a bunch of potential mounting points. I added a 90-degree bend for even more mounting options and had it made from thick aluminum. That’d be strong, light, and rustproof.
While I was on the Parts Builder, I noticed that one of the starting templates was an oval. Perfect—I had two made in Delrin (a robust, hard-wearing plastic) at dimensions slightly larger than the Civic’s fog light portals. This way it’d act as a block-off plate, and I’d simply cut a hole in it at whatever location my light unit needed.

Ultimately, I simply used a piece of steel squarestock that I shaped, drilled, and painted at home to hold the KC light itself. But it wouldn’t have had anything to cling to without the universal adapter I’d made on SendCutSend. The KC’s wiring could be run inside this mounting tube, which was critical to keeping the exterior tidy. The light can be easily aimed with the bumper on the car by simply loosening the mounting bolts on the side.
Once I test-fitted to find exactly where the light mounting tube would spear through the old fog light portals, I knew where to cut those Delrin ovals so they’d fit neatly.


I made my cuts tight enough so that the plastic oval was pretty snug on the light mounting rod. But to really make sure it wouldn’t move, I used some of the remaining open holes in my little pegboard to run some arresting bolts that effectively locked it into place against the bumper.


For the finishing touch, I put grommets on the mounting tubes to fill the tiny gap between the light mounting squarestock and the new Delrin bezel. This covered up my hacky hand cuts nicely, too. Where’d I find square grommets, you ask? Hah! I didn’t, I made them by hand by taking furniture feet I found on Amazon and cutting out the middle.
Using SendCutSend’s Design Services
You’ll find SendCutSend’s Design Services page right here.
I’m proud of how clean I was able to make the KC lights look on the face of a Civic. But let’s be real, you can play it a little fast and loose with measurements when you’re just making bracketry that’s black-on-black, and tucked in a spot that few eyes will scrutinize. The interior, however, is where a small aesthetic mistake can haunt you every time you climb into your cockpit.


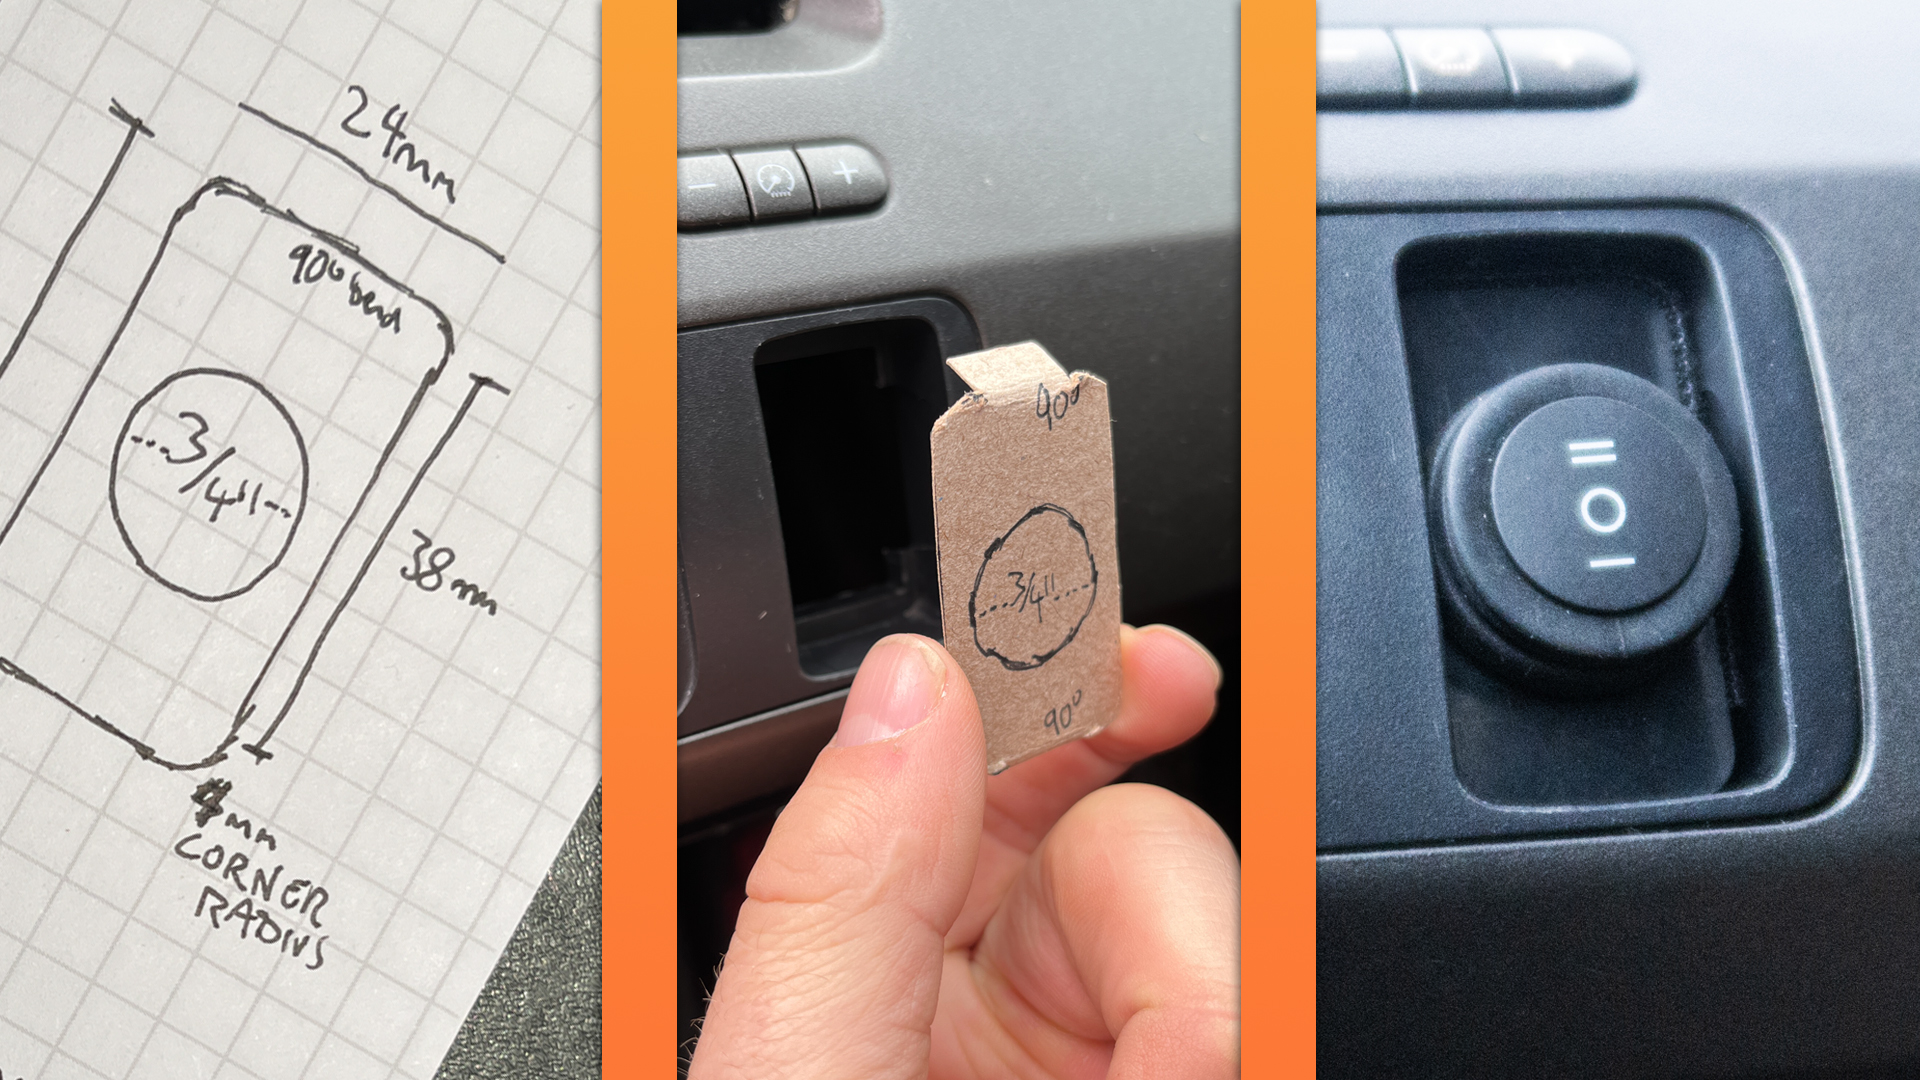
I needed to mount the KC lights’ power switch in the Civic, and I needed it to look good. I adore the eighth-gen Civic Si interior and didn’t want to mar it with an awkwardly drilled off-road light switch, but at the same time, I really wanted to use the switch KC supplied. It looked cool and well-made and I really didn’t feel like sifting through however many three-position toggles are for sale online. Putting the toggle switch in the factory fog light switch location was the most appealing choice because it meant I wouldn’t need to drill into my dash or center console. But I also meant I’d have to figure out how to put a round switch in a rectangular slot.
To solve this, I engaged SendCutSend’s Design Services process. Instead of trying to design a switch adapter in my web browser, I made physical prototypes out of cardboard (cereal boxes and beer boxes work well for this purpose) and adjusted it with scissors until I had the exact design and fitment that I wanted.


I could have mailed that cardboard to SendCutSend and they would have cut it out of whatever material I requested for me. But since it was so simple, they were also able to work with a hand-drawn rendition I photographed and emailed them.
Shortly after my note went through, I got an email from a Design Services agent who introduced himself as Kyle. I gave him more context on how the part would be used, and he recommended material options. He also pointed out an error in my drawing (I had added values incorrectly, what a surprise) and he had me re-measure certain parts to get on the same page.

So in addition to being able to turn your hand-drawn designs and cardboard-aided design projects into real items, SendCutSend’s Design Services agents can help guide you on the refinement of your part. Kyle helped me understand how much bendiness to expect from different metals and plastics, and we decided to try the switch adapter in simple black ABS plastic while making a slightly different version in aluminum. The metal piece didn’t end up looking right, but it was cool to be able to try it.
The round KC three-position is aesthetically incongruous with the late-’00s Honda interior, there’s just no way around that. It looks like it should be in a UTV or an old 4Runner, which makes sense, since those are the kinds of vehicles that KC lights are more commonly installed on.

But since I did want to keep it, my thought process was, “I’ll do a slightly recessed adapter plate, so that the round toggle is kind of tucked into the dashboard and doesn’t protrude, but isn’t so deep it’s hard to reach.”
That is not something you’d be able to type into Amazon to get the part you want—but I was able to tell that to my guy Kyle via Design Services, and we made it happen.
It doesn’t look factory, but it looks clean this way. And it’s ergonomically excellent. To lock the bezel into place, I squeezed a tiny Velcro shim between the new switch plate and the mounting slot. Feels stone solid.
From there it was just a matter of re-connecting the car’s battery, and boom, we had a sweet little KC lights installation on a Civic.
SendCutSend Is a Great Tool for the Inventive and Curious
For those of you who appreciate the joy of tinkering, I bet the wheels are already turning on what you could make with the design and manufacturing tools I just ran through. I know I’ve spent many hours in hardware stores, looking at off-the-shelf brackets and metal stock trying to figure out how to complete my projects with “close enoughs.” I doubt I’m the only one. Now, we can skip that, and get parts made to our specs the first time via SendCutSend.
Even if you’re just vaguely curious, or have one specific thing you could sketch but not build, SendCutSend has largely democratized fabrication.
Whether you’re a master at CAD and just need the physical construction of something done, or you’re like me and can’t add two angles together without a calculator, this site is your ticket to an infinite supply of cool items. Check out the SendCutSend site and make something yourself!
