I’m about to turn 36 years old and have gone through quite a few phases of car fandom. As a teen, I was all about pointless decorations and offensive exhaust volume. These days I like things a little classier … but I’m still into the same makes and models. Now instead of getting stock Hondas from old guys and ruining them with bad mods, I’m buying crass cars from young dudes and reversing some of the same “upgrades” I once was into.
We are going to discuss the science of automotive air intakes in another post (I’m still gathering professional insights) but I’m eager to share some practical takeaways from this project: Reverting a car from an aftermarket cold-air system to a stock one. I have a feeling I’m not the only person undertaking such a task in 2023.

My 2006 Honda Civic Si had an Injen cold-air intake installed when I got it. This is a pretty well-known brand, in fact, Injen was one of the first outfits to make a CAI for the eighth-gen Civic and people still run these today. My car seemed to be performing fine with it, once I had the computer properly tuned with Hondata software. But when it came time to clean the air filter, I saw just how nasty it’d gotten in its super-low position. I decided it’d be worth switching to a stock system for maximum protection for the engine against the elements. After all, I got this car to be a backroad and backwoods wintertime beater as much as a summertime track rat.
Putting a Civic Intake Back To Stock: Project Rundown

Steps
- Source all factory intake parts
- Remove aftermarket intake
- Check for supporting pieces (mounts, attachment brackets) that need to be adjusted
- Deep-clean any accessible parts or new-to-you used parts (Optional: Decorate parts)
- Double-check all visible hoses and seals for fatigue
- Install stock system (use parts catalog to help guide assembly)
Tools
- WD-40® Precision Pen
- WD-40 Specialist® Penetrant with EZ-REACH®
- Standard mechanic’s ratchet set
- Screwdrivers
- High-quality pliers
Tips and Tricks
- Be careful with sprung hose clamps—they can fly off into oblivion if your hand slips while pinching one open
- Fastidiously check the condition of any hoses you’re able to reach
- Now’s a great time to vacuum out any usually inaccessible areas
- If you’re doing any gold wrapping of intake parts, remember that the wrap needs to be laid in small pieces, as flat as possible (it will bunch up if you try to wrap a pipe like you’re using a bandage)
- Genuine heat-reflective gold wrap isn’t cheap, but don’t expect gold-colored vinyl to do the trick if you’re actually looking for heat protection
Sourcing Stock Intake Parts
A pick-’n-pull junkyard would be my first recommendation for finding something like a stock intake, though you’d better be quick because easily removable parts like that often get yanked or destroyed shortly after a desirable car enters a yard. But alas, one more bummer about keeping this car in the Northeast—this region simply does not have the bountiful open-to-the-public boneyards that you find in the Southwest. So I could either spend a heap of money and order everything new from Honda, or lots of time and cobble a stock intake together from eBay listings. I opted to do a bit of a combination.

You can’t just click and order a complete stock intake for an older car like you can an aftermarket one. The stock intake is actually made from a whole basket of parts, and unless you’re personally removing it from a donor car, you can’t count on wrecking yards to get everything if you’re buying used. If you’re buying new, you have to manually add every coupler and hose clamp from the Honda parts catalog.
I got pretty frustrated when the first “complete stock Civic intake” I got from eBay wouldn’t go together—turned out a critical junction was missing. Back to eBay I went, and got another used one, which was missing parts too … lucky for me, between the two orders, I had all the piping I needed for one whole kit.


The plastic of my new-used kit was intact but the metal pieces were ashy with surface rust. I hit the old, ugly hose clamps with my WD-40 Precision Pen which freed them up nicely without getting overspray anywhere—that pen would come in handy quite a few times on this project.
Removing a Cold Air Intake

Since my Civic’s been taken apart and re-assembled so many times, the front bumper came off easily which exposed most of the Injen intake. Unfortunately, the hose clamps must have been screwed down by a particularly sadistic previous owner because all the access points were at preposterous angles (of course!).
Those hose clamps were crusty, too. I was tempted to hose them all down with half a can of penetrating fluid, but just as I was thinking I should be careful to avoid getting that stuff on belts or electronics, I remembered the new WD-40 Precision Pen I’d just been fiddling with.


The Precision Pen is exactly what it sounds like: A pen-like product that dispenses WD-40 Multi-Use Product, the Original WD-40 Formula, with controlled flow. The two biggest advantages of this dispenser are portability and, well, precision. I particularly liked using it on the screws holding the MAF sensor to the intake—that’s a sensitive piece of electronics and even though aerosol-style WD-40 Brand products are safe on most under-hood surfaces, it was nice to be able to keep the product very contained.
Once loosened, the Injen cold-air intake just took some tilting to extract from its home in the engine bay.
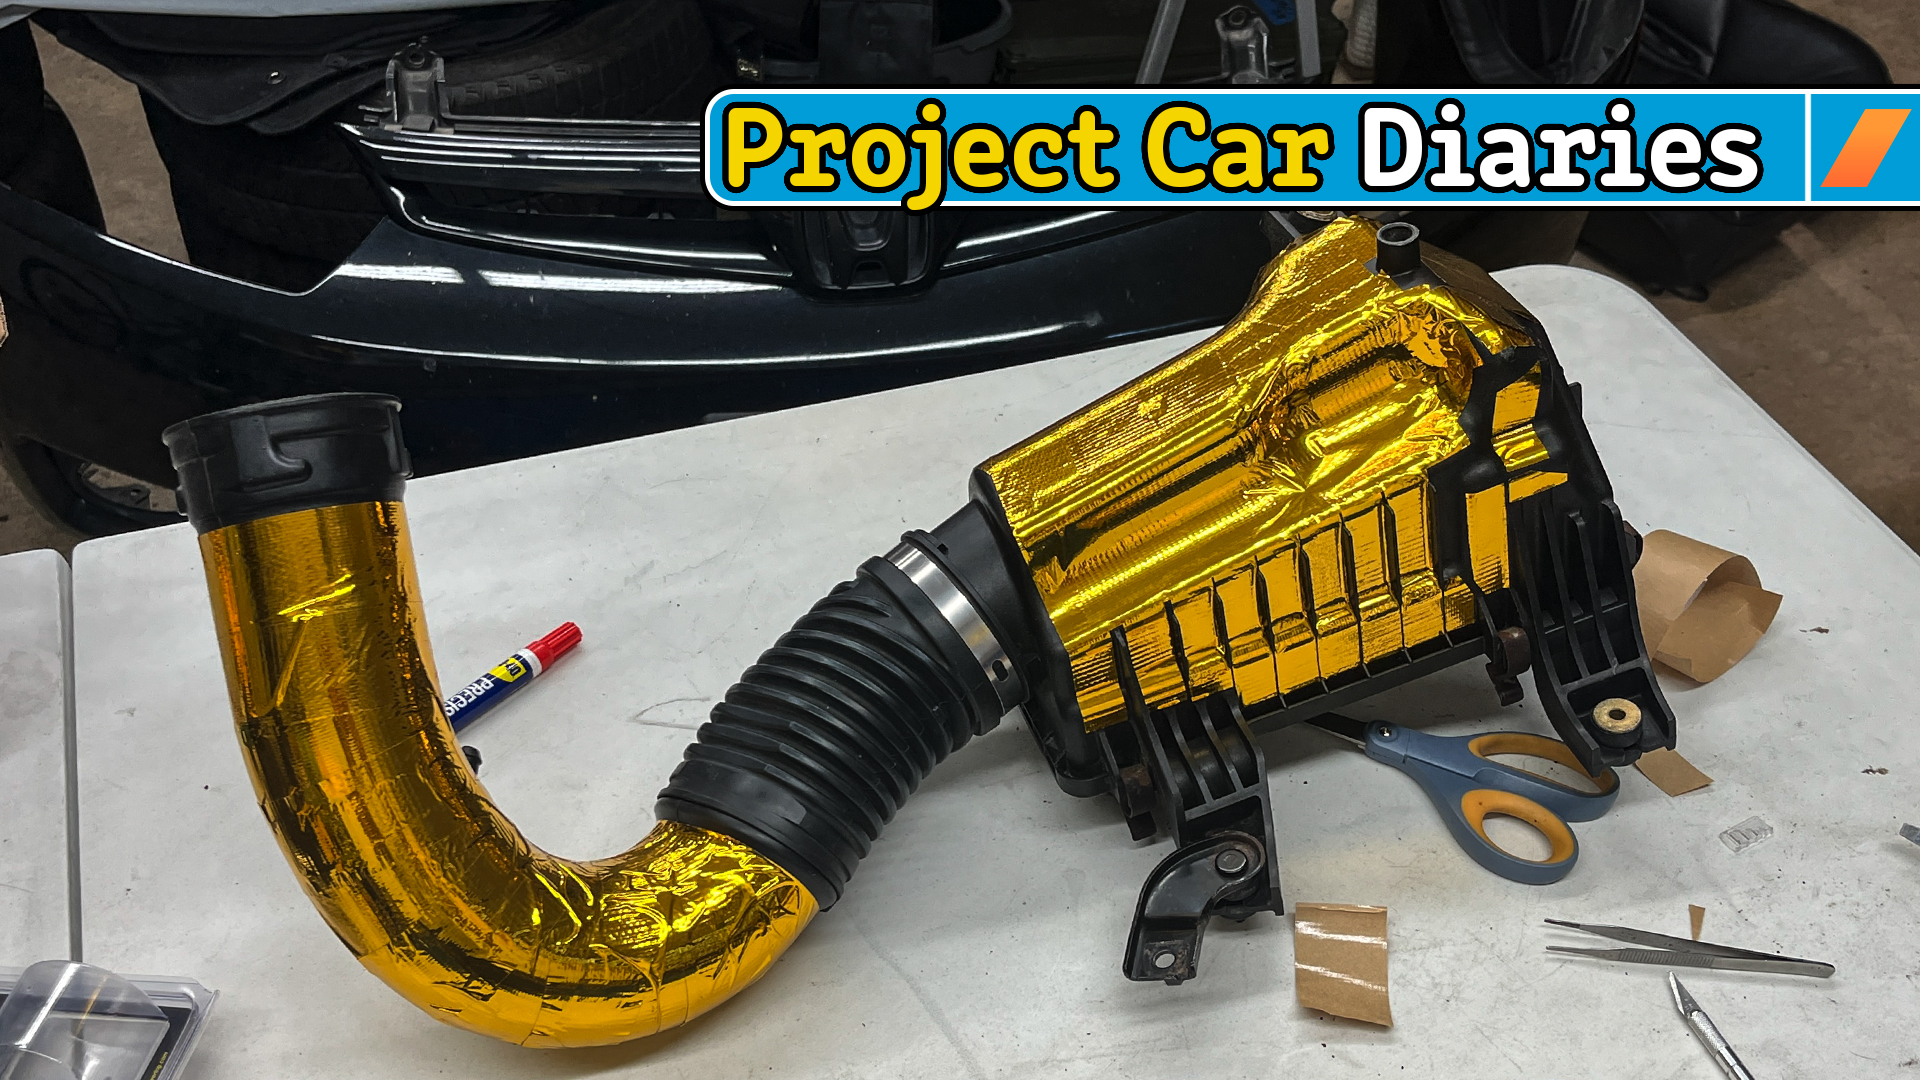
Making a Stock Intake Look Cool
One of the biggest bummers about ditching my Injen intake for a stock airbox is that it’d make the engine bay look a lot less cool. I’m a big engine dress-up guy; I don’t care that only me and the occasional service tech see it. I love cleaning and decorating the under-hood area of my cars.
First I figured I’d clean the heck out of the used intake pieces I’d gathered from various eBay sellers. Once again, I pulled the WD-40 Precision Pen out of my pocket for just the right amount of light lubrication that cranky old hose clamps needed to come open without stripping. I really started loving this little thing.

The Precision Pen’s compact size is mainly beneficial when you’re on the move; toss one of these pens in your glove compartment or fanny pack and you’ve got quick access to the power of the Original WD-40 Formula any time. I’m going to end up tossing one in all my car gloveboxes, but it’s even pocket-sized for junkyard runs or driving around. I have a little BMX bike that I like to bring to race events to zoom around spectator areas, and you better believe I’ll be keeping a Precision Pen in that thing’s little cargo bag from now on.
But it’s also nice to just toss in a front shirt pocket while you’re rolling around the garage on a wheely chair like I was—scooting from the partially dismantled car to the workspace I’d set up in the other garage bay.
The clamps that hold the airbox together loosened up nicely with a few dabs of the WD-40 pen, and it was also a good way to lubricate the rubber and metal collars that hold the piping into place.


I mentioned that the MAF sensor is sensitive—to protect it during this deep clean, I just popped it out of its housing and put it in a Tupperware box to protect it from the dust, paint spray, and dog hair that’s always wafting around my garage.
After deep-cleaning the stock intake pieces with WD-40 Brand products, cotton swaps, and degreaser wipes, it looked a lot sharper than it’d come from the junkmongers. To elevate the look beyond factory-fresh, I copied a page from colleague Chris Rosales’ school of tuning and wrapped the hard pieces in heat-reflective gold tape.


At an eyewatering price of about $100 for 30 feet (1.5 inches wide) of the stuff, I have to admit I was crazy to do this. While it has been proven that this tape can reduce intake air temperature, I’m fully aware I won’t feel any appreciable performance gains—it’s really a bling mod.
I took a lot of care in cutting and shaping the gold so it’d cover the black plastic smoothly, which was immensely fun. If you don’t enjoy arts and crafts you’ll probably find this tedious. But if you like taking your time with a decorative project and want to do this, my main piece of advice would be to remember that gold tape shouldn’t be “wrapped” like a bandage; keep the pieces as flat as possible with minimal overlap to achieve the smoothest look.
Instead of completely covering everything, I was very tactical about laying the gold down, making sure to trace the stock air box’s existing lines and run strips of tape in an aesthetically pleasing pattern. This is basically the car-nerd equivalent of mowing a crosshatch pattern into your lawn.
Reinstalling the Stock Intake
Installing the stock intake seems trivial, and it probably would be if you’d removed one. But having just gone from the aftermarket system, I felt like I was finding new mounting pieces every time I poked around the engine bay.

Ultimately, I just opened up Honda’s parts catalog and used the diagrams to see exactly how the stock intake plumbing was supposed to be oriented. That also enlightened me on one final important observation: I was still missing some tiny sealant elements that live between plastic piping parts. Namely, two little O-rings that go on each side of the resonator.
Now, could you run the car without them? Probably. But I’m sure Honda wouldn’t have wasted its money making them if they weren’t helpful, so in the interest of optimizing the stock system, I went ahead and ordered them. While I was filling my shopping cart I inspected some other ancillary parts, and what do you know, more old rubber bits were showing signs of fatigue.


If you’re really interested in getting the most out of your car and don’t want to futz with factory reliability, I strongly recommend closely examining rubber bits and seals. You’re probably not going to get stranded on the side of the road by a small air or vacuum leak, but keeping all this stuff optimal is a great way to keep an aging engine around as long as possible.
As for physically finagling the stock intake piping into the engine bay, it was a lot more annoying than I’d hoped. Especially since I wanted to be careful not to scratch my expensive gold wrapping.


I found one more perfect application for the WD-40 Precision Pen as I put the intake system back together. Some of the pipes are held in place by bolts that run through metal colors that are surrounded by rubber—a small dab of the Original WD-40 Formula from the pen’s tip made them slide together very easily without any spillage onto my precious pretty gold wrapping.
Next: Testing Filters
I had my car running nicely with a custom ECU tune, programmed via Hondata, to let it run optimally with the Injen CAI and A’pexi World Sport 2 cat-back exhaust system. I’ll have to adjust the engine tuning again for the stock airbox, but I’m curious to know if there’s any more optimization to be found by running a high-end air filter in the stock location. But that’ll be a test for another day.


